
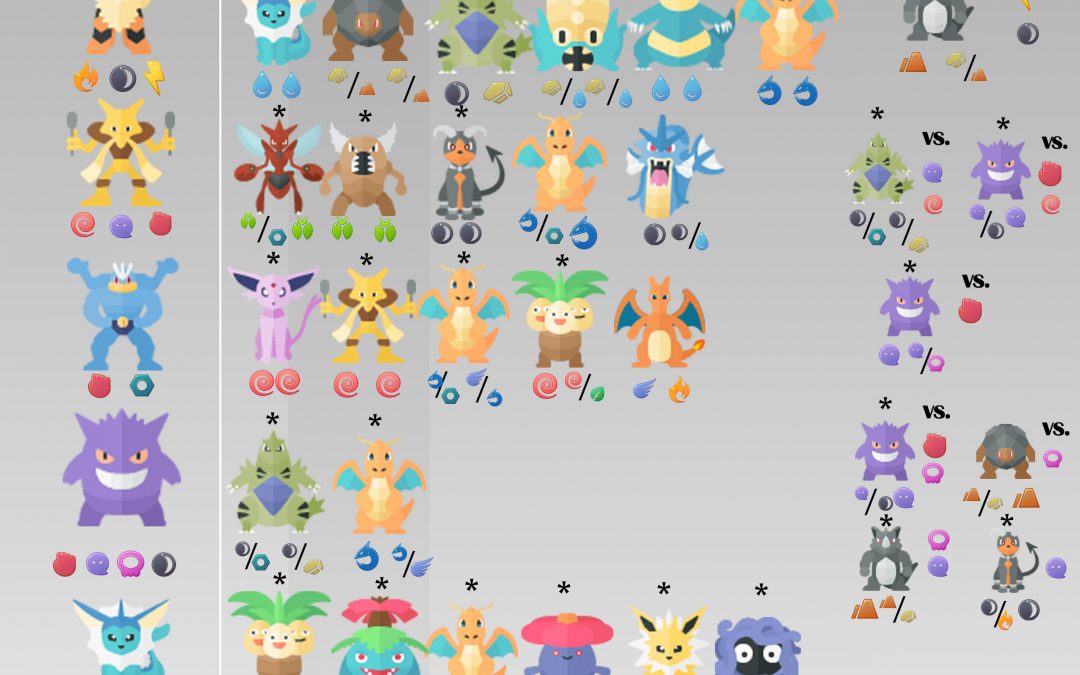

Tier 3 and Tier 4 Raid Counter Infographics
I did my best to make my wife go blind these last few days making her mess with teeny tiny Pokemon Go icons in Photoshop. But if you know anything about Pokebattler, you know we can’t rest until we’ve got THE most accurate and effective Pokemon analyses! So while there are plenty of nice looking infographics floating around out there in the interwebs, and some may even be more attractive or better organized, NONE are more accurate or effective than these! How do I know? Because as far as I can tell, everyone making these infographics is using my site. And I JUST updated my site (twice) for more accuracy, which is what these infographics are based on. Plus those other graphics aren’t even trying to show counters based on the move the raid boss is using, which is a big deal! If you go in to a Alakazam fight with Tyranitar and he has Focus Blast, you are in for a world of pain (unless you dodge).
Download Tier 3 counter
Download Tier 4 counter
Download Combined Tier 3 and Tier 4 counter
Reading the Infographics
Borrowing some organization styles from other infographics, and using the updated data from the interactive raid guide, these guides will help you get started on a raid when you don’t know what types of moves your boss has yet. The icons below each mon are the strongest types of quick and special moves.”All’ means all their move sets are good. Some Pokemons have two icons separated with a slash. For these, the top left one is stronger than the bottom right, but they are both good choices. On the right side, there are specific counters for after you’ve lost the first round and know what types of moves the boss is using. The icons to the right of the counter are types of moves that you should use this counter against. Typically these counters are strong but have a very big weakness such as Tyranitar vs. raid bosses with fighting moves. But if a boss is REALLY throwing you for a loop, or if your level if throwing off your counters, it’s time to get custom results using pokebattler.com. Fortunately for you, it’s as mobile-user friendly as I can make it.
Using custom counters from the Interactive Raid Guide
Many players may just use the infographics to choose their guys and call it a day. But if you’re a Pokebattler.com user, you don’t just stop there. You see the infographic as something to help you get started and do a few rounds with your raid boss to see how you do. But if you haven’t got a strong team for a raid 4, or are trying to solo a tier 3, you’re probably going to lose that first round. So like I mentioned before, pay attention to the types of moves your raid boss is using. Sometimes it’s obvious – Arcanine only has one special electric move – wild charge. And in that case, he’s going to murder your normally very effective Vaporeons way too quickly. The other thing the interactive raid guide gives you is the ability to choose your level and attack strategy. If you want to solo a boss, sometimes you have to dodge!
Data used for this chart
Pokebattler is by far the most analytical Pokemon Go site out there. There are a huge number of simulation options and it is constantly being updated. The most recent update added full support for raids, running 6 attackers in a row against the boss. This helps handle some situations that were skewing the results of previous simulations. For example, if you managed to get 2 big solar beams off and then die to a quick attack, there was no penalty for the 2nd attacker having to face an immediate special to the face. I know what some of you are thinking, ‘I have no idea what he’s talking about’ and that’s okay! Just leave the simulations to me and trust that the results have the best research currently available behind them. For the few of you who do want to get into the details, I encourage you to join me in the Pokebattler subreddit for detailed Pokemon Go research.
How I Get My Results
So when new research is complete, new highly accurate monte carlo simulations need to be run. These take up a ton of space even in highly optimized binary format! The latest update is still generating for all combinations of rankings but the results for this infographic were from monte carlo runs. This means 200 simulations were run for each possible combination of movesets that every attacker and boss might have. The results from all possible movesets were collected in the below table along with the chart. As before, the overall numbers below can be used to see which bosses are easiest, with the most counters. These numbers should not be used for soloing, for that, use the raid guide and sort by time to win!
Tier 3, level 30 attacker, no dodging, Monte Carlo
| Raid Boss | Quick | Special | Overall | |||||||
|---|---|---|---|---|---|---|---|---|---|---|
| Arcanine | Unknown | Unknown | 224.5% | |||||||
| Arcanine | Snarl | Wild Charge | 212.7% | |||||||
| Arcanine | Fire Fang | Wild Charge | 214.5% | |||||||
| Arcanine | Snarl | Crunch | 221.6% | |||||||
| Arcanine | Fire Fang | Crunch | 221.8% | |||||||
| Arcanine | Snarl | Fire Blast | 232.1% | |||||||
| Arcanine | Fire Fang | Fire Blast | 232.7% | |||||||
| Alakazam | Unknown | Unknown | 181.2% | |||||||
| Alakazam | Confusion | Shadow Ball | 167.2% | |||||||
| Alakazam | Confusion | Focus Blast | 167.4% | |||||||
| Alakazam | Psycho Cut | Shadow Ball | 171.1% | |||||||
| Alakazam | Confusion | Future Sight | 183.0% | |||||||
| Alakazam | Psycho Cut | Focus Blast | 192.0% | |||||||
| Alakazam | Psycho Cut | Future Sight | 206.6% | |||||||
| Machamp | Unknown | Unknown | 222.9% | |||||||
| Machamp | Counter | Heavy Slam | 212.7% | |||||||
| Machamp | Bullet Punch | Dynamic Punch | 213.9% | |||||||
| Machamp | Counter | Dynamic Punch | 214.9% | |||||||
| Machamp | Bullet Punch | Heavy Slam | 216.8% | |||||||
| Machamp | Bullet Punch | Close Combat | 238.8% | |||||||
| Machamp | Counter | Close Combat | 240.3% | |||||||
| Gengar | Unknown | Unknown | 219.1% | |||||||
| Gengar | Sucker Punch | Shadow Ball | 190.1% | |||||||
| Gengar | Hex | Shadow Ball | 192.6% | |||||||
| Gengar | Hex | Sludge Bomb | 226.9% | |||||||
| Gengar | Sucker Punch | Sludge Bomb | 228.3% | |||||||
| Gengar | Hex | Focus Blast | 232.9% | |||||||
| Gengar | Sucker Punch | Focus Blast | 243.6% | |||||||
| Vaporeon | Unknown | Unknown | 180.2% | |||||||
| Vaporeon | Water Gun | Water Pulse | 217.7% | |||||||
| Vaporeon | Water Gun | Aqua Tail | 217.7% | |||||||
| Vaporeon | Water Gun | Hydro Pump | 221.7% | |||||||
| Jolteon | Unknown | Unknown | 133.7% | |||||||
| Jolteon | Volt Switch | Thunderbolt | 155.7% | |||||||
| Jolteon | Thunder Shock | Discharge | 157.3% | |||||||
| Jolteon | Thunder Shock | Thunderbolt | 157.5% | |||||||
| Jolteon | Volt Switch | Discharge | 158.5% | |||||||
| Jolteon | Volt Switch | Thunder | 159.6% | |||||||
| Jolteon | Thunder Shock | Thunder | 167.5% | |||||||
| Flareon | Unknown | Unknown | 133.7% | |||||||
| Flareon | Fire Spin | Overheat | 178.6% | |||||||
| Flareon | Ember | Overheat | 178.7% | |||||||
| Flareon | Fire Spin | Fire Blast | 179.1% | |||||||
| Flareon | Ember | Fire Blast | 179.1% | |||||||
| Flareon | Fire Spin | Flamethrower | 180.7% | |||||||
| Flareon | Ember | Flamethrower | 181.2% |
Tier 4, level 30 attacker, no dodging, Monte Carlo
| Raid Boss | Quick | Special | Overall | |||||||
|---|---|---|---|---|---|---|---|---|---|---|
| Venusaur | Unknown | Unknown | 219.0% | |||||||
| Venusaur | Vine Whip | Sludge Bomb | 196.9% | |||||||
| Venusaur | Razor Leaf | Sludge Bomb | 197.8% | |||||||
| Venusaur | Razor Leaf | Solar Beam | 218.1% | |||||||
| Venusaur | Vine Whip | Solar Beam | 222.2% | |||||||
| Venusaur | Razor Leaf | Petal Blizzard | 226.8% | |||||||
| Venusaur | Vine Whip | Petal Blizzard | 230.2% | |||||||
| Charizard | Unknown | Unknown | 265.8% | |||||||
| Charizard | Air Slash | Overheat | 262.9% | |||||||
| Charizard | Air Slash | Dragon Claw | 264.3% | |||||||
| Charizard | Fire Spin | Dragon Claw | 264.5% | |||||||
| Charizard | Fire Spin | Overheat | 265.1% | |||||||
| Charizard | Air Slash | Fire Blast | 268.1% | |||||||
| Charizard | Fire Spin | Fire Blast | 269.9% | |||||||
| Blastoise | Unknown | Unknown | 196.8% | |||||||
| Blastoise | Water Gun | Ice Beam | 177.6% | |||||||
| Blastoise | Bite | Ice Beam | 178.0% | |||||||
| Blastoise | Water Gun | Hydro Pump | 204.7% | |||||||
| Blastoise | Bite | Hydro Pump | 204.7% | |||||||
| Blastoise | Bite | Flash Cannnon | 207.0% | |||||||
| Blastoise | Water Gun | Flash Cannnon | 208.8% | |||||||
| Rhydon | Unknown | Unknown | 260.3% | |||||||
| Rhydon | Mud Slap | Stone Edge | 252.9% | |||||||
| Rhydon | Mud Slap | Earthquake | 255.9% | |||||||
| Rhydon | Mud Slap | Megahorn | 257.7% | |||||||
| Rhydon | Rock Smash | Earthquake | 262.3% | |||||||
| Rhydon | Rock Smash | Stone Edge | 265.5% | |||||||
| Rhydon | Rock Smash | Megahorn | 267.2% | |||||||
| Lapras | Unknown | Unknown | 233.6% | |||||||
| Lapras | Frost Breath | Ice Beam | 222.4% | |||||||
| Lapras | Water Gun | Ice Beam | 225.2% | |||||||
| Lapras | Frost Breath | Blizzard | 228.9% | |||||||
| Lapras | Frost Breath | Hydro Pump | 237.3% | |||||||
| Lapras | Water Gun | Blizzard | 243.1% | |||||||
| Lapras | Water Gun | Hydro Pump | 244.9% | |||||||
| Snorlax | Unknown | Unknown | 211.6% | |||||||
| Snorlax | Zen Headbutt | Hyper Beam | 193.8% | |||||||
| Snorlax | Zen Headbutt | Heavy Slam | 207.5% | |||||||
| Snorlax | Lick | Heavy Slam | 214.0% | |||||||
| Snorlax | Lick | Hyper Beam | 215.5% | |||||||
| Snorlax | Zen Headbutt | Earthquake | 215.8% | |||||||
| Snorlax | Lick | Earthquake | 222.8% | |||||||
| Tyranitar | Unknown | Unknown | 241.7% | |||||||
| Tyranitar | Iron Tail | Crunch | 235.2% | |||||||
| Tyranitar | Iron Tail | Fire Blast | 237.8% | |||||||
| Tyranitar | Iron Tail | Stone Edge | 238.3% | |||||||
| Tyranitar | Bite | Crunch | 240.5% | |||||||
| Tyranitar | Bite | Fire Blast | 241.0% | |||||||
| Tyranitar | Bite | Stone Edge | 257.1% |
Conclusion
Infographics are a lot of work, especially when you have high quality standards like Pokebattler does. We hope you find these infographics useful in your raids. As always, the official raid guide is always kept up to date with the latest and greatest information.
My next updates will include allowing you to enter your own personal Pokémon and getting counter results based on your own custom line up, so keep checking back later.
Special thanks to Reddit and Twitter fans
I posted this yesterday and was informed of some errors so I deleted the post. In addition, there were multiple bug reports on twitter so I decided to ship out yet another release and tweak the formulas to make them more consistant and fit the meta. This has the new updated power formulas and the new weighting for Overall that is now 2/3s time to win and 1/3 power. The effect of this is to dramatically shift the rankings towards the higher dps options.
Celandro, love all the articles and research you publish. Thanks for this. If you happen to be short on topics to write about, I’ve been looking to do some data mining for my own purposes, but then get frustrated when different sites have different opinions on best and second best raid Mon. Also, filtering through some of the best move sets, and reasoning has been tiresome. For example, Gamepress says Poliwrath’s best moves are Bubble/Dynamic Punch. But for raiding, Rock Smash/Dynamic Punch is obviously better, due to typing and the fact that water attacks are better left to other Mon.
Anyway, if you had to start your account fresh, and if your objective was to build a raiding A-Team, with A-Team move sets, what would be your priority list?