
There has been a major update of this guide. Please see the new version here:
Tier 3 and 4 Raid Guide – Newer, Better, More Effective
Original article:
After much researching, updating, and tweaking, we have an updated raid infographic and an updated raid guide and raid simulator (coming soon!) to go along with it! There has been significant research into the exact stats of the bosses and we are confident we are very close to the real world now. So its time to update the original raid guide!
How to Use the Infographic
It wasn’t easy trying to make an infographic with all the necessary info that was also easy to read and nice to look at. So in case you’re confused, here’s how it work:
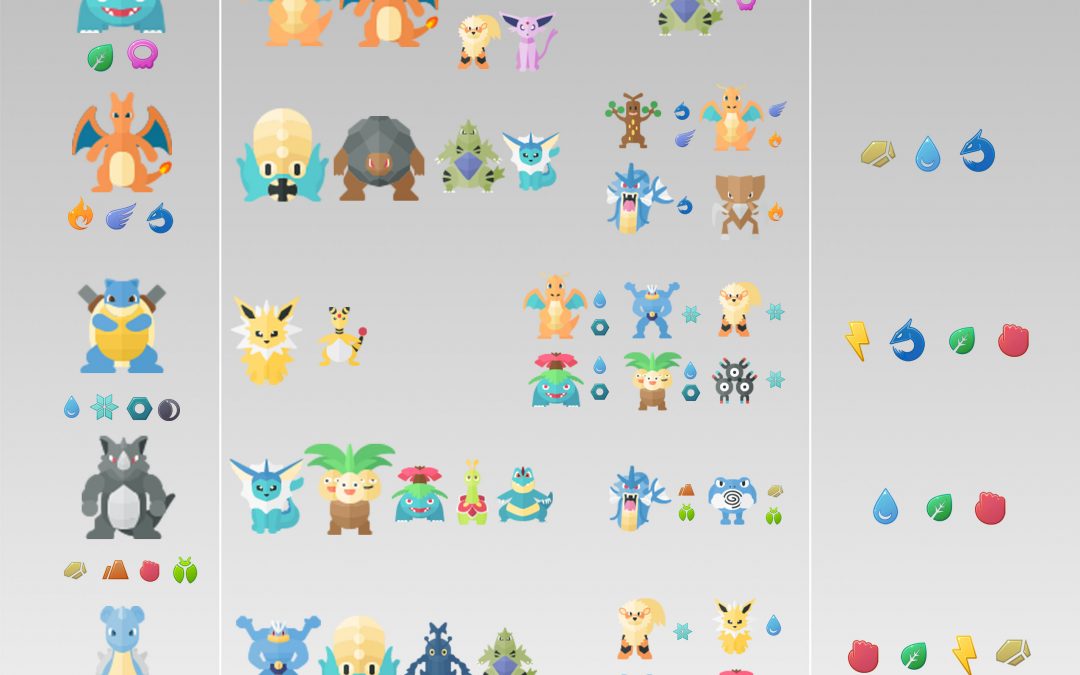
Starting from the left, we have the raid bosses and the icons underneath for the types of moves they have. Next are their best general counters, the pokemon that are best against that particular raid boss no matter what moves the boss may have. They are in order of most effective. The bigger they are, the stronger they are against your boss. Then we have counters against specific boss attacks. Terrible title I know, but it’s the best we could figure out. These counters are only good against your boss if the boss has the specific move type shown. For example, you want to use Tyranitar against a poison Venusaur but not a grass one. Finally, we have the types of moves that are good against your raid boss. These are the move types you want your own pokemon to have. For example against that same Venusaur, you want fire, flying, psychic and dragon attacks, so Arcanine should have fire attacks for this boss (but electric for others).
If You Want to Win, You Have to Lose
The best way to figure out your best counters is to figure out what kind of moves your boss has first. The only surefire way to do this is to start battling him. If you win, cool, but if you lose, remember what his moves are and use this info to figure out the best guys you can for round 2. This infographic is a great guide, but to really narrow in on your best lineup, check out our customizable raid guide. Remember you can do your first fight while you are waiting for your team to show up too! Use this guide to help your team pick their best attackers
The second way to guess at the best counters is to look at which pokemon are suggested for you. The game does a poor job at auto picking pokemon for you (way too many Blisseys) but you can sometimes tell what the boss moveset is by looking at the suggestions. If it is suggesting fire pokemon vs. Blastoise then you can assume Blastoise does not have water attacks. This is not a perfect method but it is often a good guess.
What was updated
The simulator has been dramatically updated in terms of quality. The information from this post was generated from millions more simulations than the first. 200 simulations were performed with each possible moveset of each attacker against each possible moveset of each boss. In addition, the simulations now run up to 6 fighters in a row against the same raid boss to better simulate how real combat works. These simulations take a ton of time to generate but the improved quality is worth it!
What my machine does all night

The new infographic was made without dodging. With the current implementation of raids, not only is dodging very difficult to do correctly, it eats far more time than it did before. Timeout is the only way to lose vs. a raid boss so its critical to do as much dps as possible. This is the new default setting on the raid guide. If you are trying to solo a raid however, you will likely want to check out the raid guide with dodgeability that will be released tomorrow.
One of the main problems with the original infographic is it tried to show pokemon that were good in general against a raid boss. The new infographic does this as well. The issue is that some bosses like Lapras and Blastoise have what is called ‘Type Coverage’. This means they have some movesets that will completely destroy common attackers. Jolteon for example does great damage against these 2 but if they have Ice attacks, then he gets destroyed. On the other hand, if you use an Arcanine, it is great against those same ice attacks if you have a wild charge special move but gets destroyed by water attacks. The new infographic shows you this.
The final missing piece is the movesets to use. Putting a ton of text on the chart is not what we were looking for so we put the types of the moves that show up at the top of this list. These moves are NOT neccessarily super effective although most are. They are to be used to pick your moves. For example if you see Arcanine against Blastoise and look at the moves, you see you want electric moves so you need to use Wild Charge.
Information used to generate this infographic
We used a private server to generate this data. The public release should be coming out sometime today or tomorrow. The overall number is a good indicator of how difficult a raid boss is. The higher the number, the easier the boss. You will notice that bosses with type coverage are by far the most difficult. Ice Beam Blastoise, Sludge Bomb Venusaur and Zen Headbutt Snorlax are going to be your hardest fights.
| Raid Boss | Quick | Special | Overall | Attack Types | |||||||
|---|---|---|---|---|---|---|---|---|---|---|---|
| Venusaur | Unknown | Unknown | 137.24% | Fire, Flying, Dragon, Psychic | |||||||
| Venusaur | Vine Whip | Sludge Bomb | 113.30% | Fire, Dragon, Flying, Psychic | |||||||
| Venusaur | Razor Leaf | Sludge Bomb | 114.60% | Flying, Fire, Dragon, Psychic | |||||||
| Venusaur | Razor Leaf | Solar Beam | 133.80% | Fire, Dragon, Flying, Psychic | |||||||
| Venusaur | Vine Whip | Solar Beam | 139.70% | Fire, Flying, Psychic, Dragon | |||||||
| Venusaur | Razor Leaf | Petal Blizzard | 147.70% | Dragon, Flying, Fire, Psychic | |||||||
| Venusaur | Vine Whip | Petal Blizzard | 150% | Fire, Flying, Dragon, Psychic | |||||||
| Charizard | Unknown | Unknown | 166.47% | Rock, Water, Dragon | |||||||
| Charizard | Air Slash | Dragon Claw | 163.50% | Rock, water | |||||||
| Charizard | Fire Spin | Dragon Claw | 163.80% | Rock, Water | |||||||
| Charizard | Air Slash | Overheat | 164.80% | Rock, Water, Dragon | |||||||
| Charizard | Fire Spin | Overheat | 167.60% | Rock, Water, Dragon | |||||||
| Charizard | Air Slash | Fire Blast | 168.50% | Rock, Water, Dragon | |||||||
| Charizard | Fire Spin | Fire Blast | 170.60% | Rock, Water | |||||||
| Blastoise | Unknown | Unknown | 126.55% | Electric, Grass, Dragon, Fighting | |||||||
| Blastoise | Water Gun | Ice Beam | 107.90% | Electric, Fighting, Grass | |||||||
| Blastoise | Bite | Ice Beam | 110% | Electric, Fighting, Grass | |||||||
| Blastoise | Bite | Hydro Pump | 129.70% | Electric, Dragon, Grass | |||||||
| Blastoise | Water Gun | Hydro Pump | 133.70% | Dragon, Electric, Grass | |||||||
| Blastoise | Bite | Flash Cannnon | 138.80% | Electric, Grass, Dragon, Normal | |||||||
| Blastoise | Water Gun | Flash Cannnon | 139.70% | Electric, Grass, Dragon, Normal, Flying | |||||||
| Rhydon | Unknown | Unknown | 162.27% | Water, Grass | |||||||
| Rhydon | Mud Slap | Stone Edge | 153.60% | Water, Grass | |||||||
| Rhydon | Mud Slap | Earthquake | 160.50% | Grass, Water | |||||||
| Rhydon | Mud Slap | Megahorn | 162.80% | Water, Grass | |||||||
| Rhydon | Rock Smash | Stone Edge | 164.30% | Water, Grass, Fighting | |||||||
| Rhydon | Rock Smash | Earthquake | 165.00% | Grass, Water | |||||||
| Rhydon | Rock Smash | Megahorn | 167.40% | Water, Grass, Fighting | |||||||
| Lapras | Unknown | Unknown | 144.93% | Fighting, Grass, Electric, Rock | |||||||
| Lapras | Frost Breath | Ice Beam | 134.50% | Fighting, Rock, Electric | |||||||
| Lapras | Water Gun | Ice Beam | 137.40% | Fighting, Rock, Electric | |||||||
| Lapras | Frost Breath | Blizzard | 141.50% | Fighting, Rock, Electric, Fire | |||||||
| Lapras | Frost Breath | Hydro Pump | 146.90% | Fighting, Grass, Rock | |||||||
| Lapras | Water Gun | Blizzard | 151.50% | Fighting, Electric, Grass | |||||||
| Lapras | Water Gun | Hydro Pump | 157.80% | Fighting, Dragon, Grass, Electric | |||||||
| Snorlax | Unknown | Unknown | 134.82% | Fighting, Dragon, Rock, Dark | |||||||
| Snorlax | Zen Headbutt | HyperBeam | 118.00% | Rock, Dragon, Fighting | |||||||
| Snorlax | Zen Headbutt | Heavy Slam | 125.60% | Rock, Dragon, Fighting, Fire | |||||||
| Snorlax | Lick | Heavy Slam | 133.70% | Rock, Fighting, Dragon, Water, Fire | |||||||
| Snorlax | Zen Headbutt | Earthquake | 138.70% | Dragon, Fighting, Water, Grass | |||||||
| Snorlax | Lick | Hyper Beam | 141.10% | Fighting, Rock, Dragon | |||||||
| Snorlax | Lick | Earthquake | 152% | Fighting, Dragon, Rock, Dark | |||||||
| Tyranitar | Unknown | Unknown | 144.15% | Fighting, Ground, Rock | |||||||
| Tyranitar | Iron Tail | Crunch | 136.30% | Fighting, Water, Rock | |||||||
| Tyranitar | Iron Tail | Fire Blast | 139.40% | Fighting, Water, Ground | |||||||
| Tyranitar | Iron Tail | Stone Edge | 140.30% | Fighting, Fairy, Water | |||||||
| Tyranitar | Bite | Crunch | 141.40% | Fighting, Rock, Fairy | |||||||
| Tyranitar | Bite | Fire Blast | 147% | Fighting, Rock, Ground, Steel, Fairy | |||||||
| Tyranitar | Bite | Stone Edge | 160.70% | Fighting, Earth |
Conclusion
Infographics are hard to make! This particular one has a very high information density, giving you all the data from the entire table in one picture. This can be both a good and a bad thing. Hopefully you find it useful as a quicksheet to remind you what to use on an actual raid. If you want to make decisions as to what to power up, I highly recommend using the actual fully featured, customizable raid guide. It is always up to date with the latest research and is easy to use even on mobile.
A Tier 3 raid boss infographic will be made soon. These take a lot of time to make so be patient!
Trackbacks/Pingbacks