

Breakpoints are an advanced topic in Pokemon Go. For an intro to breakpoints, please read the Damage Breakpoints article first.
The Mystery of Raikou
Raikou has very strange performance in the Pokebattler rankings for Ho-Oh. He starts in 3rd place at level 30, slowly moves up and then at 35.5 has a giant leap into first place where he basically flat lines. In my initial analysis of Raikou, I found a defense breakpoint that I believed caused the issue. Now with the help of the Pokebattler Raid Advice spreadsheet (available to all Patreon supporters), I have found another cause of Raikou’s unusual performance.
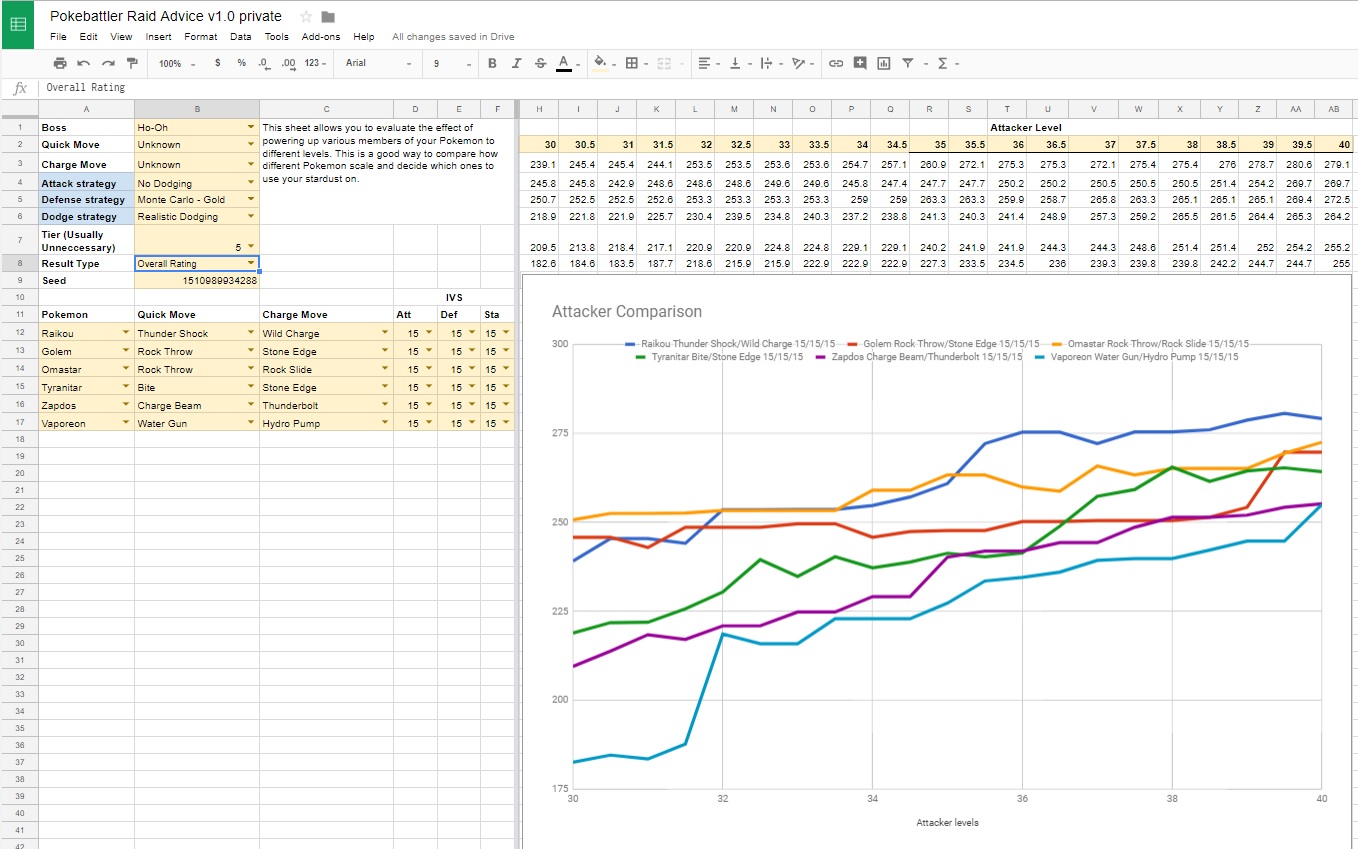
So here are the results. We see 3 big jumps that should be breakpoints. There is Vaporeon at 32, Golem at 39 and Raikou at 35.5. First thing is the easiest, let’s look for attack breakpoints. If a quick attack is doing 1 more damage that is definitely going to make a big difference.
Pokebattler Raid Advice Spreadsheet
A quick plug before I continue on with the Raikou analysis. This article was made from with the use of the Pokebattler Raid Advice Spreadhsheet. With the help of /u/djw39 I created an advanced Google sheet that makes hundreds to thousands of calls to the backend Pokebattler servers to generate results. Each call is typically a Monte Carlo simulation itself. This is a very expensive way to perform these types of analysis and is available for Patreon supporters only.The different sheets show different prototypes of functionality I am planning to add to the website in a more optimized form in the future.
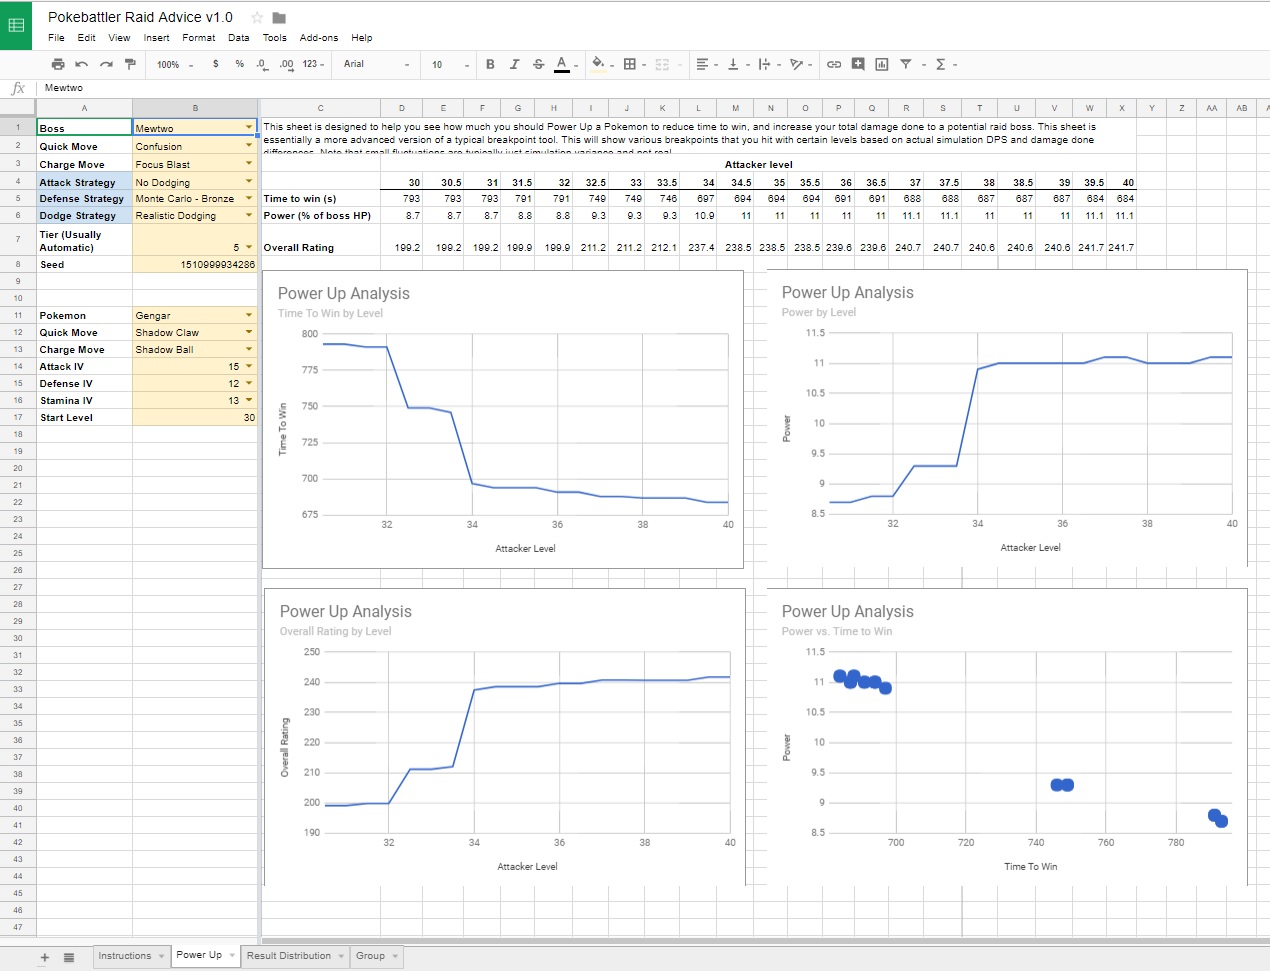
This sheet shows the advice page I am currently working on. This example shows the infamous Gengar vs. Mewtwo breakpoints with enormous jumps in power. It’s a very good way to look at a particular Pokemon you have and how far to power it up for a particular raid boss. Above you can see any power up past 34 is not a great return on investment in this particular scenario.
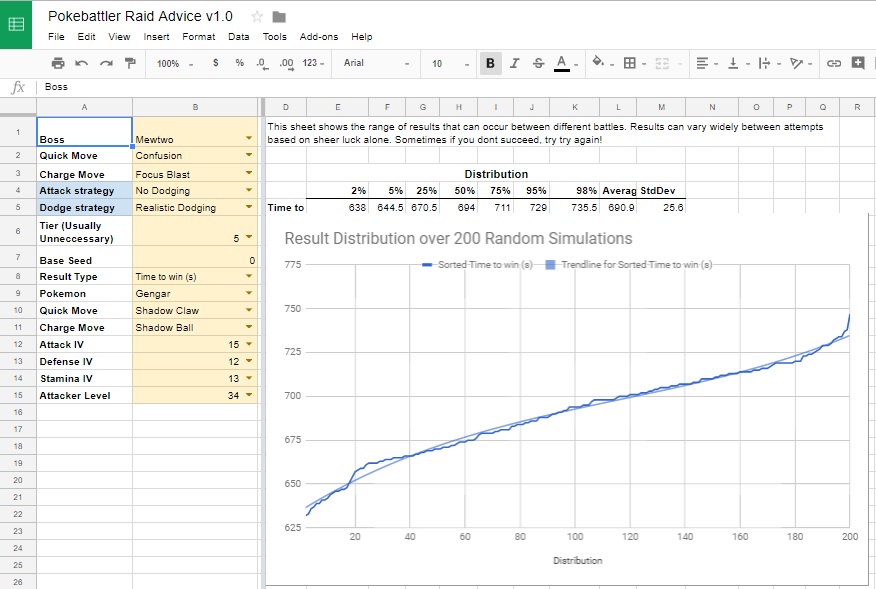
The above chart shows the damage distribution of various attempts. You can see that Gengar has a very wide range of possible results depending on how lucky he gets! This chart is great for investigating solo attempts. Like seeing just how lucky do you have to get to solo Ninetales. And yes, the contest is still going on!
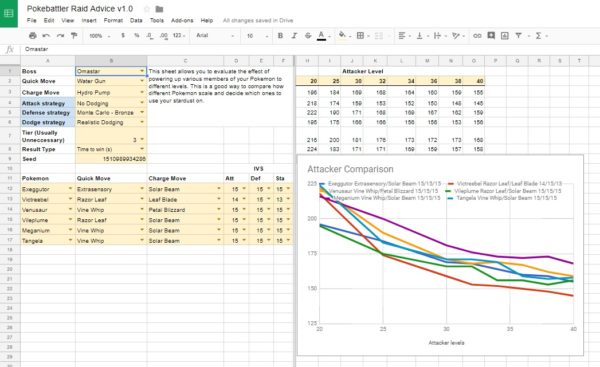
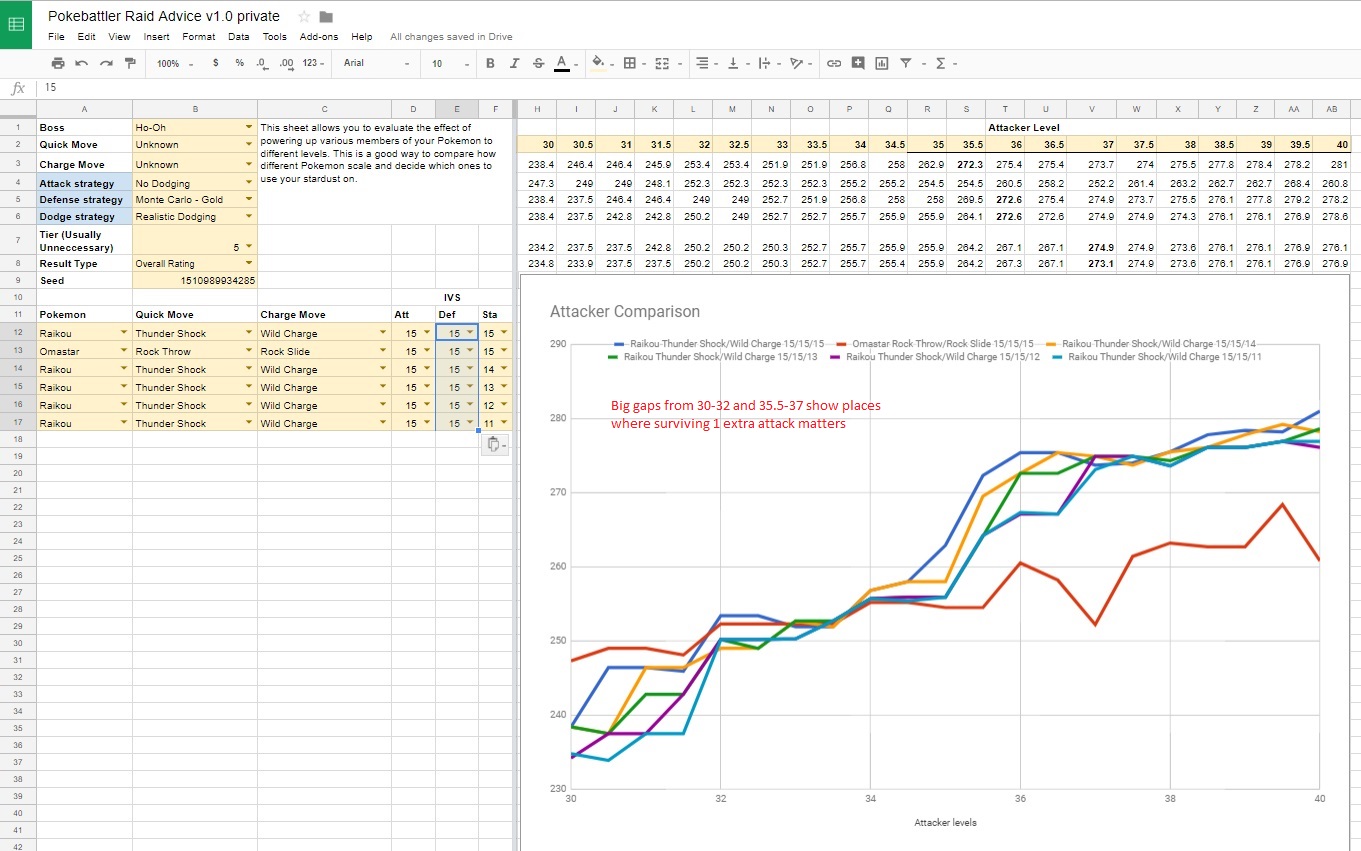
This is the chart I will be using today. It allows you to quickly compare 6 different combinations of Pokemon. This is a convenient number as it is the number of Pokemon you put in a group, the number of IVs between 10 and 15 AND the number of movesets that most Pokemon have. You can pick different things to graph.
There is a limit (thankfully) imposed by Google of 50,000 remote calls a day. Ask me how I know 😆. That’s over 10 Million simulations for this article and also why it took me 2 days to write!
Attack Breakpoint Analysis
Attack breakpoints are well known to most advanced players at this point. They are caused when a particular IV and level combination cause you to deal 1 additional damage from one move. These look like stairs when displayed in graph form. Let’s look at Raikou:
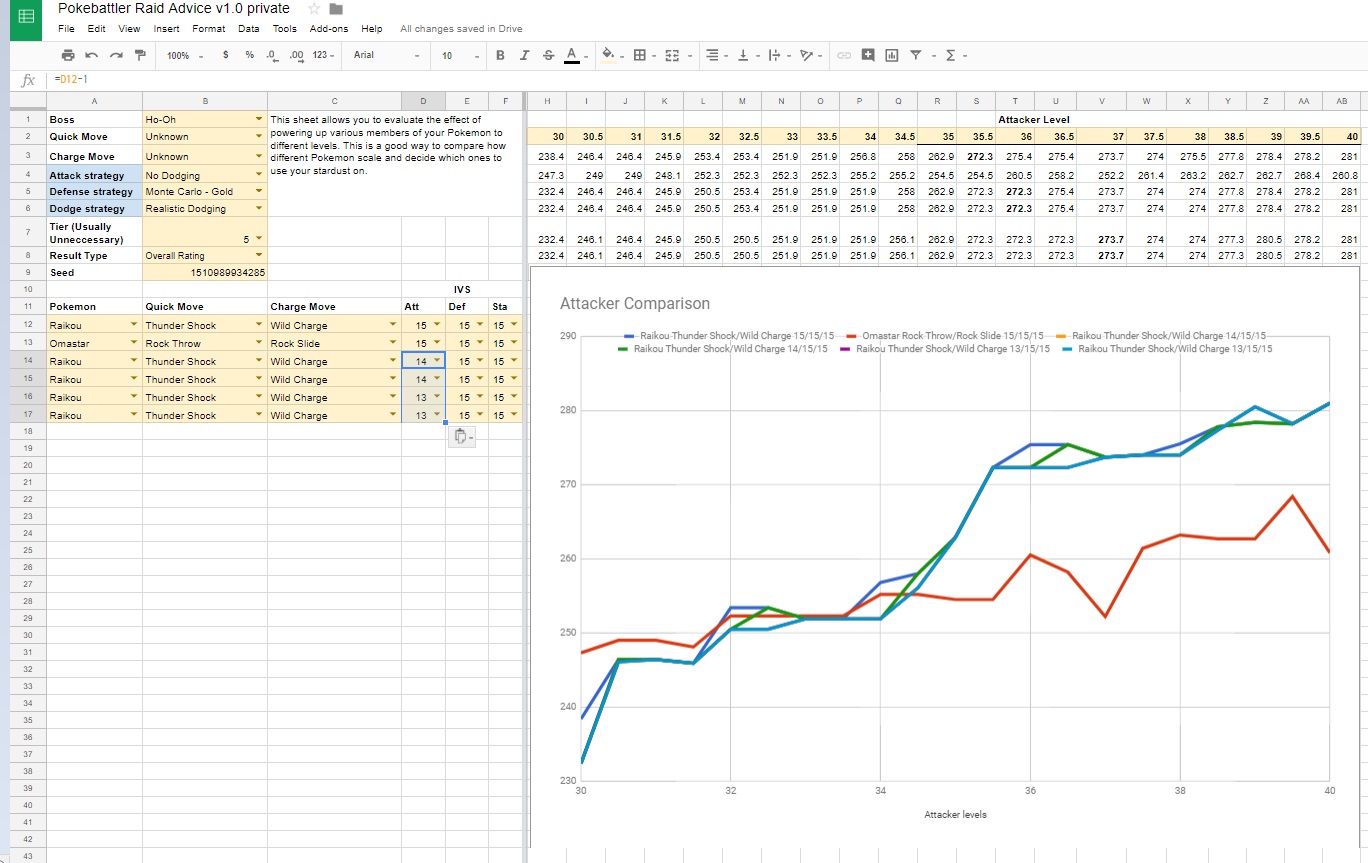
Raikou does not have any of these for Thunder Shock between level and 30 and 40 as seen in the chart below but he does have small spots where 1 additional damage comes from a charge move.

Now looking at Vaporeon by attack IV we see a huge jump of 33% in overall rating corresponding to an increase of 32% in absolute overall rating correlating with a whopping 17% increase in performance from a single level up 183 * 1.17= 215. This jump starts at level 32 with 15 attack IV and goes to 34.5 for 10 attack IV.
Defense Breakpoint
Defense breakpoints are particular IV and level combinations where you take 1 less damage from a quick move. For Raikou, at level 35.5 as seen above, he gets a large boost in damage. If you look closely you can see a stair pattern start at 35.5 going up to 38 for 11 defense.
Looking into this, it is caused by Extrasensory doing 1 less damage per attack, dropping from 8 damage to 7 damage.
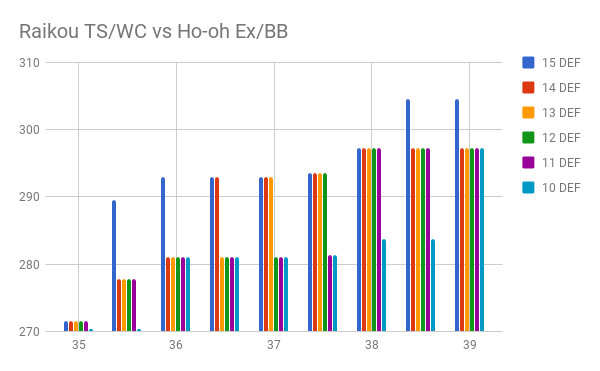
Isolating just the Extrasensory moveset, you can see the breakpoint here much more clearly, starting at 35.5 and going up to 39 for 10 defense. This is a fairly large 14% absolute gain in overall rating corresponding to around 5% better performance, which in equation form is 280 * 1.05 = 294.
Stamina Breakpoint
Looking into this further, I wondered why there was such a huge jump in the unknown movesets at 35.5 for 15 defense but a relatively small one at level 38 for 11 defense. What is going on here? It turns out that this defense breakpoint also coincided with multiple stamina breakpoints! Stamina breakpoints are particular IV and level combinations where gaining 1 additional health allows you to get significantly more attacks off. This is similar to a defensive breakpoint in that you do more damage. You can find stamina breakpoints by looking for places where the following formula is true:
quick move damage * X + charge move damage * Y + 1 = hp
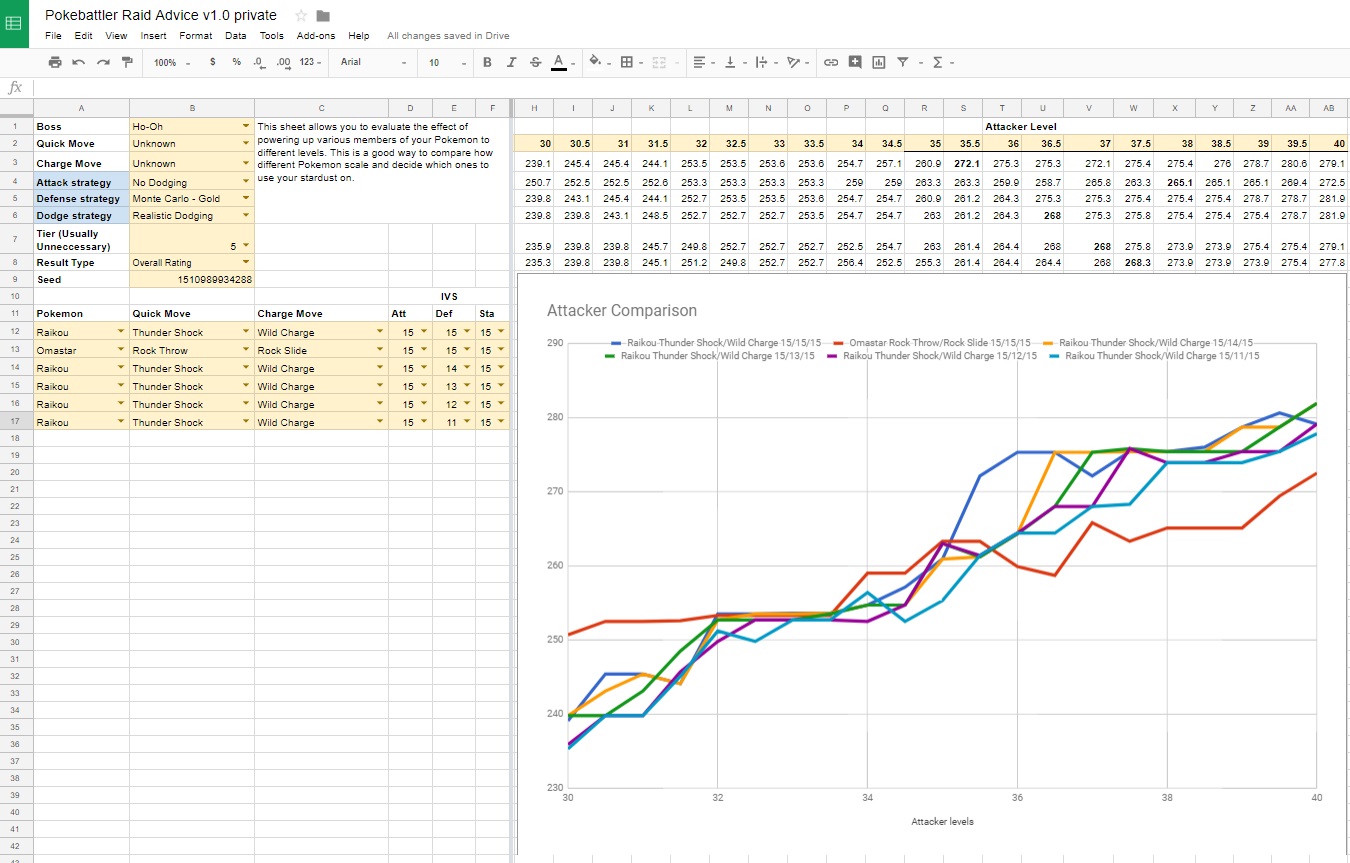
Getting this 1 extra HP in these situations is usually a good thing. Here is the graph showing the effect of stamina for unknown attacks. You can see that typically it is very small but every once in awhile it jumps up a bit and you get something of a stair pattern. We can see there is something going on in the level 35 to 37 range with 15 defense that is affecting these results.
Individual Move Analysis
This graph does not have the same stair pattern as the defense so let’s look at the individual results to see what is going on.
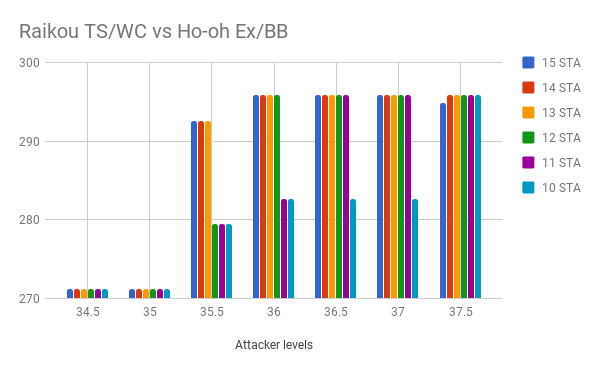
Extrasensory/Brave Bird starts a stair pattern at 35.5 and ends at 37.5, showing large overall ratings gains as high as 14%.
Breakpoint at 147 hp: 8 Extrasensory + 2 Brave Bird = 56 + 90 = 146 HP.

Extrasensory/Solar Beam starts a stair pattern at 34.5 and ends at 37.5, showing large overall rating gains as high as 13%.
Breakpoint at 148 hp: 6 Extrasensory + 1 Solar Beam = 42 + 105 = 147 HP
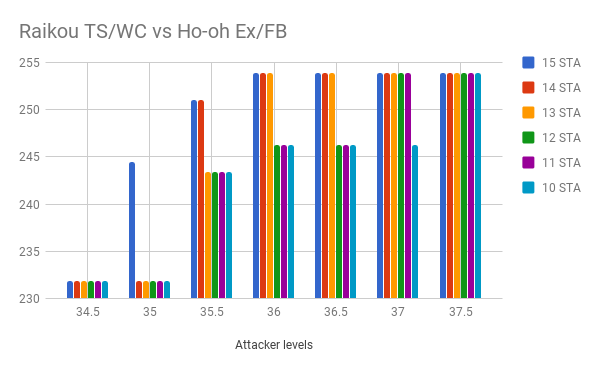
Extrasensory/Fire Blast starts a stair pattern at 35 and ends at 37.5, showing overall rating gains as high as 8%.
Breakpoint at 148 hp: 7 Extrasensory + 1 Solar Beam = 49 + 98 = 147 HP.
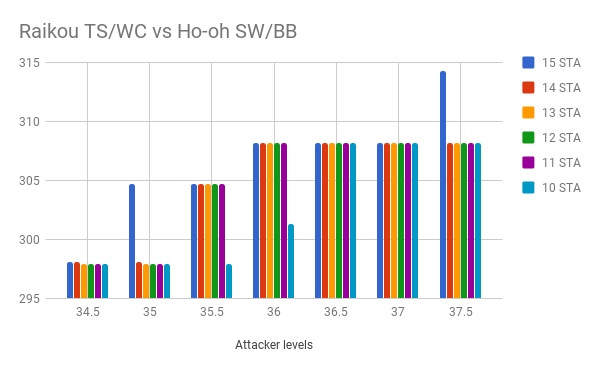
Steel Wing/Brave Bird starts a stair pattern at level 35 and finishes at 36.5, with overall rating gains as high as 8%.
Breakpoint at 146 hp: 11 Steel wing + 2 Brave Bird = 55 + 90 = 145 HP.
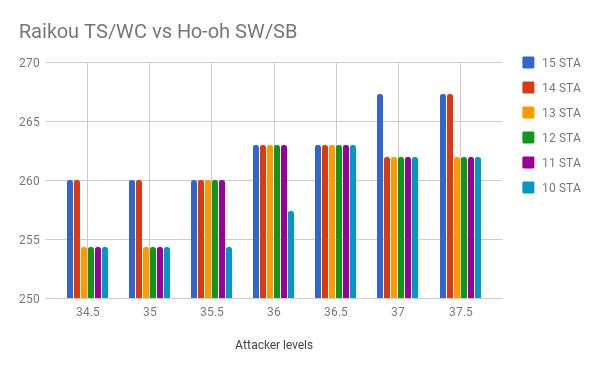
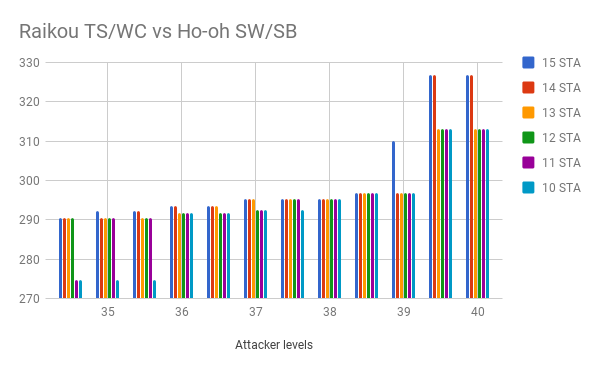
Steel Wing/Solar Beam starts a stair pattern at 34.5 and finishes at 36.5 with overall rating gains as high as 7%.
Breakpoint at 146 hp: 8 Steel Wing + 1 Solar Beam = 40 + 105 = 145 HP.
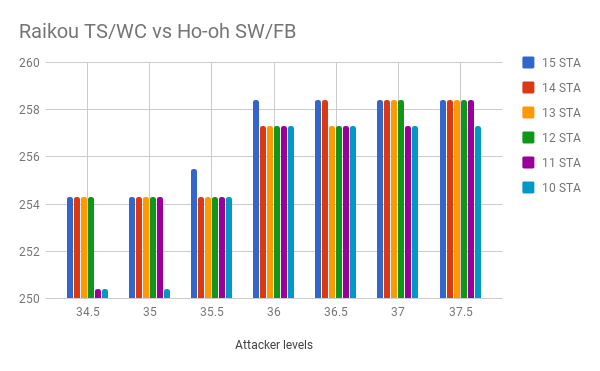
Steel Wing/Fire Blast starts a stair pattern at 35.5 and ends at 38 with tiny gains of 1%.
Breakpoint at 149 HP: 10 Steel Wing + 1 Fire Blast = 50 + 98 = 148 HP.
Stamina Breakpoints Gone Right
The various Extrasensory movesets all show large gains, with Extrasensory/Bravebird being the largest. So whats causing this? Let’s look at an example case:
Level 35.5 Raikou Thunder Shock and Wild Charge, 15 stamina vs. Ho-Oh with Extrasensory and Brave Bird
- Combat Time: 214.2s
- Time to Win: 926.7s
- Power: 23.3%
- Overall: 301.0%
- Deaths: 25
- First boss damage dealt: 433
- First boss final health: 0
- Total Wild Charges: 31
Level 35.5 Raikou Thunder Shock and Wild Charge, 10 stamina vs. Ho-Oh with Extrasensory and Brave Bird
- Combat Time: 185.9s
- Time to Win: 935.6s
- Power: 20.0%
- Overall: 277.7%
- Deaths: 29
- First boss damage dealt: 417
- First boss final health: -4
- Total Wild Charges: 29
8.9 seconds faster time to win with 3.3% more damage done to the boss before fainting and 4 fewer deaths. 3 Thunder Shocks on the first boss and 2 extra Wild Charges overall. A clear boost to every metric.
Stamina Breakpoints Gone Wrong?
Getting extra attacks off is usually a good thing but not always! Getting additional charge moves off is definitely higher DPS but if you are only getting more quick attacks off and dying with wasted energy it can be worse. These numbers do tend to go away in the average case and surviving longer tends to be slightly better but not always. That 1% gain of Steel Wing/Fire Blast hides the fact that sometimes it does worse.
Level 35.5 Raikou Thunder Shock and Wild Charge, 15 stamina vs. Ho-Oh with Steel Wing and Fire Blast
- Combat Time: 162.0s
- Time to Win: 970.8s
- Power: 16.9%
- Overall: 250.1%
- First boss damage dealt: 441
- First boss final health: -4
- Total Wild Charges: 24
Level 35.5 Raikou Thunder Shock and Wild Charge, 14 stamina vs. Ho-Oh with Steel Wing and Fire Blast
- Combat Time: 149.8s
- Time to Win: 924.2s
- Power: 16.4%
- Overall: 252.9%
- First boss damage dealt: 437
- First boss final health:0
- Total Wild Charges: 24
The same number of wild charges but 12.2s longer combat time. Ouch! That’s a lot of wasted energy. Sure we did a lot of extra Thunder Shocks in that time as represented by the Power number but the lower DPS causes a 46.6s longer Time to Win!
Golem’s breakpoint is also a stamina breakpoint with non-Solar Beam moves
I’m not going to do a full analysis as this article is already getting too long but there is a definite stamina breakpoint at very high levels for Golem vs. Ho-Oh.
Great article as always! One minor issue I think: your final graph commenting on Golem, is still titled “Raikou TS/WC […]” (apologies if I’ve misunderstood). Thanks!
Any idea what causes the jump for tyranitar at level 37? Got one sitting at 35 that I am wondering about pushing up those couple of levels, but can’t see that it’s an attack breakpoint in any case.