
Do you want to know how to maximize your damage ball bonus?
Want to know if you can theoretically do a solo raid or how to set up a low party raid clear?
By using the Pokebattler raid tool, along with some math, you can figure this out! Watch the video to find out how!
The video goes into in depth detail on how to maximize your bonus balls. It also shows step by step instructions on how to use Pokebattler to analyze your own Pokemon in detail and figure out wether you have what it takes to get 3 bonus balls, 2 bonus balls or whether you are stuck with just 1.
Too Long, Didn’t Watch Summary
Team Contribution
This is an easy one. For most Mewtwo raids, you should be splitting into an Instinct, a Valor and a Mystic team. Each team should split into groups that each have enough damage to beat the boss. For other raids, splitting into reasonable size groups with each group stacked to one team or the other could help players get 2 or 3 bonus balls and most get the team bonus.
Damage Ball Bonus
While it is currently unknown how much % health you have to deal to a raid boss to get 1 ball, it is known that if you deal at least 15% damage you’ll get 2 balls, and if you deal at least 20% damage you’ll get 3 balls.
How do you know if you can cross this threshold?
Take a look at Pokebattler’s Power output.
Power
- Gym Simulations: Power represents the % of HP a single Pokemon will deal to another before fainting. Often this will be well over 100% unless you’re fighting Blissey.
- Raid Simulations: Power represents the % of HP six identical Pokemon will deal to the raid boss before fainting. To get an individual Pokemon’s performance, you need to divide its Power by 6.
- If the individual Power of the Pokemon you’re using exceeds 20%, and you’re able to get that full value in before the raid boss faints, you will receive 3 bonus damage balls.
- Note: Pay attention to “Time to Win” as well!! If you don’t get that 20% of damage in before the raid boss faints then you won’t get the full bonus!
- This means either using low “Time to Win” (i.e. high DPS) Pokemon to reach 20% sooner.
- Or attempting a low party size clear to secure not only the damage bonus, but the team damage bonus as well!
Low Party Clear/Soloing
You need to confirm 3 things before attempting a low party clear on a raid boss
- Make sure the combined Power of all your Pokemon exceeds 100%.
- Not for your 6 Pokemon (unless this is a solo attempt), but for all players involved combined.
- Make sure your personal Time to Win is under 180 seconds (tier 1-4) or under 300 seconds (tier 5).
- You can find out each individual Pokemon’s Time to Win contribution by dividing the simulated Time to Win by the “# of deaths”+1. Adding more than 1 can help ease out room for error.
- If your group’s Power is over 100% and your personal Time to Win is under 180 or 300 seconds, you should be set to win!
- Remember to leave room for error!
- These are based on simulations. They’re good simulations, but you may want to shoot for over 110% Power and well under the 180 or 300 seconds to secure your victory!
Example
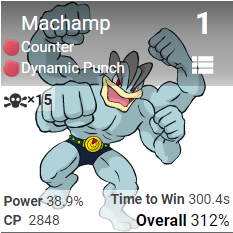
Here we have a level 39 Machamp vs a Tyranitar raid boss with Iron Tail and Fire Blast using the “No Dodging” strategy.
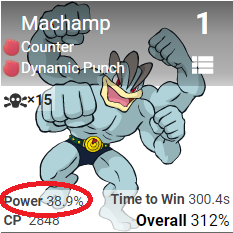
Machamp’s Power here is 38.9%, which represents that 6 Machamp, all level 39 and with this move set, against an Iron Tail Fire Blast Tyranitar, using a “No Dodging” strategy will on average deal 38.9% damage to the raid boss.
That’s great and all, but what if you only have 1 level 39 Machamp with this move set?
You can determine a single Machamp’s individual performance by dividing 38.9 by 6, which is roughly 6.48. This suggests that on average, 1 Machamp under these conditions will on average deal 6.48% damage to the raid boss.
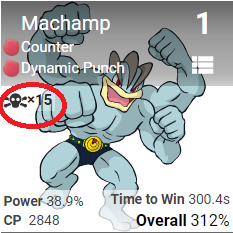

Time to Win on the other hand is based on how many Machamps it would take to defeat the raid boss alone (with other weights added in to simulate being with other attackers). The skull and crossbones (i.e. “# of deaths”) represents how many Machamps that would take. To find out the individual time it would take a single Machamp to faint under these circumstances, on average, you would have to divide Time to Win by the “# of deaths”+1(to represent the Machamp still standing). 300.4/16 results in roughly 18.78 seconds.
What this suggests is, a Machamp, under the conditions set by the simulation, on average will deal 6.48% damage to the raid boss Tyranitar in roughly 18.78 seconds.
Multiplying this all by 6, assuming you’re using 6 of the same exact Machamp, you’d find you’re dealing ~38.9% damage to Tyranitar in ~112.68 seconds. This suggests that you have enough time to beat the raid boss with 3 friends, but not 2 (unless you can quickly revive and jump back in).
If you want to duo this specific Tyranitar, you’ll have to incorporate dodging as there are no higher Power options against this specific Tyranitar if you don’t dodge!
Summary
Bonus ball optimization is a useful tool for small groups and for making the most of what you have. Just make sure you’re using it properly and wisely! When you split up in to groups, make sure you are thinking about team contribution, and that each team has enough damage to beat the raid. It is better to guarantee 2 bonus balls for yourself and to secure the win than to take too small of a group and not get Mewtwo at all! And remember, Mewtwo is pretty easy to catch, so please don’t badger less experienced and equipped players to attempt risky party compositions for an extra ball or 2.
But…… Why? If I’ve put my pokemon in you know what I have. You can’t just tell me what 6 I should use and how I’d do? I have to do a bunch of math? I don’t understand your thought process in designing it this way.
The overall rating is what you want normally. Power is for small groups and time to win for large groups.
I’m with Nathaniel. What 6 Pokemon from my Pokebox are best suited to do this raid? That’s what I wanna know. Stardust is in a massive drought. I can’t afford to power up 6 Machamp or 6 Rhydon.
It does tell the best 6 for most situations by default. It can’t tell you the best 6 for all situations because that changes depending on the size of the group.
Thanks for all the explanation! Pen and paper is at the ready to start working it all out for my team.
Is there still a need for the potions (and as a result, the “overall”) ranking for raids? I’m throwing out potions constantly. It seems the overall would be some kind of split between power and time to win.
Potions is not included in the overall ranking for raids.