

TL;DR
Breaking Swipe Rayquaza is not meta-breaking, but it does outperform Outrage a bit on average, and it’s a lot more consistent. Unless you swipe left and right to dodge.
“But it has lower DPS!!!” The plot below should explain why. I’ll show this again and explain later.
(More TL;DR points below this)

Other TL;DR points:
- In 60% of cases, Breaking Swipe is better, and occasionally by a lot.
- Even when Outrage is better, its advantage is very small.
- If the boss hits back with a Super Effective charged move, BS wins. If the boss deals NVE damage, Outrage wins. Neutral damage is a coin flip.
- BS Rayquaza still does not dominate other non-shadow non-mega dragons (only the best 60% of the time), so there’s no need for 6*L40 and I don’t think it’s worth the cost. But it solidifies its advantage over others.
- Not worth multiple ETMs. The improvement is too small. Unless you’re swimming in ETMs, save them for Groudon.
Keep reading for:
- WHY Breaking Swipe is better than Outrage: Theoretical and experimental explanations
- Other Breaking Swipe candidates, including Haxorus
- List of my previous analyses (in Appendix 2)
Introduction
From Wednesday, February 22 to the morning (10am) of Wednesday, March 1, Rayquaza will be back in Tier 5 raids. Any Rayquaza caught before 10am on March 1 will learn the exclusive move, Breaking Swipe.
There are certainly a lot of hype going for it: Rayquaza is a fan favorite, and Breaking Swipe in PvP is a ridiculously overpowered (OP) move that has good odds of entering the Master League meta.
But until now, people who don’t PvP have reacted with “meh” regarding Breaking Swipe’s utility in raids. It all originates from this:

This table shows DT/Outrage Rayquaza has 2.3% higher DPS than DT/BS. That’s it, right? Since apparently DPS is the only thing that matters, we can just TM to Outrage and call it a day, right?
… OF COURSE NOT!
Yes, let me make that clear. Using both Pokebattler simulations and theoretical justifications, I’ll show in this article that Breaking Swipe is better than Outrage, unless you dodge.
After a brief look (Part 0) at Breaking Swipe’s stats, the article will break out into the following sections:
- Part 1: Yes, Breaking Swipe is better (average performance & generic dragon-type plots)
- Part 2: Theory – How is it even possible?
- Part 3: Simulations – When is Breaking Swipe better, and by how much?
- Part 4: What if you use both Outrage and Breaking Swipe?
- Part 5: Rayquaza vs. other dragons; Is it worth building?
- Part 6: How can other Pokemon can get Breaking Swipe? Especially Haxorus?
If you’re on desktop and want to jump to a particular part, search “Part X”.
Parts 2 and 3 are the main ones for veteran players and those who can’t wrap their head around how DPS could be “wrong”. If you’re wondering how hard you should raid Rayquaza, go to Part 5.
You can now follow me (@teban54) on Twitter!
Part 0: Breaking Swipe’s stats
(Skippable in the interest of time)
Thanks to PokeMiners, we know that Breaking Swipe in PvE has the following stats:
- Power: 35
- Energy: -33 (3-bar move)
- Duration: 0.8s (0.27s – 0.7s damage window)
When Niantic announced Breaking Swipe is a 35-power move, most people – including myself – thought it would have no relevance in raids. This is ridiculously low, even for a 3-bar move.
- Other examples of 35 power moves include: Struggle, Poison Fang, Feather Dance and Return. Yikes.
But the quality of a charged move in PvE is determined by 3 dimensions (unlike PvP which only needs 2): Power, Energy and Duration.
- A charged move with shorter duration is strictly better than one with the same power and energy but a longer duration, as it’s more efficient.
- Even then, most 3-bar moves take anywhere between 1-2.5 seconds, and Breaking Swipe using those stats would have been useless.
Then, Niantic surprised us: Breaking Swipe has a duration of 0.8 seconds – second shortest in the game, only behind Return (0.7s).
For context, one Breaking Swipe takes less time than one Dragon Tail (1.1s, 15 power). Even though Outrage (3.9s, 110 power) deals 3x the damage, it takes almost 5x as long to use!
Even though Breaking Swipe is still nowhere near the best 3-bar move, it’s now a perfectly good one, in a way that you wouldn’t expect from 35 power. But how can it beat the almighty Outrage? Let’s see.
Part 1: A first look at Breaking Swipe Rayquaza
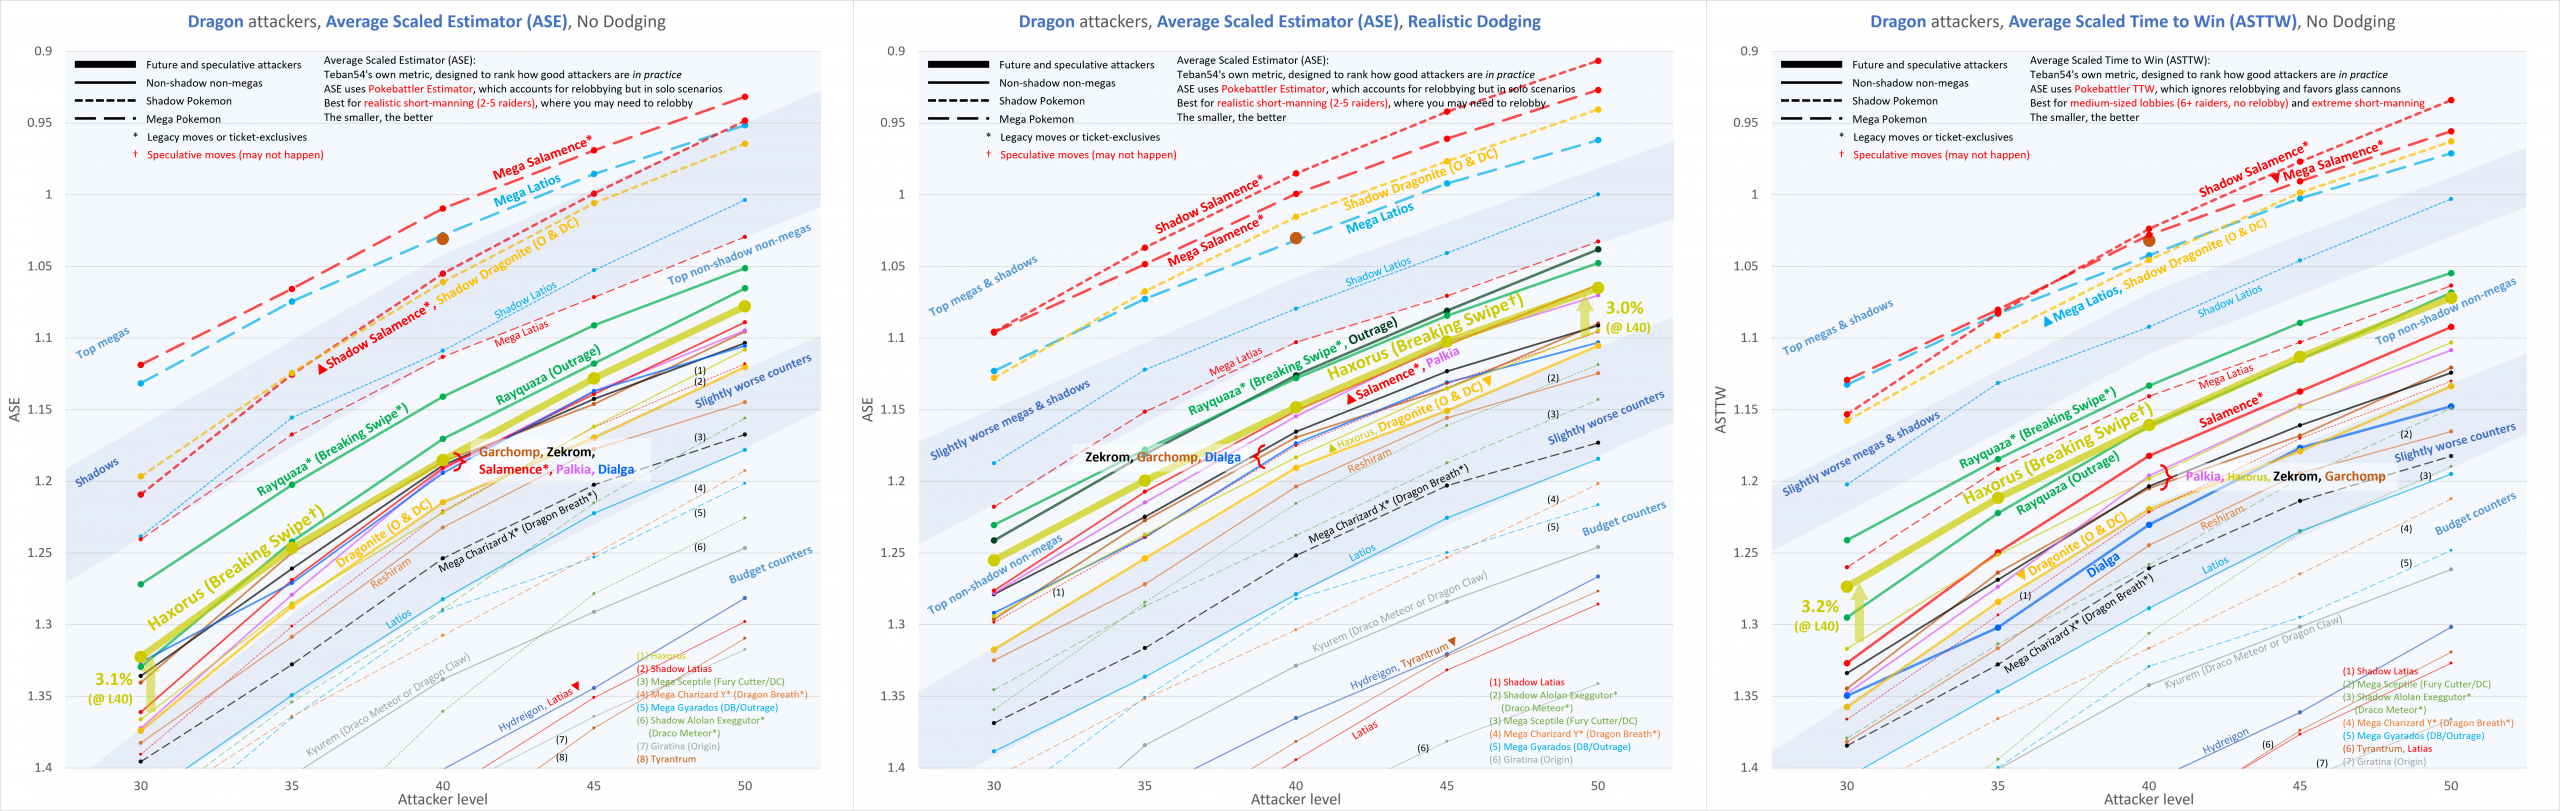
[Section TL;DR] Not only does Breaking Swipe show an average improvement over Outrage without dodging, but against almost every single raid boss with a “random” boss moveset, Breaking Swipe is the recommended move on Pokebattler! (L40 best friends)
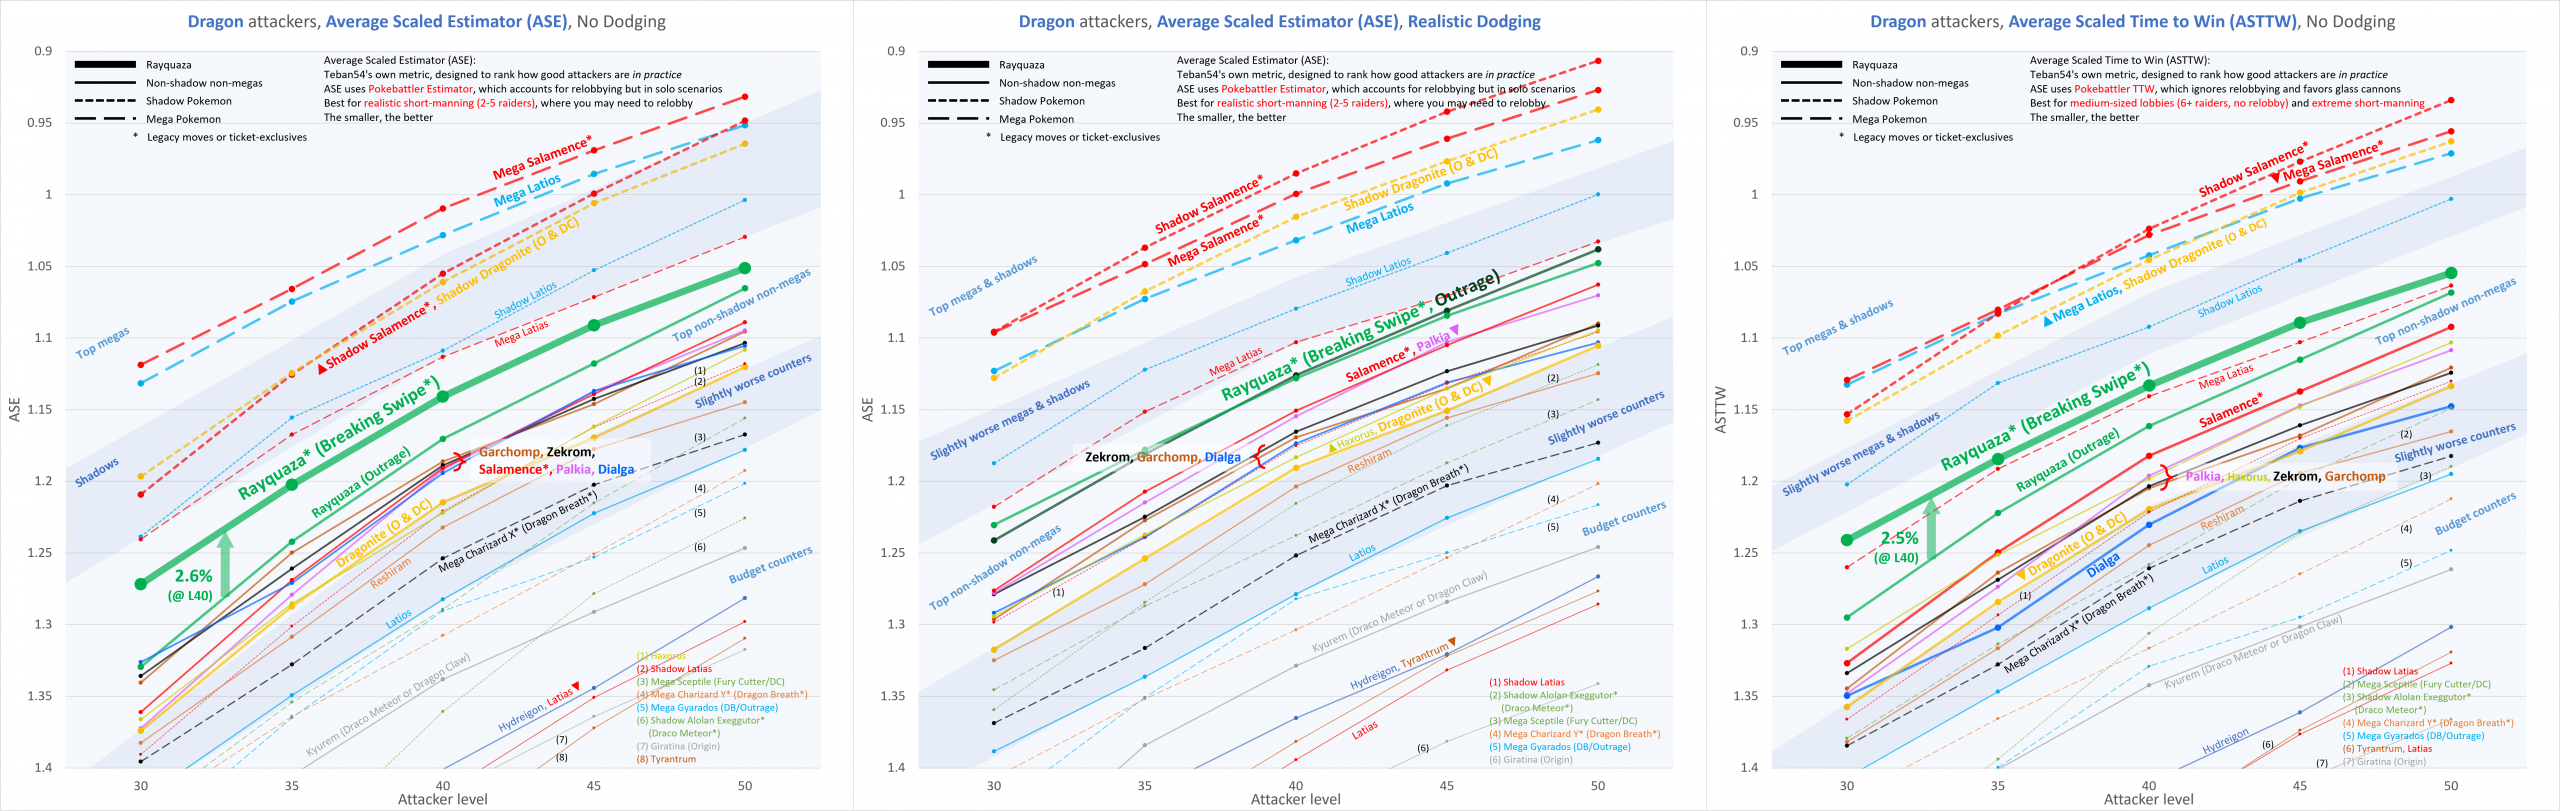
See Appendix 1 (at the end of this article) for technical details and how to read the charts. The Chandelure analysis also contains explanations on ASE vs ASTTW.
Outrage Rayquaza was already the best non-shadow non-mega dragon attacker on average, though only narrowly ahead of other dragons. But what this chart shows is: If you don’t dodge, Breaking Swipe Rayquaza is even better!
- Averaged across all bosses, Breaking Swipe shows a ~2.5% improvement in both Estimator and TTW at Level 40.
- (A greater improvement is shown at lower levels, and a smaller one at higher levels.)
- Even if you do dodge, BS’s and Outrage’s average performances are virtually identical.
- Breaking Swipe creates a bigger gap between Rayquaza and other non-shadow dragons. (More later.)
- However, the improvement is still quite small. The recent legendary signature moves typically have at least 4%, except Fusion Bolt Zekrom.
Let’s compare Breaking Swipe and Outrage more directly, by looking at how often is each of them better than the other:
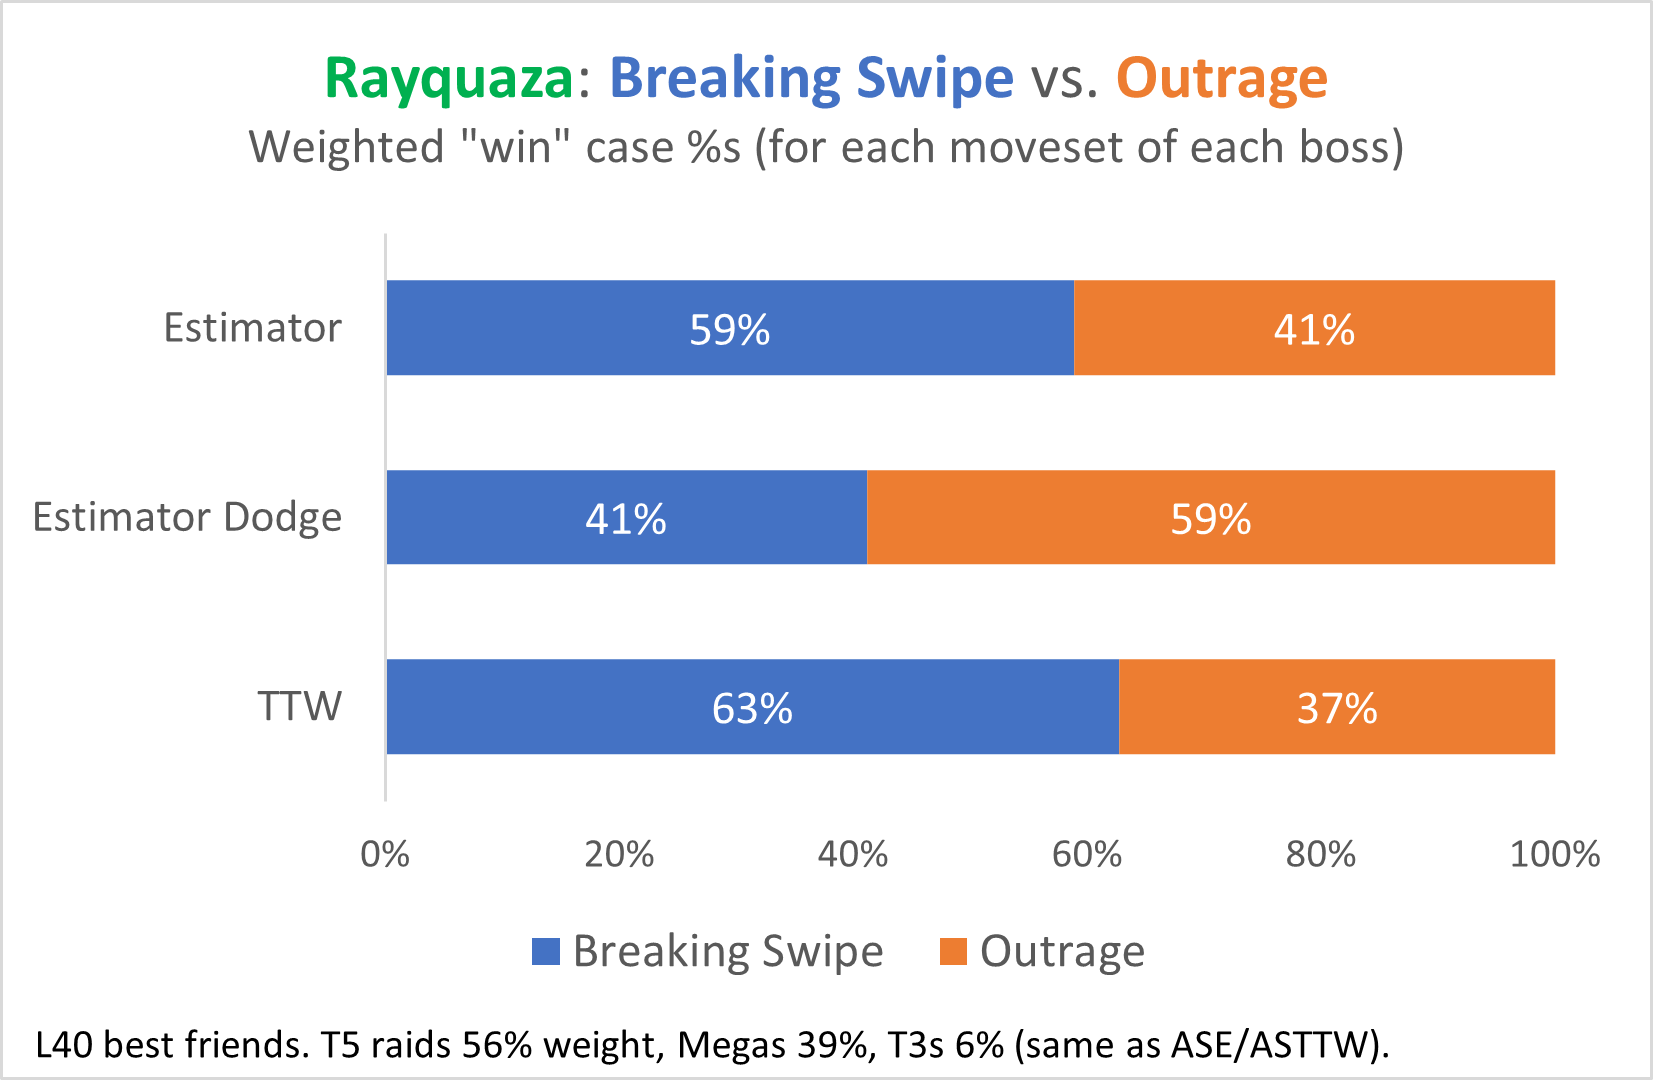
This chart narrows down to each moveset of each raid boss (e.g. Fire Fang/Crunch Reshiram). Against ~60% of bosses and boss movesets, no-dodging Breaking Swipe is better than Outrage. That’s enough for a majority!
But what if we just use Pokebattler’s default “random moveset” option for each boss (this is what infographics will show you)? Here’s an even more shocking result:
With L40 best friends and no dodging, against every Tier 5 and Mega dragon-type raid boss that lacks a double weakness (except Ultra Necrozma), Breaking Swipe is better than Outrage when facing random boss movesets!
Don’t believe me? Here are some screenshots from Pokebattler, which you can verify on your own:
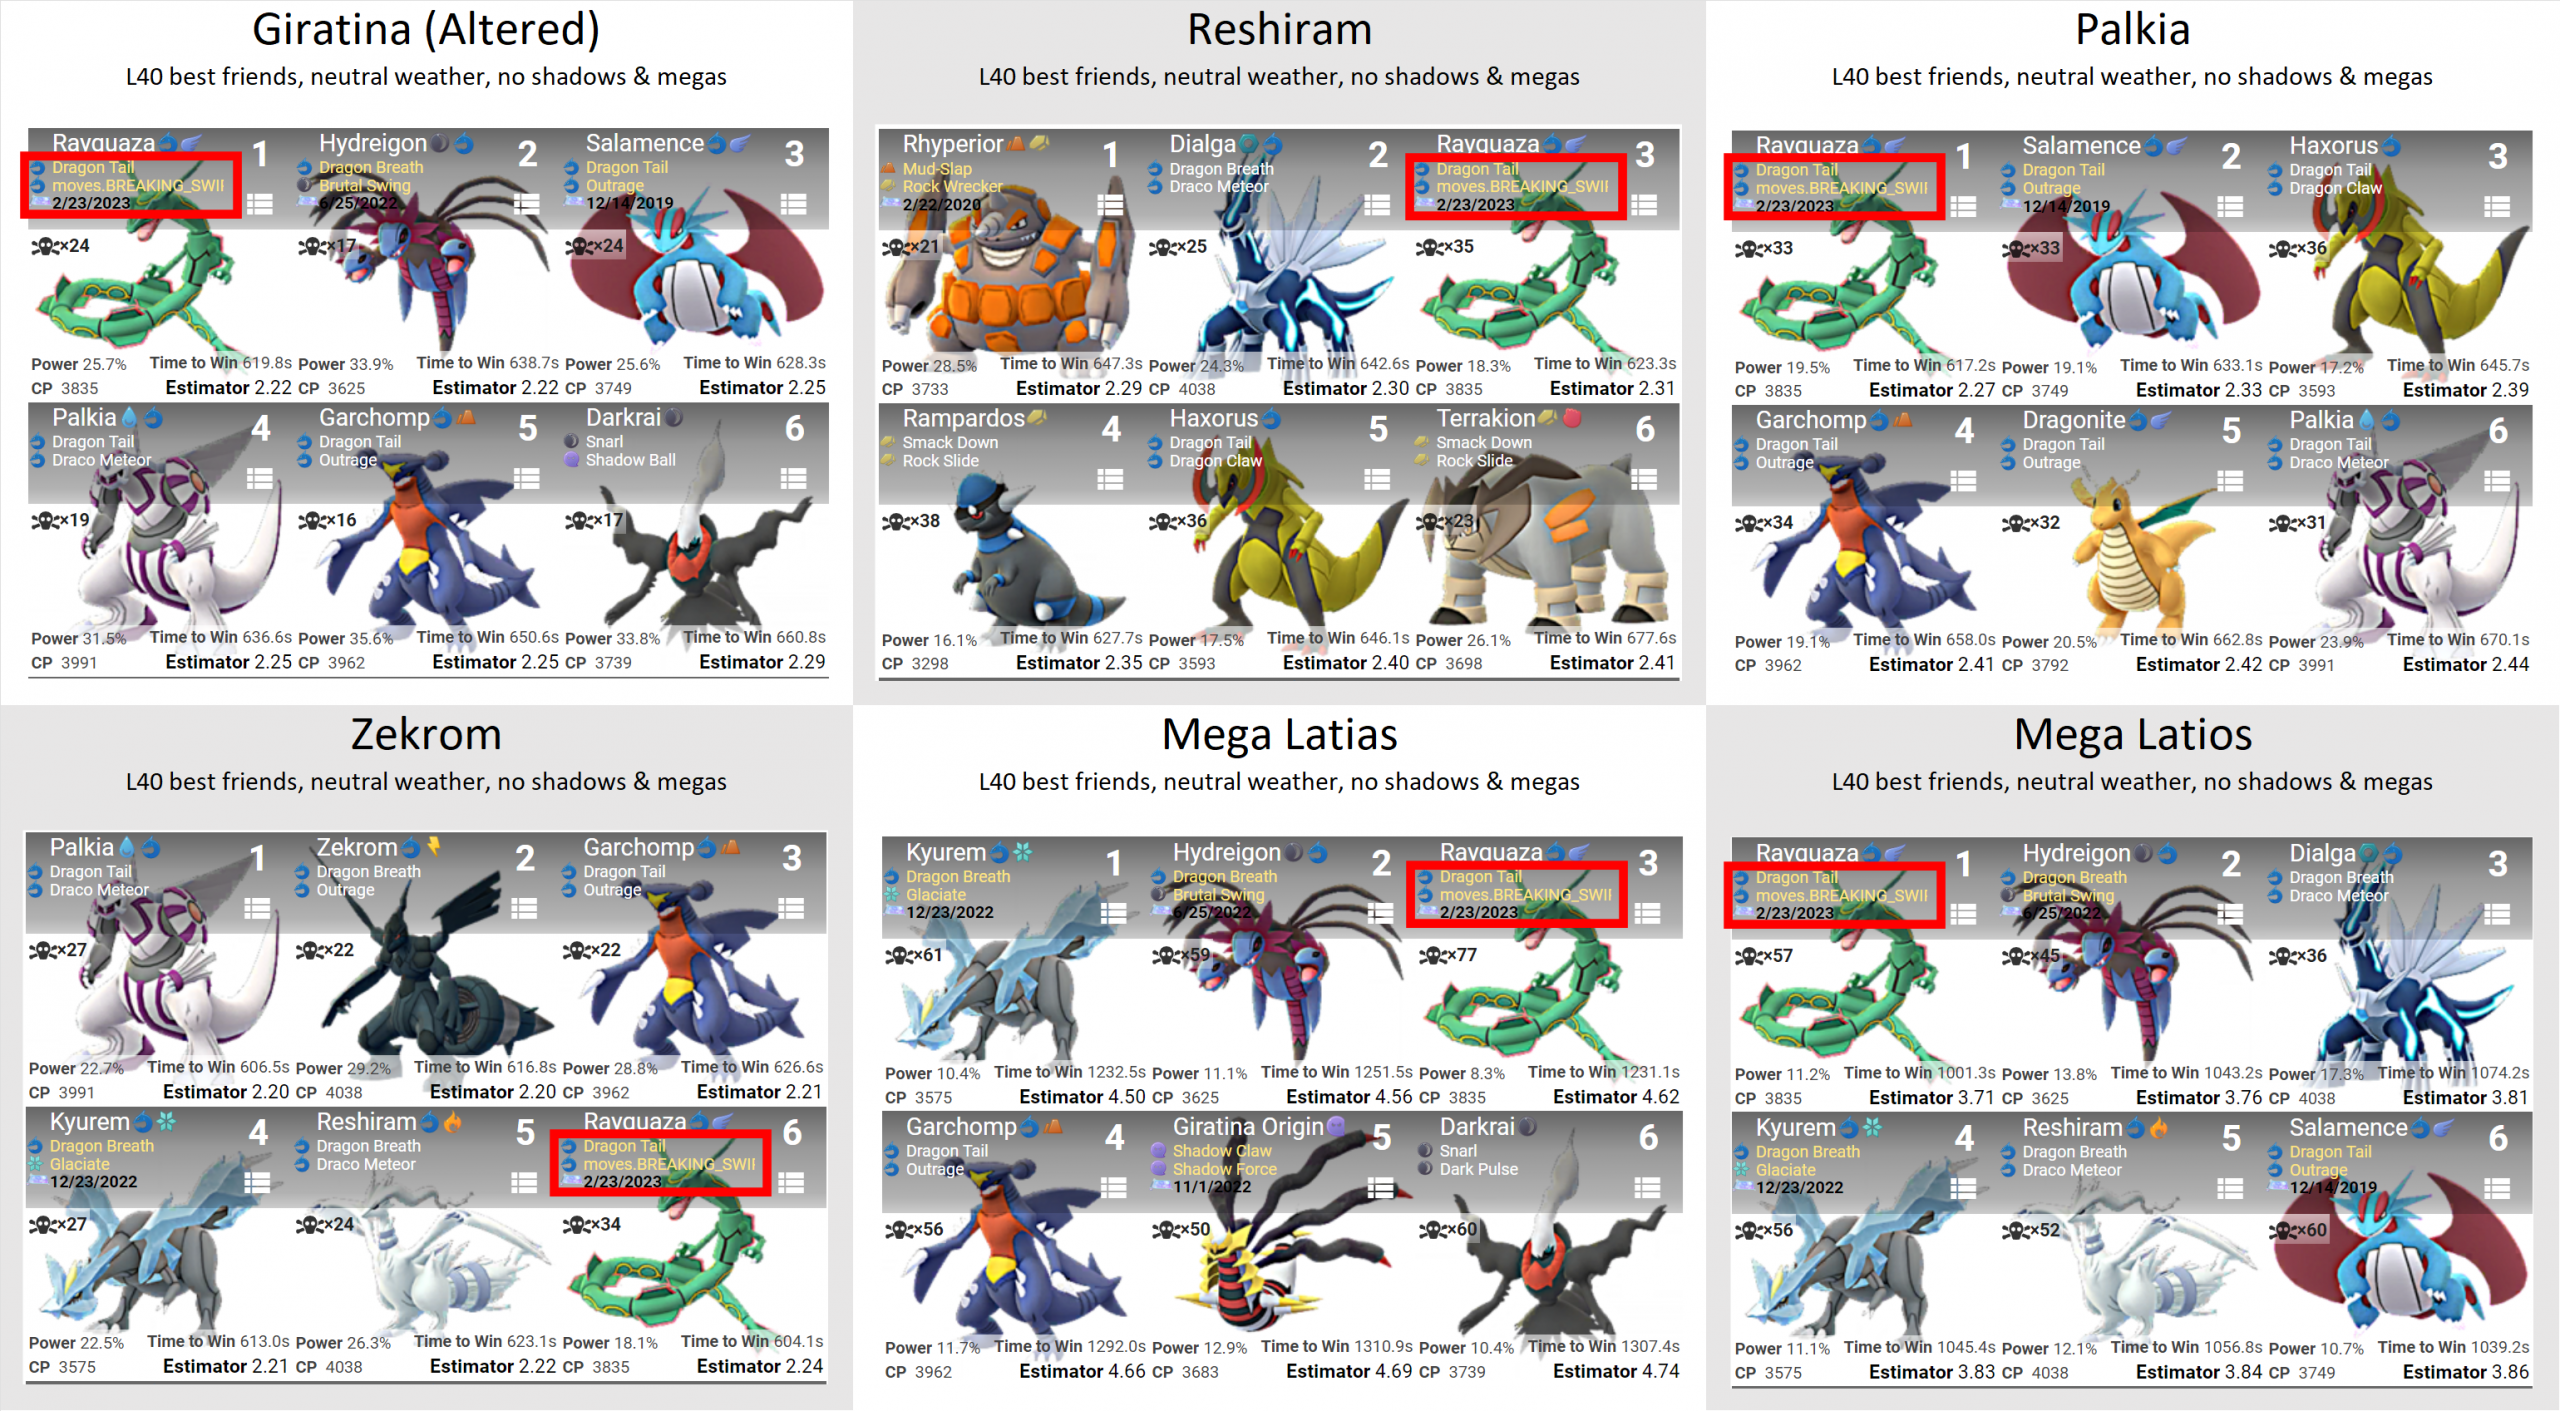
In every one of them, Rayquaza prefers Breaking Swipe.
- Without best friend bonus and/or at other Pokemon levels, Outrage can sometimes appear on top.
Part 2: Theory – How is this even possible?
[Section TL;DR] Even though Breaking Swipe has marginally lower best-case DPS ceiling (what GamePress DPS measures), it hits that ceiling more frequently and more consistently than Outrage. Unless you can reach 4 Outrages, this makes BS the better choice ~60% of the time: these are times when you would faint just before or during another Outrage.
I know what you’re thinking. “But how…? Doesn’t Outrage have higher DPS?”
Let’s first do a purely theoretical thought experiment. (If you don’t want to do math, skip to the next chart.)
Ignore the specific boss, and assume Rayquaza is fighting against a punchbag that deals no damage. No SE, no NVE… Just zero damage.
- Each Dragon Tail takes 1.1s, deals 15 damage and generates 9 energy.
- If you’re running Outrage, you can use one after 6 DTs, and the Outrage takes 3.9s to deal 110 damage. Now 10.5s has elapsed, and you’ve dealt 200 damage total.
- But what if you only use Breaking Swipe? In 10.4s, is enough for you to use 2 BSes and 8 DTs, which deal 190 damage.
The point is: 2 Breaking Swipes take almost the same time as 1 Outrage (slightly faster), and only deals a littlt bit less damage.
Visualizing this:
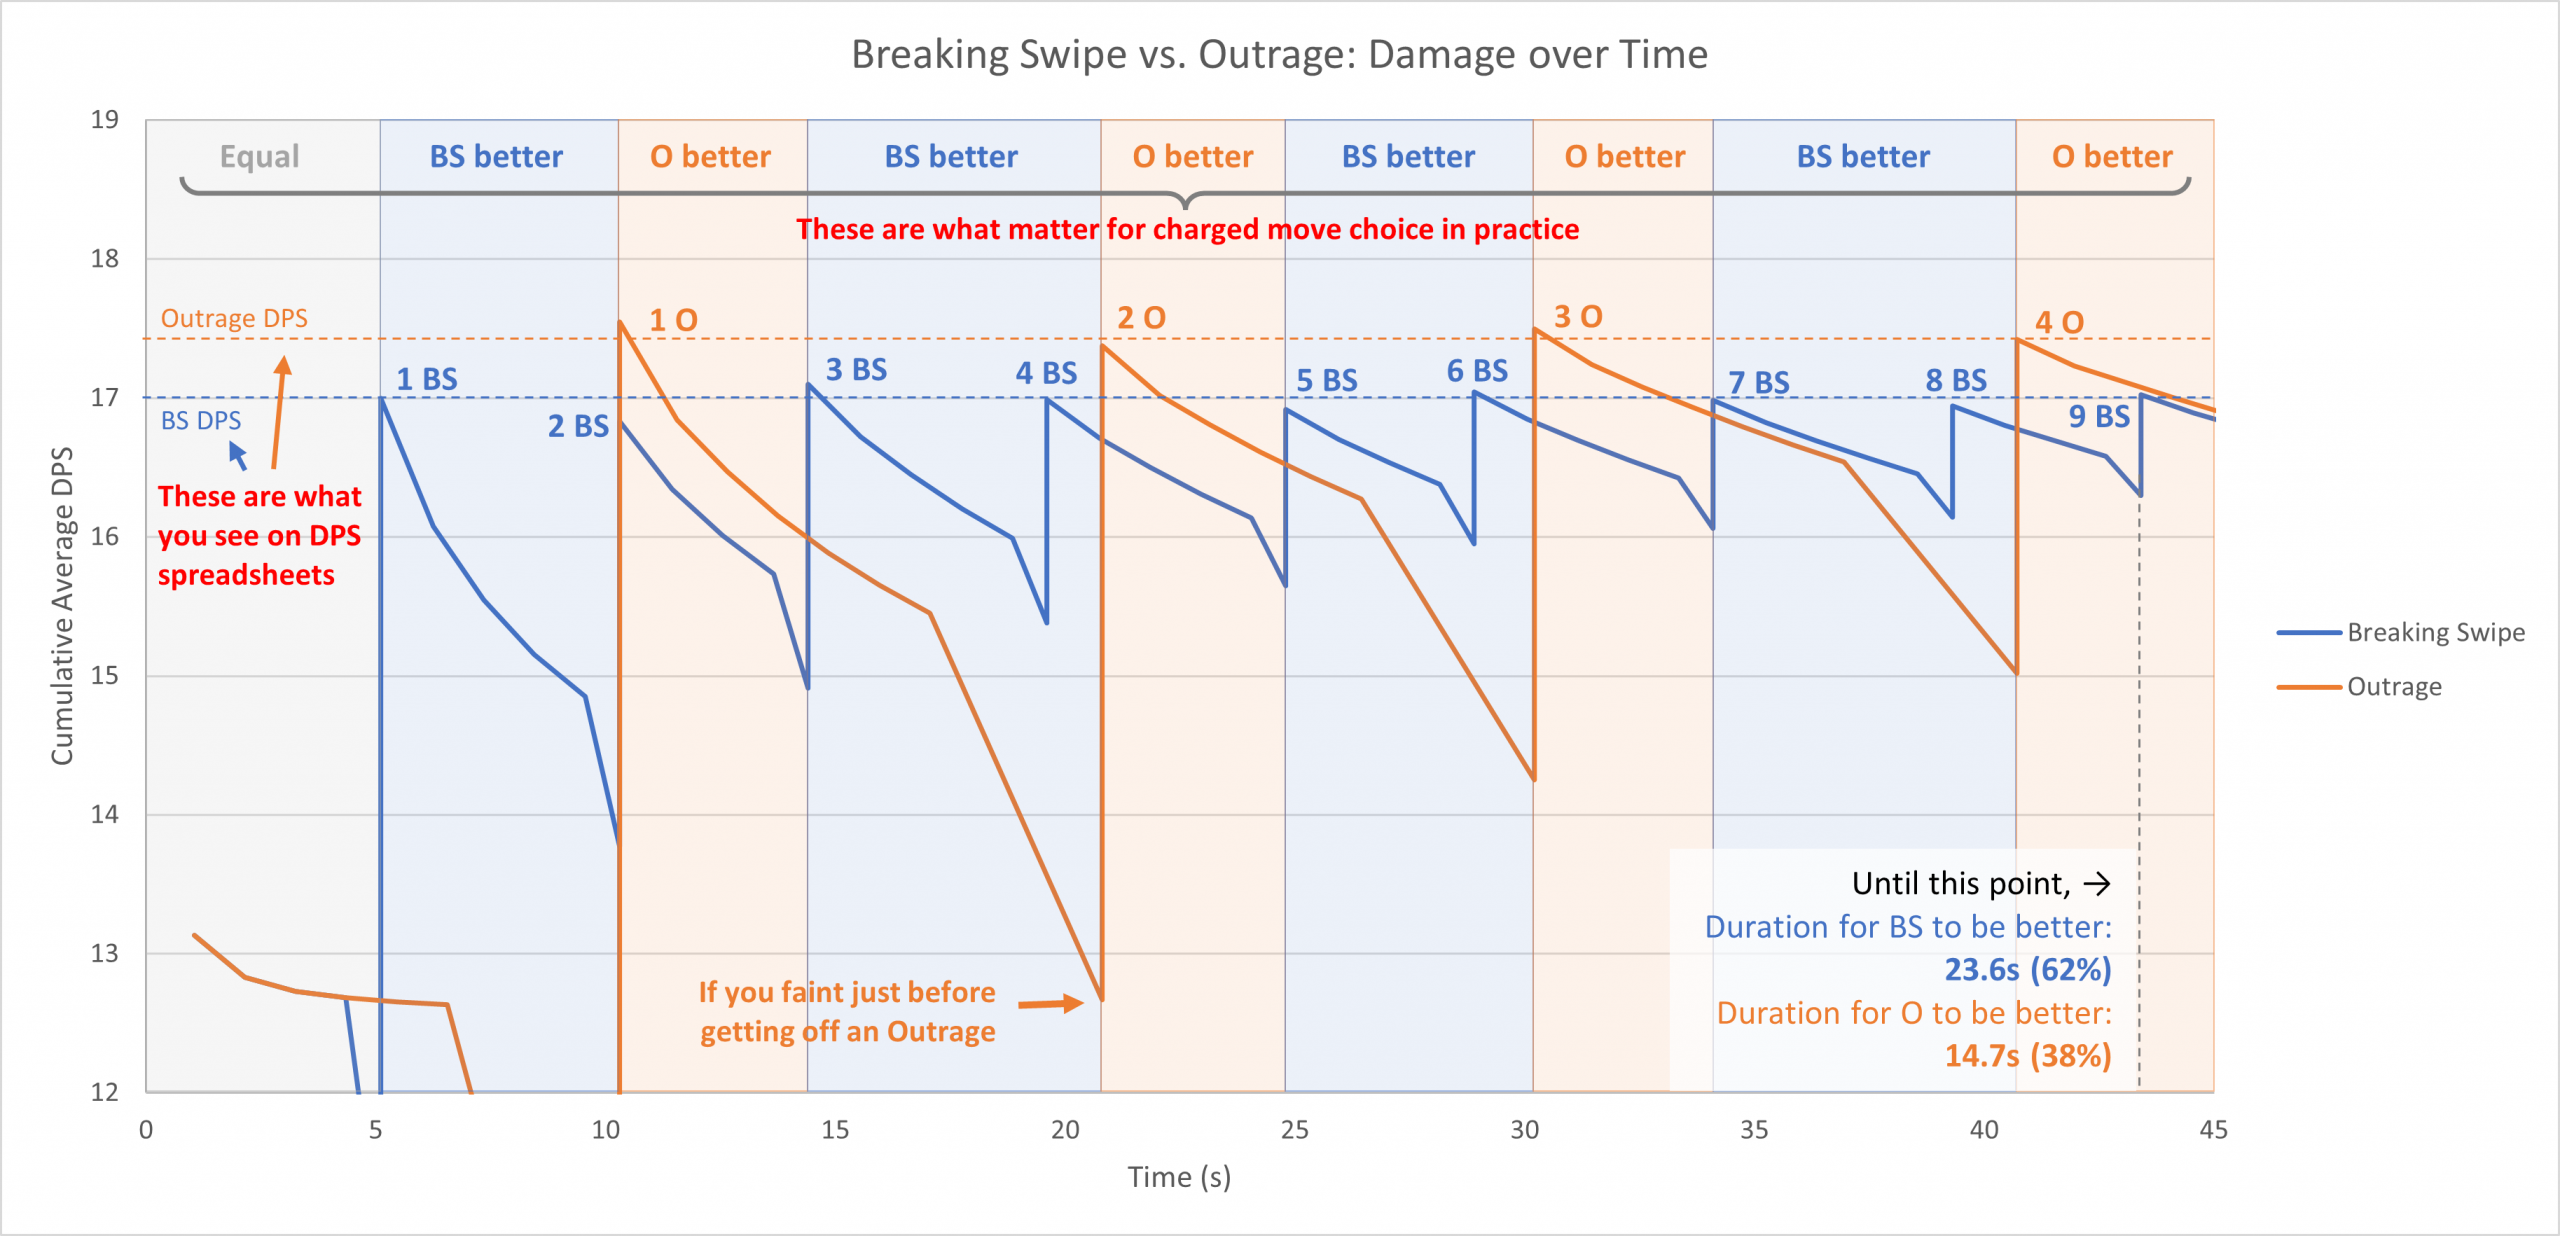
To understand this: The x-axis (left to right) is the time elapsed. The y-axis (top to bottom) is the average Damage Per Second (DPS) up to that time. You want to use the charged move that gets you higher at that point.
What GamePress DPS spreadsheet tells you is the “peak” of each curve. Outrage has a higher peak than Breaking Swipe.
- GamePress uses Comprehensive DPS (explained here), which is a slightly modified version of Cycle DPS.
- Cycle DPS is, simply speaking, the DPS at the exact moment when you’ve just finished a charged move. In other words, it’s the peak of the curve, as I’ve highlighted in dotted lines above.
- But in practice, you only achieve that peak if you faint (or switch out) immediately after finishing a charged move. If your Rayquaza faints anywhere between the 1st Outrage ends and the 2nd Outrage ends, your DPS suffers. And if you faint just before the 2nd Outrage registers damage… Your DPS is terrible.
- Basically, you don’t want to faint while you’re halfway to an Outrage. Or worse, in the middle of one.
In practice, what matters is which curve is on top. Breaking Swipe is on top of Outrage more often, even though it has a lower peak (Cycle DPS).
- Until you get to 4 Outrages, each time you use an odd number of BSes (1,3,5,7), it deals more damage and thus has higher DPS, and stays this way until the next Outrage catches up.
- (These are the blue regions on the plot.)
- Basically, 3 BS > 1 Outrage + a few DT.
- As I noted in the chart, until 4 Outrage/9 BS, BS ends up being better 62% of the time.
- If you can get 4 Outrages off, now Outrage stands out more often, as 4 Outrage > 9 BS. But Rayquaza’s glassiness means it doesn’t get to 4 Outrages frequently.
In summary, even though Breaking Swipe has a lower best-case Cycle DPS than Outrage, it gets to that best-case DPS more often. If you faint before an Outrage finishes, it’s really bad. Breaking Swipe prevents that.
- And remember, this does not consider taking any damage from the boss. We’re not assuming that the boss deals Super Effective damage, nor that Rayquaza will faint to a heavy-hitting charged move.
- Note that “4 Outrage” as a break-even point is a very rough estimate. In practice, a lot of other factors (e.g. breakpoints, charged move timing from the boss) come into play.
What if we consider damage from the boss?
[Section TL;DR] When Rayquaza takes damage and generates energy, it provides a further boost to Breaking Swipe more than Outrage. The heavier hitting the boss is, the better Breaking Swipe becomes.
In reality, we’re not fighting against a punchbag. In PvE, when you take damage from the boss and gym defender, you gain energy whose numerical value is half the HP lost. This helps you reach your charged moves faster, but crucially, it helps Breaking Swipe more than Outrage.
- A lesser-known fact is that GamePress Comprehensive DPS does consider taking damage and the associated energy generation (explained here). It assumes the boss deals damage at a constant rate. This is obviously unrealistic for any particular fight, but for this analysis, I’ll use the same assumption with the same rate for Rayquaza (loses 6.2 HP per second).
At this rate of taking damage, Breaking Swipe gets even more of an advantage:
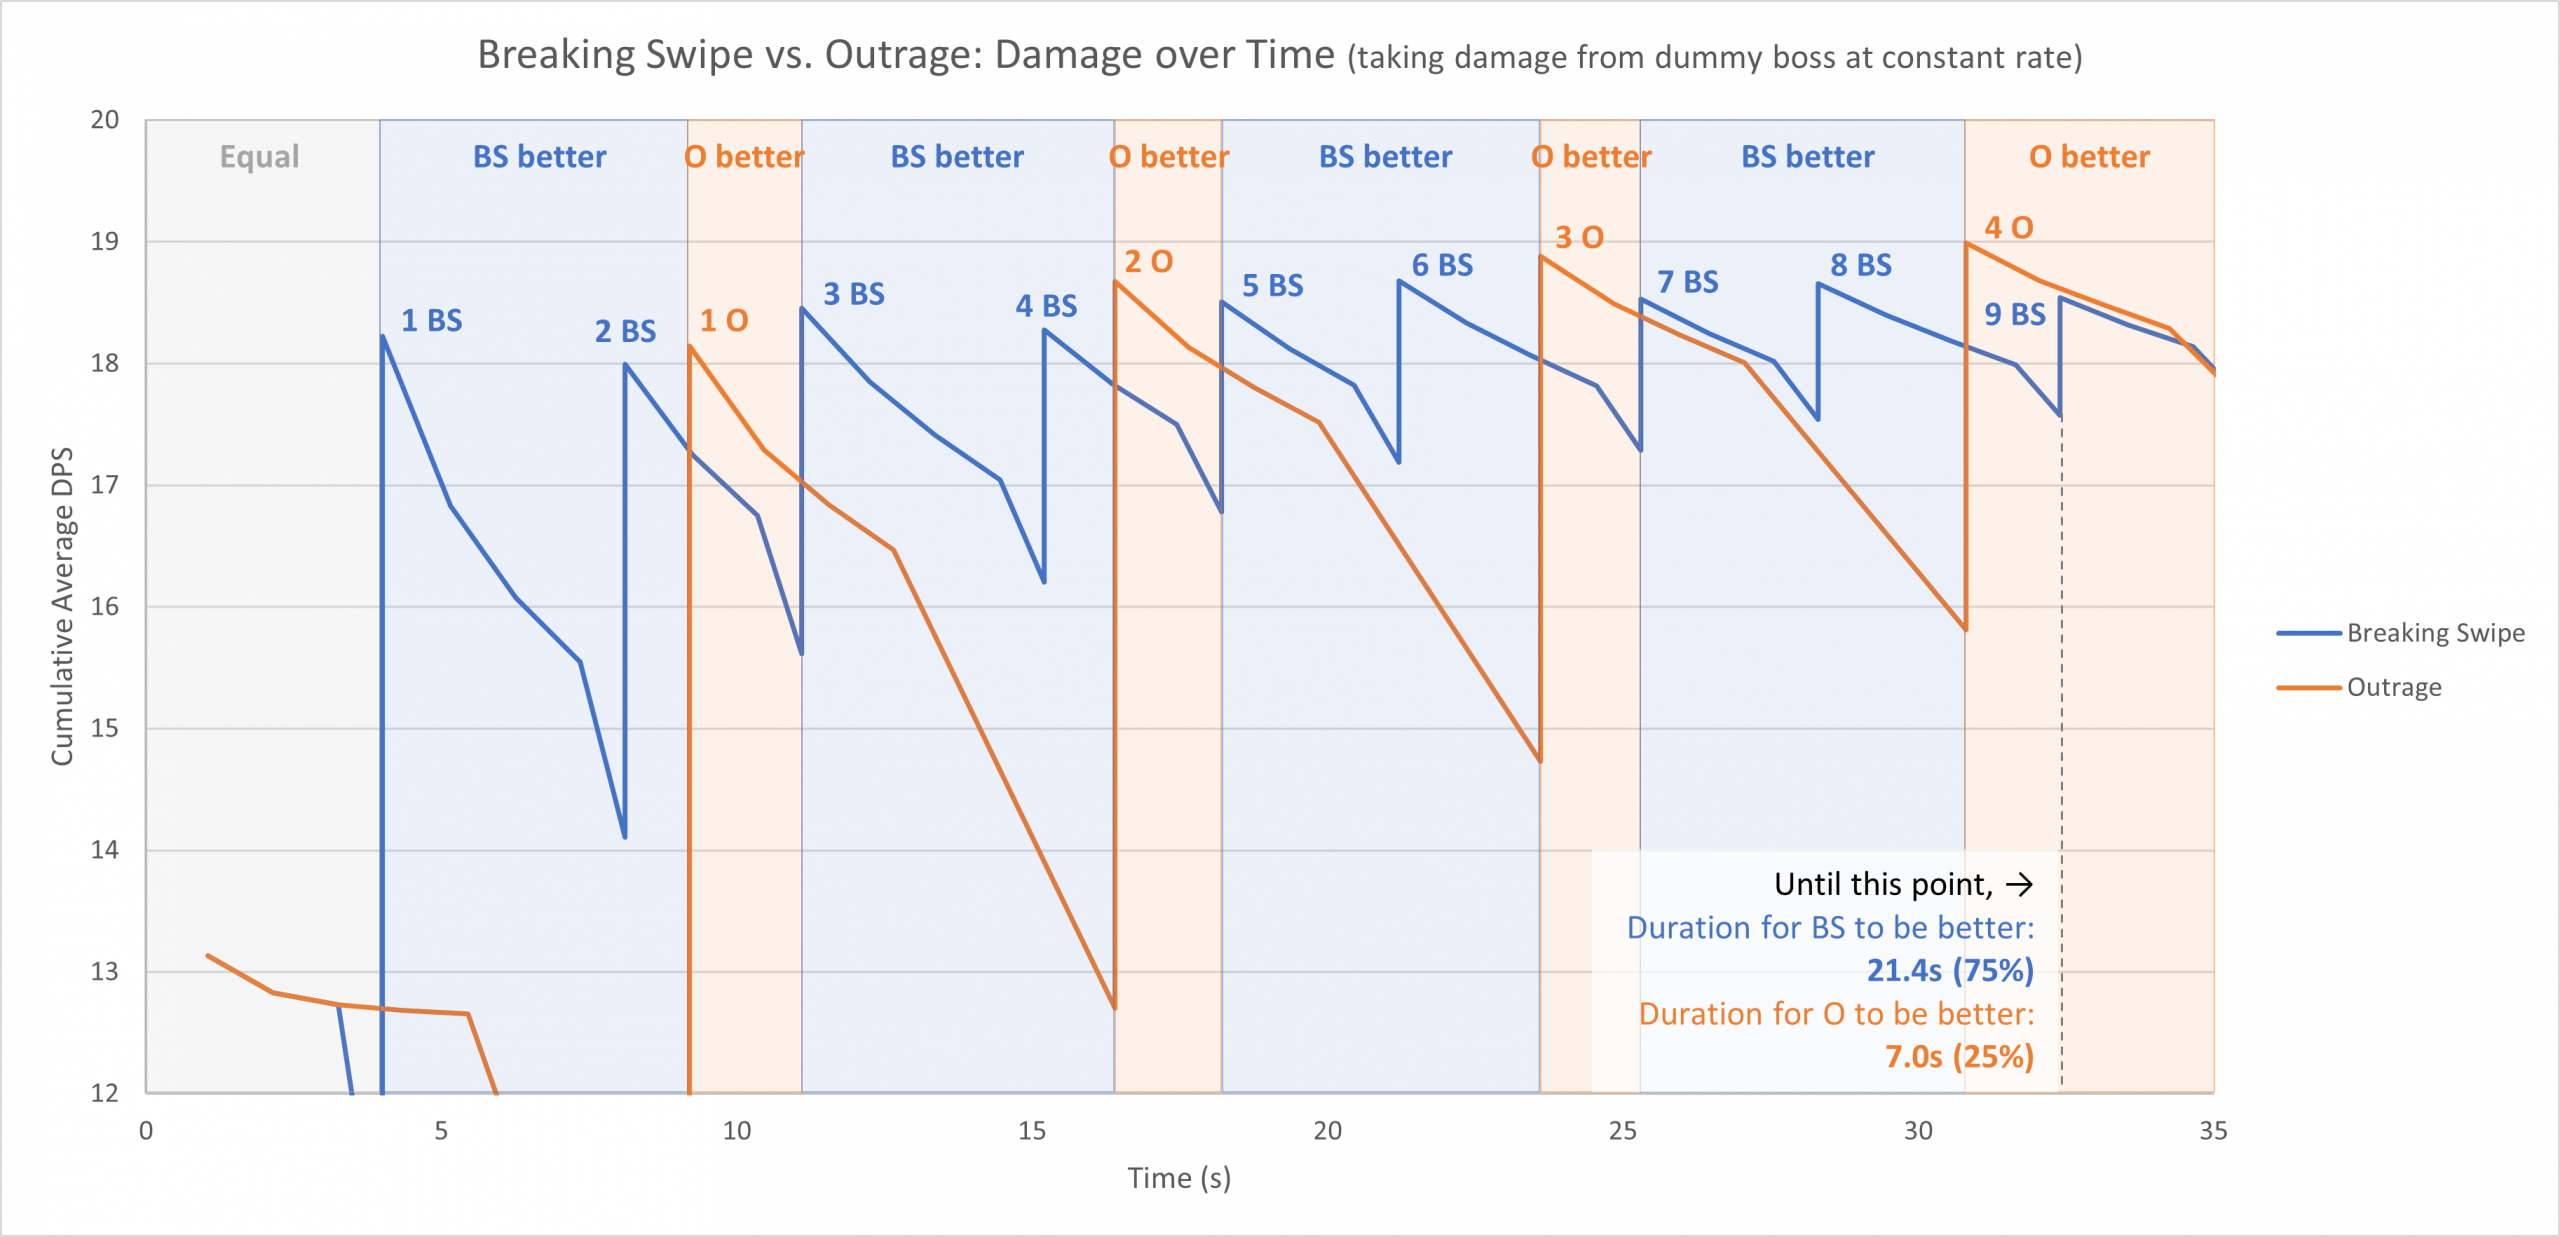
- Note that this chart uses different x/y limits than the previous one for readability. It only shows up to 35 seconds instead of 45, and has DPS up to 20 instead of 19. If plotted on the same chart, this one will peak higher and more frequently.
Thanks to energy generation from taking damage, now you get to both Breaking Swipe and Outrage earlier than before. It used to take 3-4 DTs per BS, but now it takes 2-3.
However, because BS is a 3-bar move and Outrage is 2-bar, BS gets a greater boost in frequency than Outrage. 2 BS is now even shorter than 1 Outrage, compared to being similar before.
- For instance, if you compare the two plots, on the earlier plot 3 O lies closer to 6 BS than 7 BS. Now, it’s closer to 7 BS instead.
The result is that BS stands out for an even greater proportion of time, until you reach 4 Outrage.
- Up to 9 BS, the previous plot has BS being better 62% of the time. Now it’s 75%.
The rate at which the boss is dealing damage (“boss DPS”) matters. There’s no easy way to estimate this rate for every boss moveset, but here’s a general trend:
The heavier hitting the boss, the better Breaking Swipe becomes. If the boss deals little damage, Outrage becomes comparatively better than before.
- This is due to two effects: 1) A heavy-hitting boss reduces Rayquaza’s time on the field, preventing it from reaching the “break even” point of 4 Outrages.
- But more importantly, 2) A heavy-hitting boss gives a greater boost to BS, as Rayquaza generates energy faster. Basically the “62% to 75%” change illustrated above.
- In the most extreme cases, a charged move can either KO Rayquaza, or leave it with only enough health to survive one or two additional fast moves (thus you can get off 1-2 BS but not an Outrage). But even without these extremes, the trend still holds.
Special thanks to the GamePress team for writing the comprehensive DPS calculation guide, RyanSwag ( u/RyanoftheDay) for his double move Salamence analysis that inspired this section, and u/Hawaii_01 for documenting their DPS calculations here.
Part 3: Simulations – When is Breaking Swipe better, and by how much?
[Section TL;DR] Without dodging, Breaking Swipe outperforms Outrage 60% of the time. Moreover, BS has a greater advantage in its home field than Outrage does in its own: In cases where Outrage wins, BS is closely behind, but the cases where BS wins can include some really bad scenarios for Outrage.
The entire Part 2 doesn’t rely on any real simulations at all. Does our theoretical development agree with what’s happening in practice?
Let’s first take the “Breaking Swipe vs. Outrage for each boss moveset” bar chart I showed earlier, and break it down by whether Rayquaza is hit by Super Effective (SE), Not Very Effective (NVE) or neutral damage:
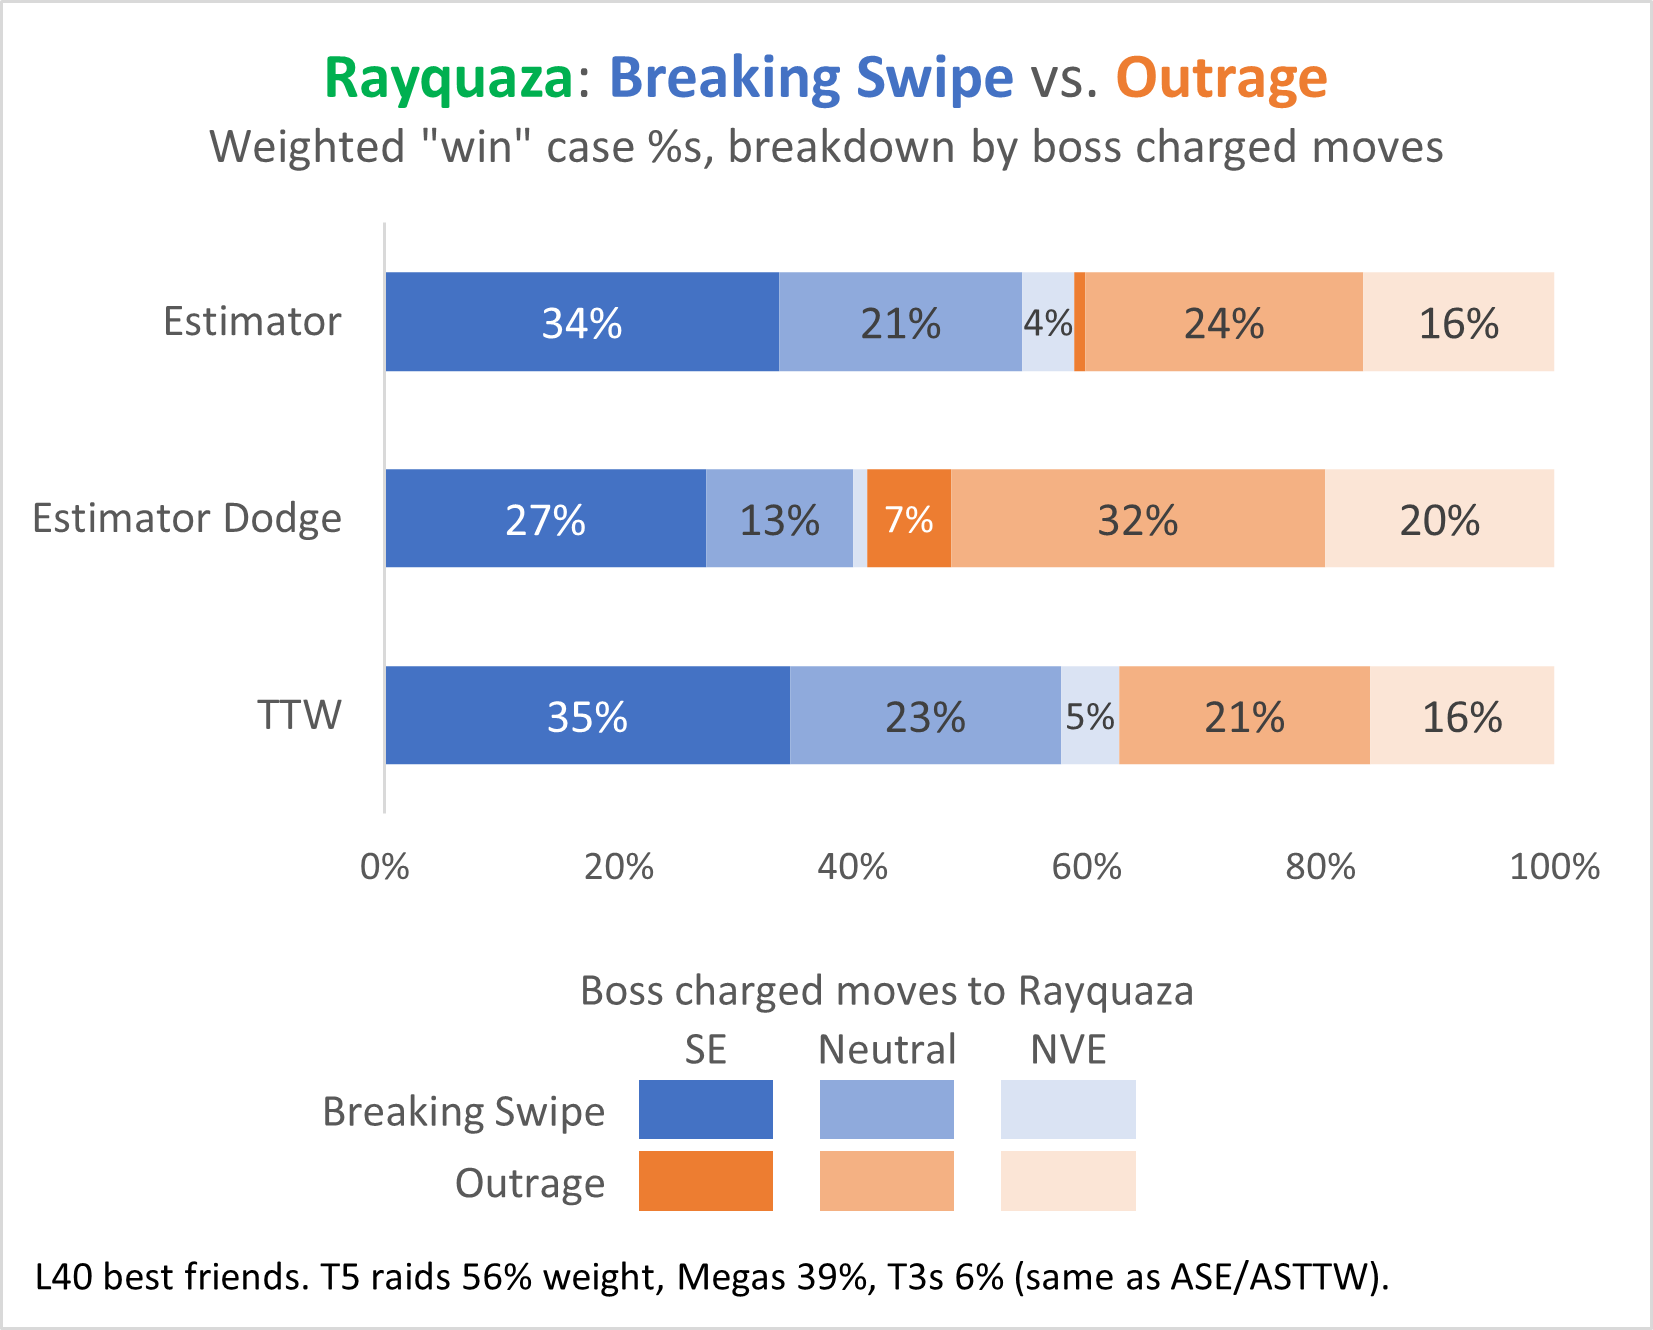
Estimator and TTW are very similar here (identical bulk so no relobbying differences). Let’s ignore dodging for a second:
- When the boss hits Rayquaza for Super Effective damage, Breaking Swipe is almost always better.
- When the boss hits neutral, it’s a coin flip. BS and Outrage have very similar numbers here (21% vs 24% in estimator).
- [Minor note] In practice, this may lean even more in favor of BS. This is because of Ultra Necrozma: Pokebattler lists Pound/Body Slam as its only moveset, that itself contributes 4%, and Outrage wins.
- When the boss hits Not Very Effectively, Outrage is generally better. (There are some outliers.)
This does agree with our theory above. SE damage makes the boss more heavy-hitting, which helps Breaking Swipe. On the other hand, NVE damage doesn’t provide enough energy boost for BS to stand out, and sometimes it may let Rayquaza survive long enough reach the break-even point (3-4 Outrages), beyond which it’s better more often than not.
Quick mention on dodging. While dodging makes Outrage the better choice more often than not (~60%), the average estimator is still similar between the two. Dodging effectively slows down damage taking so much that Rayquaza has a good chance at hitting 3-4 Outrages. Due to inconsistency of dodging, especially with Dragon Tail, this won’t be the focus for the article.
But how much better?
(Already summarized in the last Section TL;DR.)
The chart above does not consider the extent to which BS and Outrage differ – it treats 20% better and 1% better the same. Let’s take another shot:
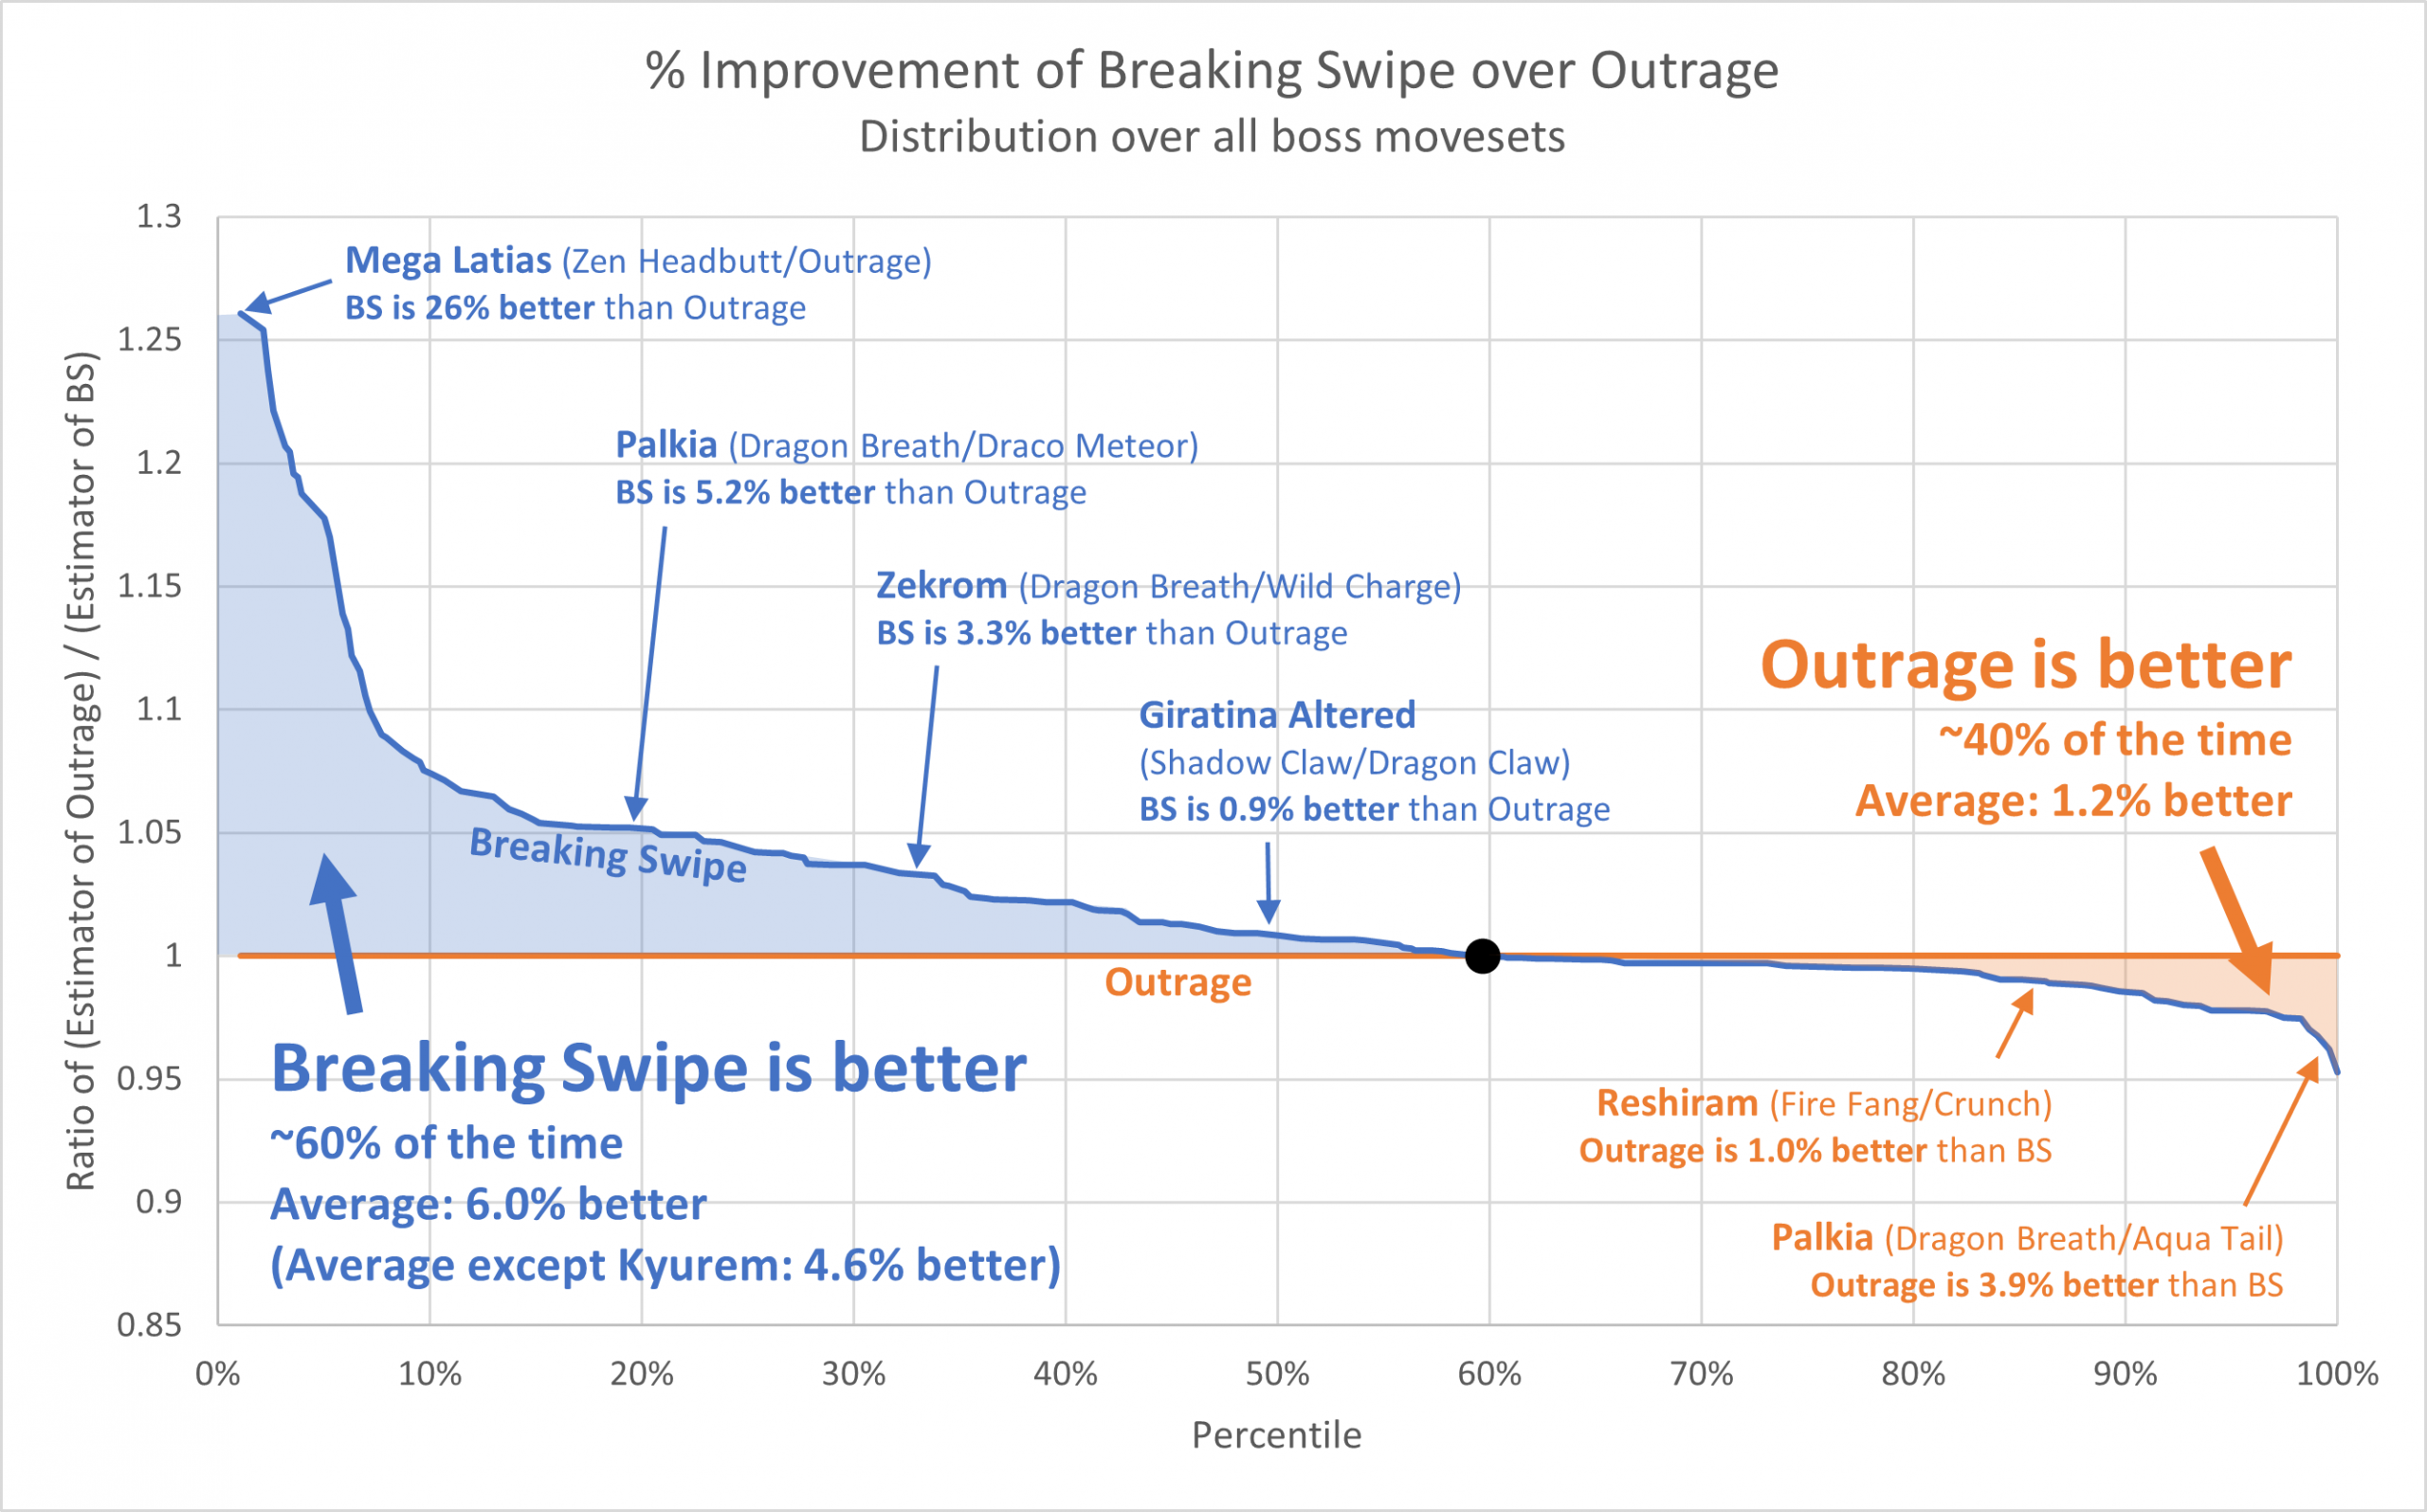
To understand this: I took all boss movesets and sorted them from most favorable for BS (left), to most favorable for Outrage (right). The higher the value on the y-axis, the bigger BS’s advantage is over Outrage.
The “areas under curve”, or the colored regions, approximate “in all scenarios where BS outperforms Outrage (or vice versa), how much advantage does it have”. Anyone who remembers calculus should find this intuitive.
What does this tell us?
- Breaking Swipe is better than Outrage ~60% of the time.
- Within these 60%, there’s a small chance that Outrage is ridiculously bad (shown on the far left), where BS may do as much as 26% better!
- These are likely cases where a single charged move OHKOs Rayquaza, before it finishes a meaningful number of Outrages.
- Note that a significant number of these extremes are Kyurem, and you really shouldn’t use Rayquaza against any of its forms. So in reality, it won’t be as extreme as shown here.
- The major non-Kyurem cases are: Outrage Mega Latias, Outrage Zekrom, Draco Meteor Reshiram, and Dragon Pulse Eternatus.
- Even if you ignore these extreme cases, when Breaking Swipe wins, it still shows a somewhat moderate advantage.
- When BS is better than Outrage, it’s 6.0% better on average.
- If we exclude all the extreme cases, it’s still ~3% better.
- On the other hand, in the ~40% of cases that Outrage is better, the difference is quite small.
- When Outrage is better than BS, it’s only 1.2% better on average.
For those interested, here’s another version of this plot with points colored by super effectiveness of the boss charged move. Some interesting observations are:
- You’ll face a Super Effective charged move 20-30% of the time (that’s the struggle with all dragons not named Dialga). The vast majority of them are on the far left (i.e. favor BS the most).
- If you know you’re facing a neutral or NVE charged move, the difference between BS and Outrage is now small (BS is only 1.9% better when it does win). However, it’s still a narrow win for BS.
In summary, ~30% of the time you’ll get a bad move, and BS clearly wins, sometimes by a lot. The not-so-bad moves are a coin flip between BS and Outrage – mostly splitting hairs, but BS still has a narrow advantage.
Even when Outrage wins, it doesn’t beat Breaking Swipe by a mile; but when Breaking Swipe wins, it might.
Part 4: Combining Outrage and Breaking Swipe
(Skippable in the interest of time)
[Section TL;DR] If you unlock two charged moves, “use as many Outrages as you can, then throw a BS just before fainting” is the best strategy. However, it will probably only do at most 1% better than just BS alone. Not worth the cost.
We’ve established that Outrage doesn’t live up to its full potential due to lack of consistency: If you faint before finishing the next Outrage, it’s really bad. Can we get around the problem by having both Outrage and Breaking Swipe, and spam BS when you know you can’t reach another Outrage?
Sadly, you probably can’t do this on a Master League Rayquaza – you will want double legacy moves Breaking Swipe/Hurricane, and later, BS/Dragon Ascent. But if you’re not using it for Master League, having two charged moves does help:
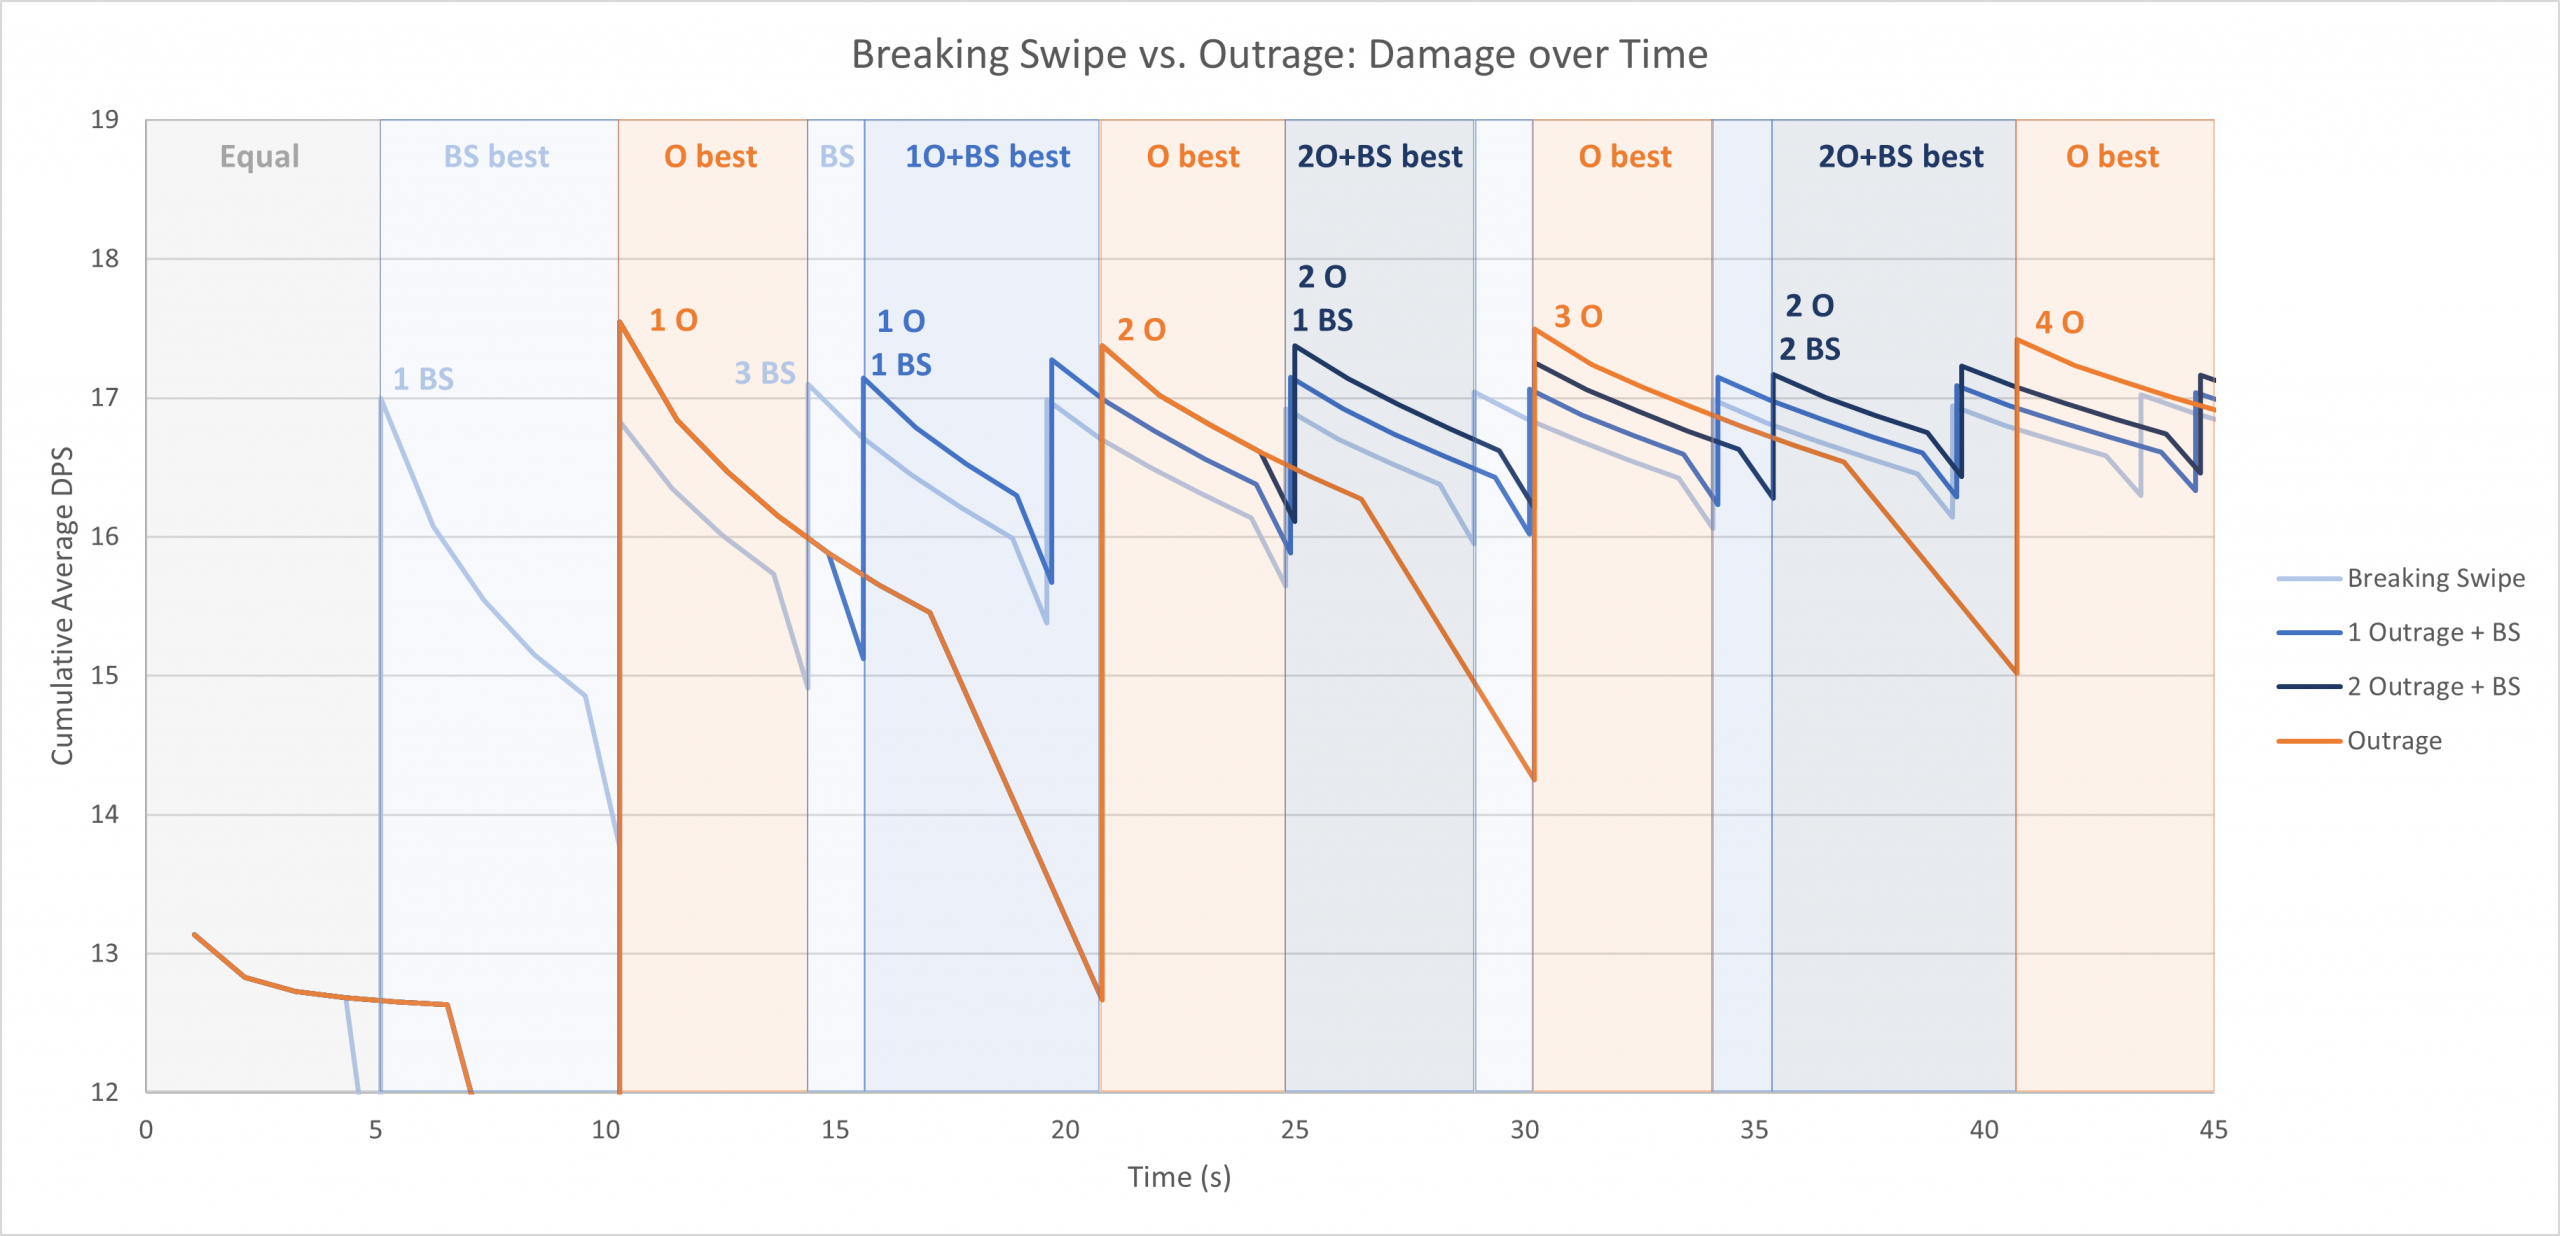
As seen here, the “1 Outrage + BS” strategy (i.e. use an Outrage then spam BS till you faint) almost always outperforms using only BS. The “2 Outrage + BS” strategy outperforms them both. However, during the period immediately after an Outrage, the “Outrage only” strategy is still the best.
So the best strategy seems to be:
- Use as many Outrages as you can.
- Just before fainting (i.e. you can’t finish another Outrage), use Breaking Swipe to use up your energy.
The problem is… This strategy doesn’t seem to perform too differently from “just spam BS”.
- You can see from the plot above that various blue curves are quite close.
- It’s impossible to measure this in simulations, as no simulators allow the “1 Outrage + BS” strategy.
- My best effort is taking the best of “BS only” and “Outrage only” strategies for each boss moveset, i.e. choose a move at the start of a battle and stick to it (thus taking the max of the red curve and the light blue curve). This only gives a 0.4% improvement.
- All things considered, my best estimate for “X Outrage + BS” is: at most 1% better than “just BS”. Mayyyyyyyybe 2%.
- Probably not worth 100k dust and 100 (rare) candies.
Part 5: Rayquaza vs. other dragon attackers
[Section TL;DR] Breaking Swipe Rayquaza solidifies its advantage over other non-shadow dragons, but still not dominant over them, and shadows are better. Given that all dragons are interchangeable and many have a variety of other uses, I don’t think it’s worth building 6 Rayquaza for most players. (Or 6 of the same non-shadow dragon for that matter.)
As seen in the Part 1 plot, both Outrage Rayquaza and Breaking Swipe Rayquaza have a better average performance (both Estimator and TTW) than all other non-shadow non-mega dragons. However, Rayquaza is still far worse than Shadow Salamence and Shadow Dragonite.
If we ignore shadows, we can do a more detailed comparison:
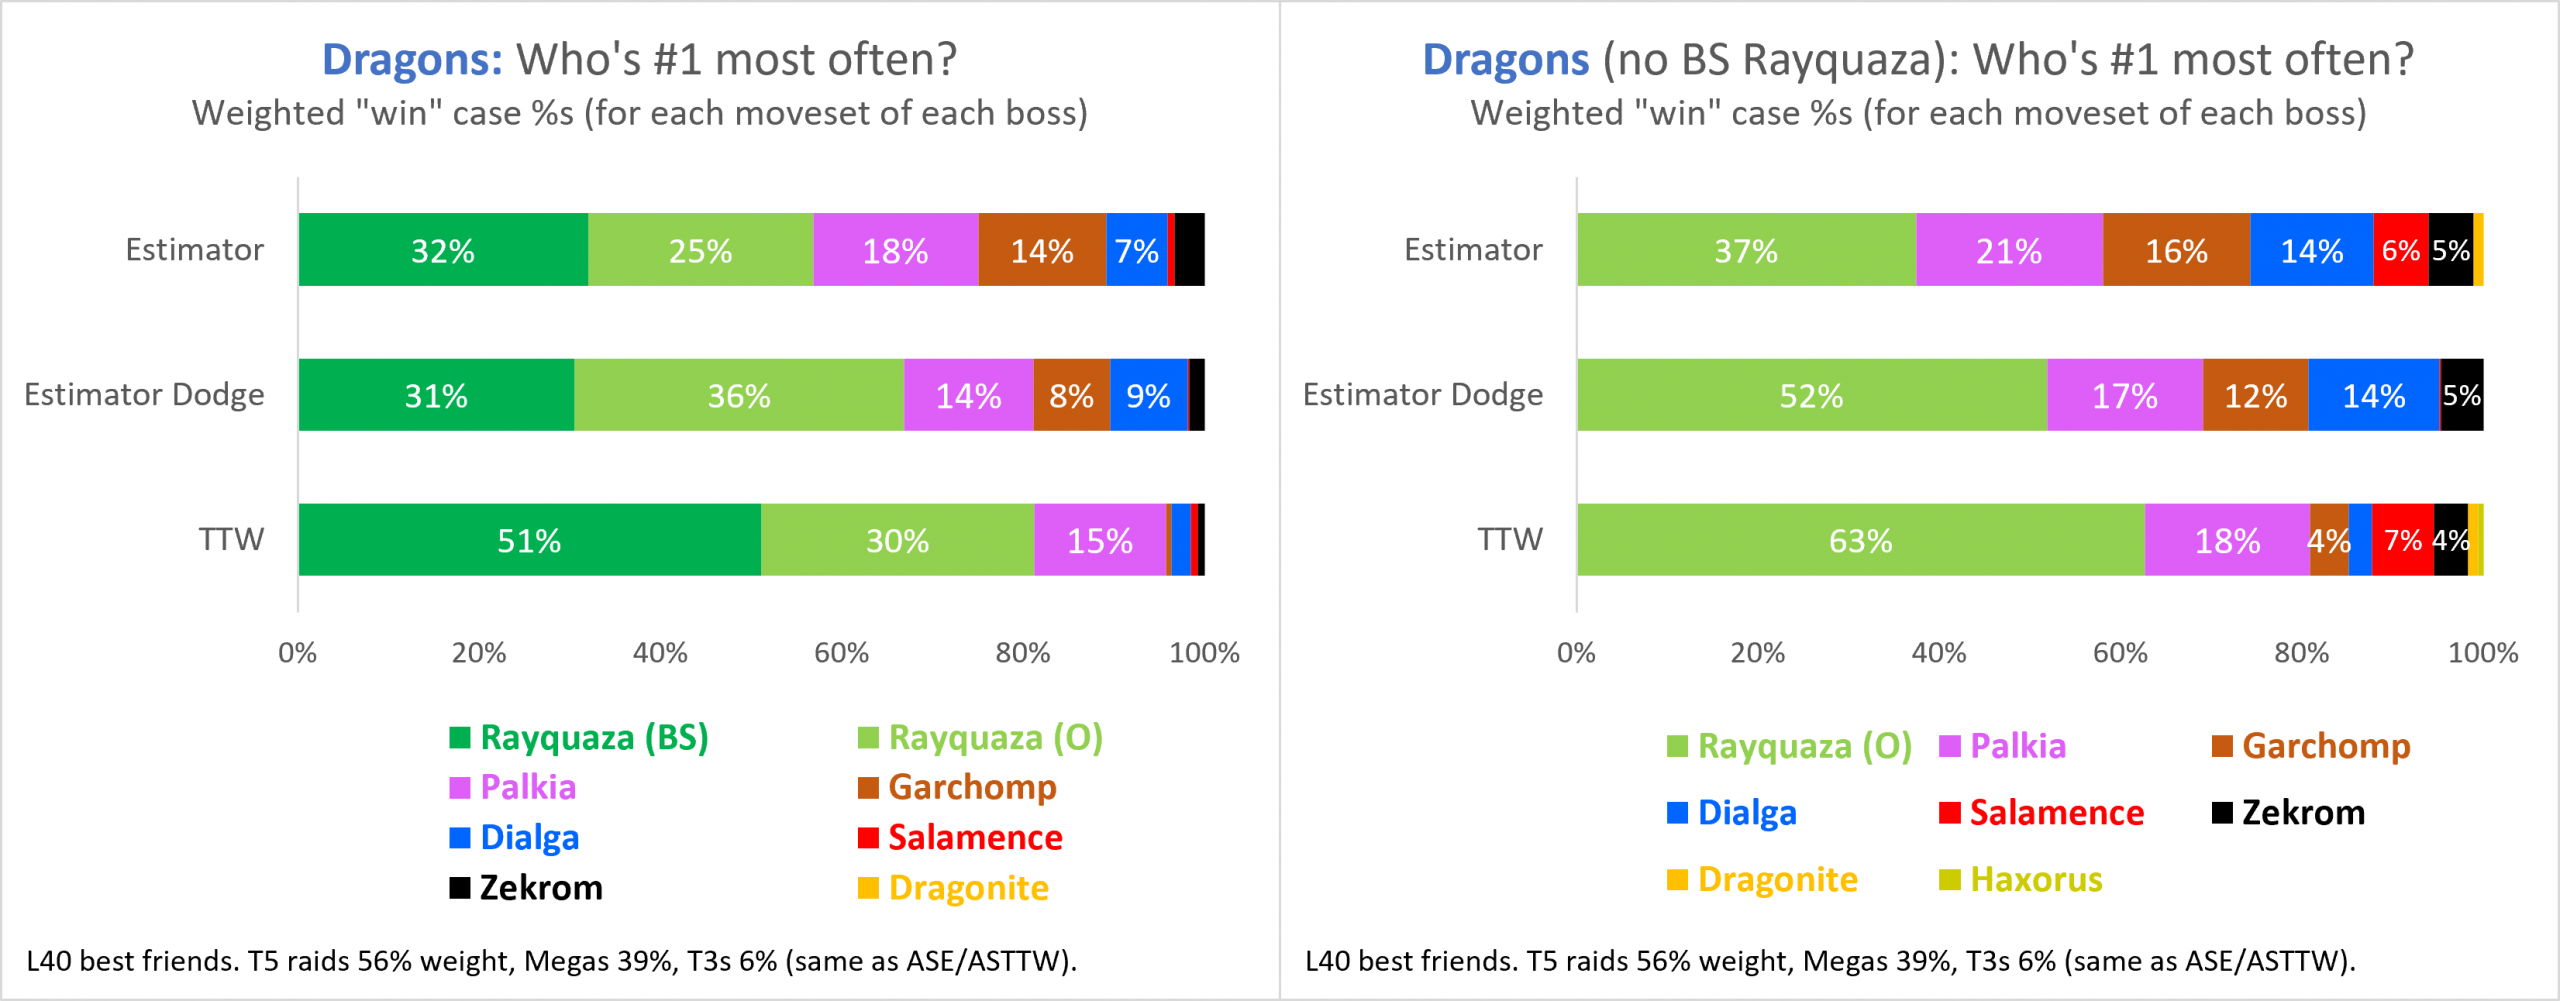
Even though Outrage Rayquaza has always been the best-performing dragon of any individual option, the problem was that it didn’t stand out from other dragons. Before BS, Outrage Rayquaza is only the #1 counter 37% of the time, with all other dragons also getting some “#1 share” (even Dragonite).
Breaking Swipe makes Rayquaza more competitive, but still not the dominant dragon. Combining BS and Outrage Rayquaza gives it a 57% “#1 share” in estimator, an increase of 20%. Now it’s technically the majority, but another dragon can still take the top spot almost half the time, likely due to typing differences.
- (I hesitate to use TTW for dragons. Relobbying is more common for dragons than other types, even in a 6-player lobby, due to being hit by SE dragon moves and the bosses generally having high attack.)
There are two advantages of Rayquaza that are not captured by the chart above:
- When using a “Random” boss moveset, Rayquaza is still #1 majority of the time (even without dodging, and even in Estimator).
- This is true with both Outrage and Breaking Swipe.
- But notably, Reshiram and Zekrom are still better countered by other dragons (and non-dragons), on average.
- Considering these are two of the three most useful bosses to use dragons for (the other being Giratina), it’s hard to swallow…
- Even when Rayquaza is not #1, Breaking Swipe offers enough consistency that it doesn’t fall too much behind the other #1 dragons.
Investment & Elite TM thoughts
In contrast to above, there are a few arguments against 6*L40+ Rayquaza, or 6 copies of any single non-shadow dragon in general:
- All dragons are so close that they’re easily interchangeable. You can build 6 different dragons and still achieve similar performance as 6 Rayquaza.
- This is less true after Breaking Swipe, but generally still holds – the performance difference is simply not huge and often typing-dependent.
- Rayquaza is a glass cannon, so a 6-Rayquaza team may result in more relobbies than a mixed team with a few bulkier dragons (especially Dialga).
- Most other dragons are either more accessible or have more double duties. That’s more questionable for Rayquaza.
- “Double duties” here include PvP (Dialga, Garchomp, Dragonite) and attackers of other types (Garchomp, Zekrom).
- While Rayquaza can be a flying attacker, flying is not used often.
- L50 Dragonite >= L40 Rayquaza.
- Dragon type as a whole is useful, but not top-tier useful.
- I touched on this in the Strength & Utility plot for my Primals analysis. You’d be surprised to see even Shadow Salamence falling below types you may not be expecting: Steel, Electric, even Flying.
- The most useful or hardest dragon bosses (Giratina, Reshiram, Zekrom, Mega Lati@s) often have non-dragon counters that are more accessible and/or see more utility, without a big performance tradeoff.
- Against Palkia is the only time when you really need to use dragons.
While building 1 Rayquaza is certainly worth it, my personal opinion is that in 2023, there’s no longer a strong argument for building 6 of the same dragon, not even 6 Rayquaza.
Sure, Rayquaza is great, and if you want the best possible team of 6 non-shadow dragons, then 6 Breaking Swipe Rayquaza is the way to go. But for most people, building 6 is not worth the cost, especially when so many excellent alternatives exist.
As for Elite TMs? Even though Breaking Swipe is generally better, I don’t think it’s a strong Elite TM candidate. 2.5% improvement is simply too small, especially when it’s situational. Obviously don’t get rid of Breaking Swipe on any Rayquaza you catch this time, but skip the ETMs on multiple old Rayquazas unless it’s for PvP or sentimental value (e.g. a hundo). Save your ETMs on something else unless you’re swimming in them.
Part 6: Other dragons with Breaking Swipe
(Skippable in the interest of time)
[Section TL;DR] Breaking Swipe is an improvement on almost all dragon attackers – the question is which ones will get it. Haxorus, the most likely candidate, will end up between Outrage Rayquaza and Outrage Salamence if given BS.
Breaking Swipe has a wide learnset in the Main Series Games – literally every dragon I mentioned in this article except Ultra Necrozma can potentially learn it. Obviously some are very unlikely to happen (e.g. BS Dialga will completely break PvP), but for a thought experiment, let’s assume every dragon gets it:
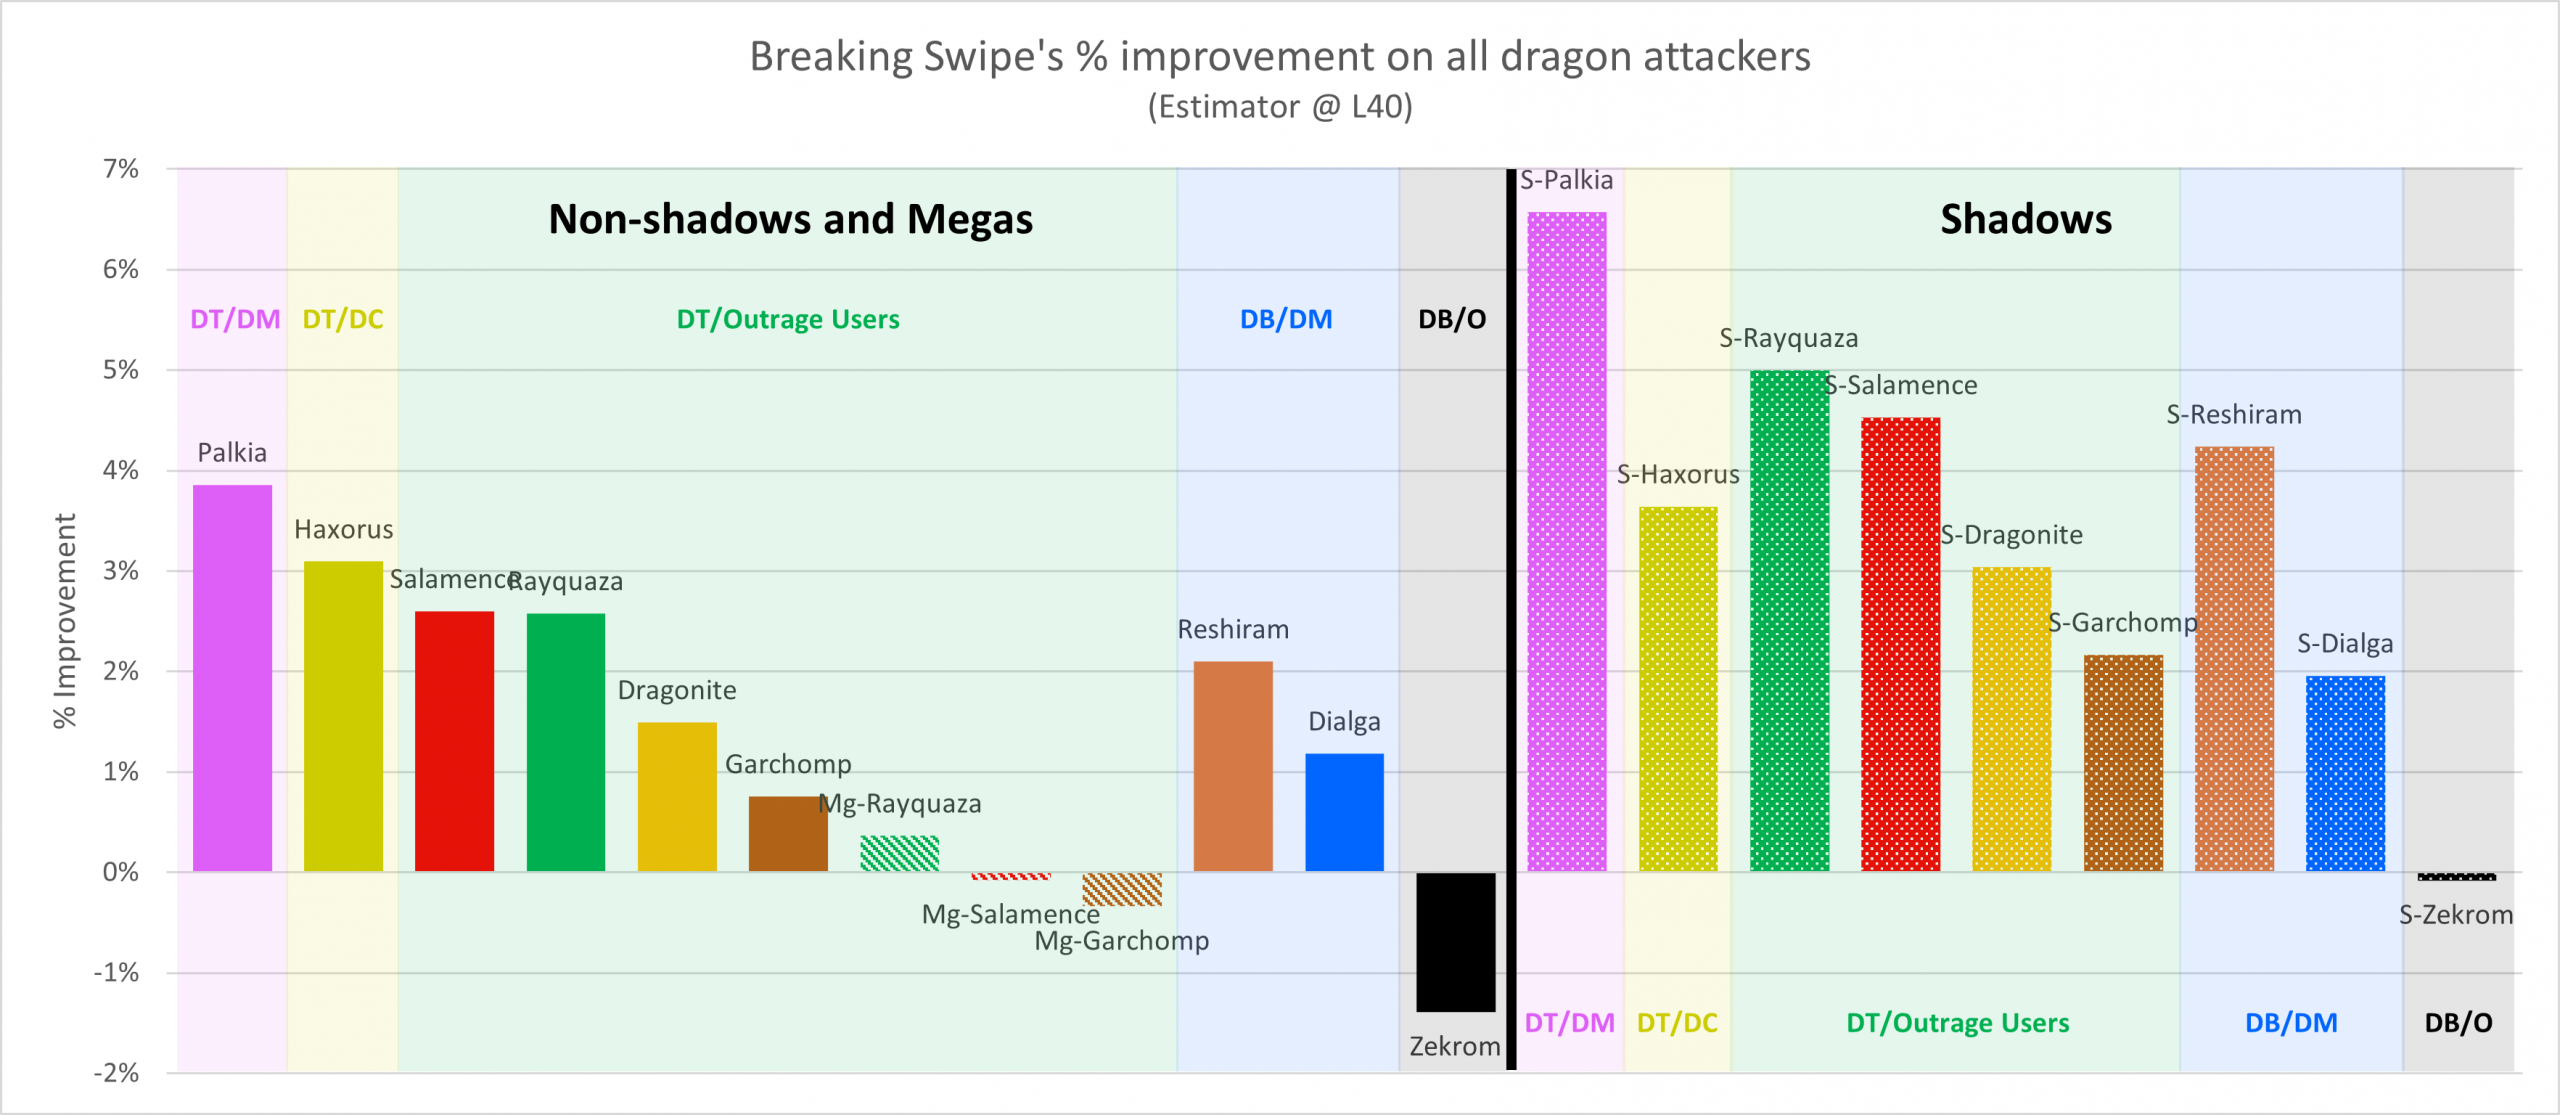
- Note: Mega Rayquaza here uses unnerfed stats. With a 3% nerf, the improvement will be better than shown here, but still less tha non-mega Rayquaza.
I won’t go into details, but here are the main observations:
- Breaking Swipe is a better move on every dragon attacker except Zekrom (and Mega Salamence/Garchomp).
- Dragon Tail users get more use from Breaking Swipe than Dragon Breath users.
- Non-Outrage users get more use than Outrage users.
- The glassier the Pokemon, the greater the improvement. (Shadows included)
Breaking Swipe Haxorus?
One notable Pokemon with the highest chance of receiving Breaking Swipe is Haxorus. Not only is Axew a highly likely Community Day candidate (possibly in the near future), but Breaking Swipe’s benefits to Haxorus in both raids and PvP are healthy, not meta-destroying.
Obviously BS may not actually end up being Haxorus’s CD move, but let’s assume it is:
As shown here, Breaking Swipe Haxorus lies between Outrage Rayquaza and Outrage Salamence, depending on metric (and strictly worse than Breaking Swipe Rayquaza).
- Haxorus has 284 base attack, same as Rayquaza, but only 87% of its bulk. This makes it dangerously glassy as a dragon attacker.
- Breaking Swipe’s consistency alleviates the bulk issues, and it’s almost a strict upgrade over Dragon Claw. But there’s only so much you can do.
Still a very useful dragon attacker, but not ahead of anything you likely have.
Closing, miscellaneous remarks and personal thoughts
(Completely skippable)
One last thing about Rayquaza: Its role as a flying attacker.
- As seen from my Staraptor CD analysis, Rayquaza (with either legacy Hurricane or non-legacy Aerial Ace) is a good one, below Sky Attack Moltres but above most other options like Yveltal, Honchkrow and Staraptor.
- However, flying attackers have rather low utility, as there aren’t many raid bosses to use them against. Currently, they’re specialists against Virizion, Pheromosa and Buzzwole. There’s also Mega Heracross in the future.
- Unless you really need a double legacy Hurricane/BS Rayquaza for PvP right now, it’s almost certainly not worth an ETM to get Hurricane. Especially when Dragon Ascent (a flying-type move) will come some day and we just don’t know when.
Now moving on to non-Rayquaza aspects.
This article was quite a wild ride, even for me. I was already expecting Breaking Swipe to outperform its theoretical DPS numbers when I saw the stats (more below), but I honestly didn’t expect it to be this good. If anyone still needs proof that DPS isn’t everything, I think this is it.
This is far from the only scenario in which a lower DPS, shorter duration moveset outperforms a higher DPS, longer duration moveset situationally, and sometimes even on average. Here are a few other cases I’ve identified so far:
- Shadow Ball vs Dark Pulse on Darkrai: Shadow Ball has higher DPS, but Dark Pulse is situationally better. I haven’t checked their average numbers.
- Drill Run vs Earth Power (hypothetical) on Excadrill: Earth Power has higher DPS, but Drill Run is better on average.
- Fusion Flare vs Blast Burn (hypothetical) on Reshiram: Blast Burn has higher DPS, but Fusion Flare is better on average.
I myself really enjoyed writing this analysis (and I can’t say this to a lot of my articles). It combines a thorough examination of simulation data from various angles with a deep dive into PvE battle mechanics and theoretical measures (some of which were even new to me). I don’t expect to do this very often, and I don’t anticipate any need to, but hopefully I’ve made a strong case for this seemingly strange phenomenon.
One concern I have about this raid rotation (in addition to all the drama in the past 3 days): 2nd raid-exclusive move.
- Breaking Swipe is the second raid-exclusive move that Rayquaza got, the first being Hurricane. It’s widely expected that Rayquaza will eventually received a third exclusive move, Dragon Ascent.
- Who’s to say there won’t be more? Imagine if every time Rayquaza comes back, it gets a different special move… Now you may not even be able to have all move combinations you need on a single Rayquaza, not to mention the number of Elite Charged TMs you need. At that point, a new raid-exclusive move may feel more like an ETM bait, rather than an actual incentive to raid more.
- (I’m sure many long-term PvPers already felt this way about Zap Cannon Registeel.)
- And who’s to say it won’t happen to Pokemon other than Rayquaza? Blue Flare, Bolt Strike and Dark Void are the most obvious examples. And I can think of several more: Incinerate Groudon (for its primal and PvP), Counter/Aura Sphere Mewtwo (mega and PvP), Wild Charge Zapdos, Gust Lugia and Ho-Oh, Freeze-Dry Kyurem as a fast move…
Articles coming up next
When my IRL schedule permits, I plan to analyze the following:
- Finishing the full Primal Kyogre & Groudon analysis.
- I have previous mentioned the possibility of a poison-type analysis, both as a Tapu Bulu counters guide, and because it’s the only type I have not covered. However, now I’m not sure if I’ll have enough motivation to pull it off, especially if the remote raid changes go live… We’ll see.
Appendix 1: Guide on how to read the charts & Technical details
Don’t know how to read the charts?
If you’re totally lost, just look at the first two plots, or just the first one if you don’t dodge in raids. These two plots are based on my Average Scaled Estimator (ASE) metric, which approximates in-raid performance using Pokebattler Estimator, best suited for realistic shortmanning (2-5 raiders).
The Average Scaled Time to Win (ASTTW) plots are similar, but best suited for medium or large lobbies (6+ raiders). This metric assumes no relobbying (i.e. reentering the raid after all Pokemon fainted).
The ER (aka DPS3*TDO scaled) and DPS plots are for experienced players who want to check these metrics.
In all six plots, the higher, the better. Example: Shadow Salamence is generally better than Rayquaza, which is better than Dragonite, if they’re all at the same Pokémon level. But everything listed is perfectly usable and will let you pull your weight in raids.
You can also compare different attackers at different levels: points on the same horizontal line mean they’re equally as good. Example: Looking at the “ASE no dodging” plot, A Level 35 Shadow Salamence performs similarly to Level 40 Breaking Swipe Rayquaza and Level 45 Salamence.
Reminder: All plots show average performance against many raid bosses. Against a specific raid boss, the rankings can be different.
Technical details
- The first two plots are based on my in-house Average Scaled Estimator (ASE) metric, which estimates in-raid performance by automatically computing the average Pokebattler estimators against a variety of T5, Mega and T3 raid bosses, scaled so that the best attacker at L40 gets 1.0. The smaller, the better. For more details, refer to my Venusaur analysis in January 2022 and the comments.
- The last plot uses Average Scaled Time to Win (ASTTW) follow the same methodology, but replaces Pokebattler estimator with TTW.
- “ASE Dodge” uses simulations with the “Dodge Specials” + “Realistic Dodging” options on Pokebattler. You can compare it to ASE without dodging to see how much dodging helps an attacker.
- For example, Breaking Swipe Rayquaza’s ASE at Level 40 drops from 1.141 without dodging to 1.128 with dodging, so dodging generally helps Rayquaza’s performance.
- However, Mega Latios’s L40 ASE rises from 1.028 to 1.032 with dodging, so dodging may hurt Mega Latios more than it helps.
Appendix 2: Past analyses on other types
- Bug: Bug Out
- Dark/Ghost: Tyranitar CD Classic
- For Giratina-O comparisons: Shadow Force Giratina-O
- Dragon: Mega Salamence
- Electric: Reshiram & Zekrom with Fusion moves
- Mega Mewtwo Y (Thunderbolt) data is wrong
- For Xurkitree comparisons: Bug Out
- Fairy: Mega Gardevoir
- Fighting: Shadow Mewtwo (Part 2 Terrakion section), with a few future and speculative attackers
- For future megas: September update (Mega Mewtwo X data is wrong)
- Fire: Reshiram & Zekrom with Fusion moves
- Mega Mewtwo Y (Flamethroewer) data is wrong
- For full future attackers: Gen 3 mega starters
- Flying: Staraptor CD
- Grass: Gen 3 mega starters (without Chesnaught in current attackers)
- For full future attackers: Kartana
- For Chesnaught-specific plots: Chesnaught CD
- Ground: Primal Groudon (Partial)
- Ice: Kyurem & Mega Glalie
- Mega Mewtwo Y (Ice Beam) data is wrong
- Psychic: September update/Psychic Spectacular
- Mega Mewtwo data is wrong
- Rock: Tyranitar CD Classic
- For full future attackers: Gigalith CD
- Steel: Mega Aggron
- Water: Primal Kyogre (Partial)
- For full future attackers: Gen 3 mega starters
Missing types: Poison
Recent Comments