
Warning: This article may forever change the way you think about raid counters
We here at Pokebattler.com try our best to keep the main website as easy to use as possible. We provide counters that are usable for players and help people optimize their teams. The simplicity of the interface hides a lot of the actual calculations that go on. There are hundreds of thousands of simulations performed to display even the simplest page. This article is going to analyze some of those detailed simulations to show you the true answer to the question on everyone’s mind this week:
What are the top counters for Cresselia?
The top counters for Cresselia are Gengar, Mewtwo, Banette, Weavile, Tyranitar, and Honchkrow. Gengar should have Shadow Ball and either Shadow Claw, Lick or Hex. Mewtwo and Banette want Shadow Ball with Psycho Cut and Shadow Claw. Weavile and Tyranitar and Honchkrow want double dark moves. This is for level 40, best friends, no weather and unknown moves. The actual level and friendship and weather will move these around a bit. But most of you already knew that.
Let’s go a little deeper. How about we look into the range of results that could occur. What if we get lucky against Cresselia? What if we get unlucky? We will use the Pokebattler Raid Advice Spreadsheet (available to Patreon subscribers only) to generate some graphs.
NOTE: The numbers displayed in all graphs below are Time to Win with a 30 second rejoin time and will not match the website unless you use the same battle party.
What Does the Distribution of Time to Win Look Like for Cresselia?
This gets a bit more interesting. If you are extremely lucky, the best are Gengar (Shadow Claw then Lick), Mewtwo, Banette, Weavile, Honchkrow, and Tyranitar. Banette very quickly becomes the worst and Honchkrow becomes worse than Tyranitar. As we move to average luck, Mewtwo passes Lick Gengar first, then Shadow Claw Gengar. Moving on to around 1/3 of the time you get a poor matchup for a particular charge move and Honchkrow becomes the worst. Weavile similarly drops into a three-way tie for last place, over 40% worse than where they started. Finally, 20% of the time you are so unlucky that Tyranitar becomes the #2 counter with both Gengar becoming up to 50% worse than where they started. Mewtwo and Tyranitar are very consistent across all simulations, losing less than 15% of their initial performance. Final order? Mewtwo, Tyranitar, Gengar, Weavile, Honchkrow, Banette.
That’s a lot of Words, How ’bout a Picture?
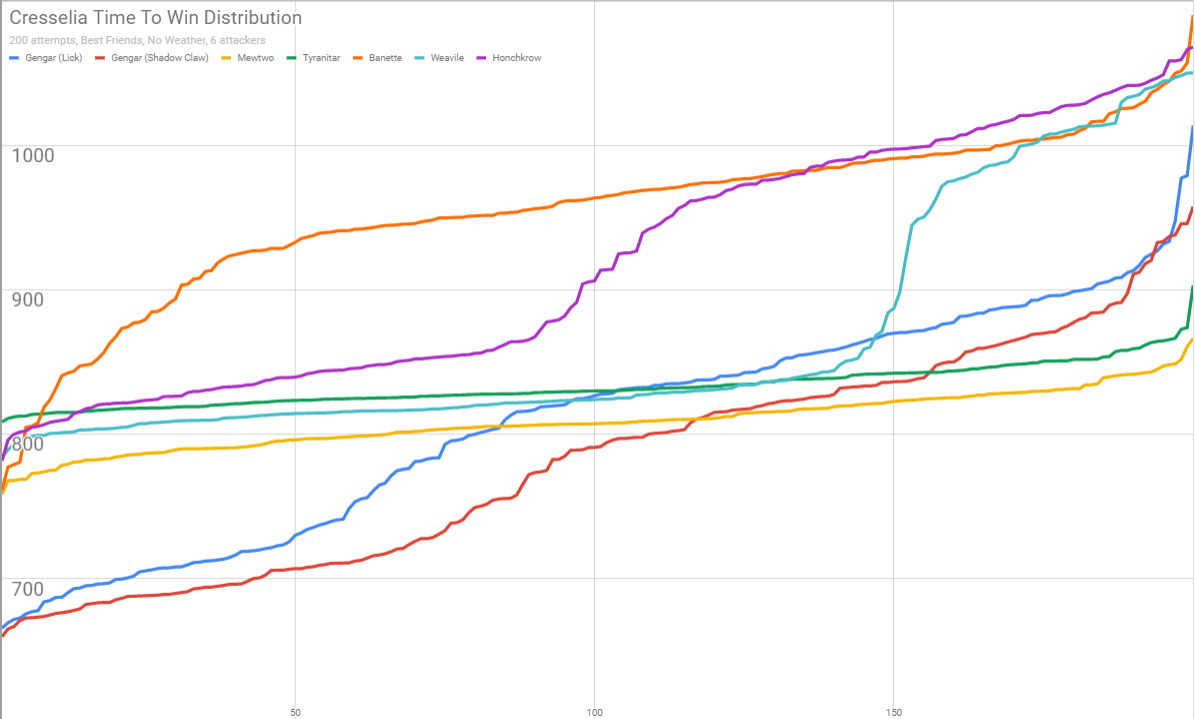
Those 2 flat lines in the middle are Mewtwo and Tyranitar. The other crazy lines are all the other counters. The glass cannons are quite variable in their results as their time to win numbers jump up when they need to rejoin!
Is That All You Got?
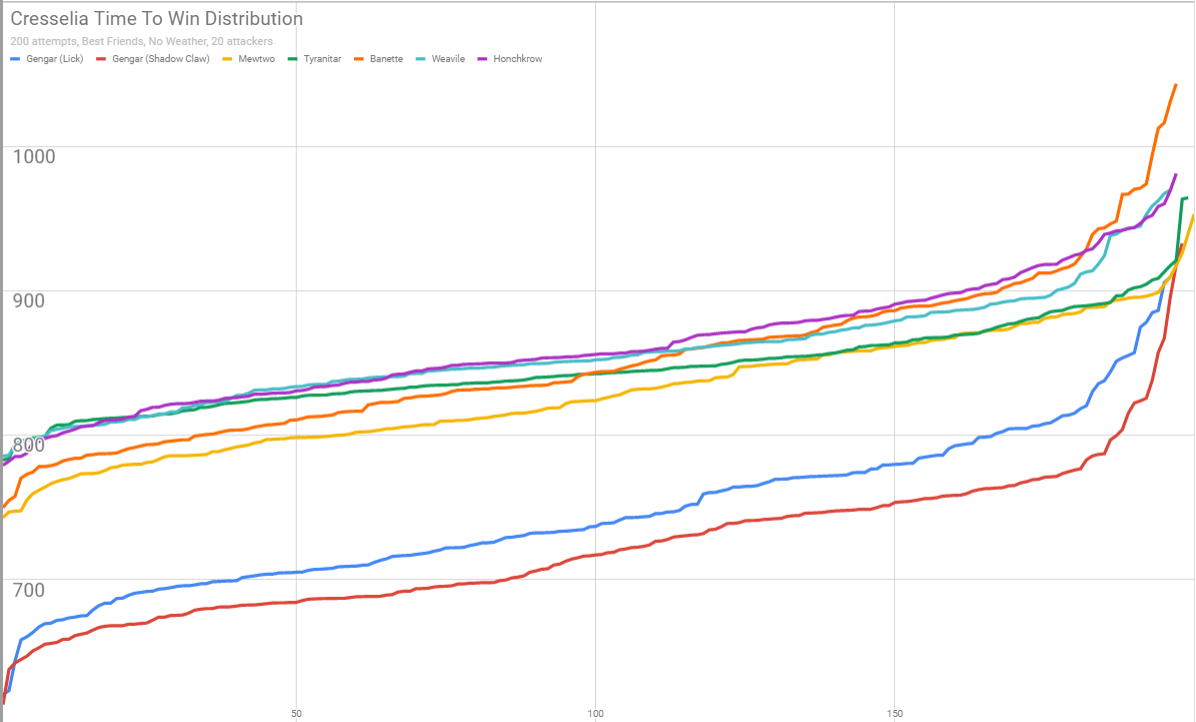
Not blown away yet? Turns out the order looks a bit different when you change the simulation around. Let’s look at group size of 20!
Note: that these extra group members are assumed to be using strong level 30-35 Pokemon that are not optimal counters, similar to a random public group.
This time with 20 people, the results are far more consistent without rejoin time affecting results as much. Shadow Claw Gengar is followed closely by Lick Gengar. Then a pack of Mewtwo, Banette, Honchkrow, Weavile, and Tyranitar follow with Tyranitar gradually beating out all but Mewtwo as time goes on. Banette has some very poor results
What is Going On?
At this point, some of your heads are spinning from graphs and numbers flying around so let’s start with the obvious…
Boss Charge Moves Matter a Lot
I’m sure you all have had the experience of your Pokemon fainting and your next Pokemon dying before using a charge move. This is absolutely terrible for DPS! And this happens more often than you would like for glass cannons like Gengar and even more for Banette. In fact, if you only have a level 20 Banette, that top 6 counter drops all the way down to #14, with 71 deaths on average. If you want to be able to use your charge moves, you need enough tankiness to preferably survive a charge and a couple quick moves. This is also true for hard hitting quick moves like Confusion Mewtwo, where surviving even quick attacks can be a struggle.
Bosses have the following strategy for using charge moves:
- Not enough energy for a charge move? Use a quick move!
- Enough energy for a charge move? 50% of the time, use a charge move, remaining 50% use a quick move!
In normal situations like a solo raid attempt, there is a lot of time where bosses sit in the #1 state, without enough energy to use a charge move. This causes things that are not very common to become much more common.
Here are a few graphs to show the issue. Moonblast is a 1 bar move and takes a while to charge up if no one is attacking it so it shows boss energy mechanics well.
Cresselia (Moonblast) 1 Player
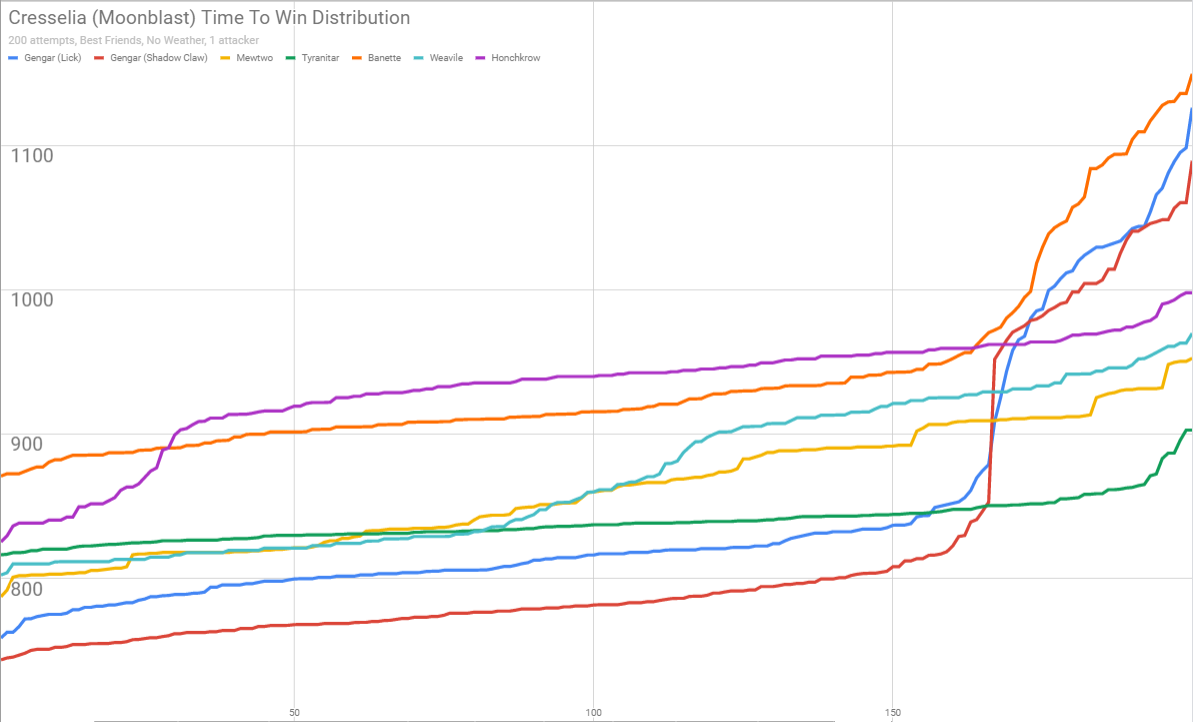
With solo attempts 1 bar moves, things look fairly interesting. The interesting number to look at is 900s TTW. That’s the range for 3 man success.
- Tyranitar is the most consistent and is a good safe bet, staying below 900 seconds 99% of the time.
- With Banette, Weaville and Honchkrow the interesting number to look at is 900 seconds time to win. Honchkrow beats it 15% of the time, Banette beats it 25% of the time and Weaville beats it 35% of the time.
- Mewtwo starts off slightly better than Tyranitar and then is worse 75% of the time. It stays under the 900s magic number 80% of the time.
- Both Gengar moves are great 80% of the time or so before leaping 100 seconds past the 900 seconds goal.
Again, these sims were run with a rejoin time of 30 seconds, so there are some interesting features most likely due to particularly poor situations of rejoining without being able to get a charge move off.
Cresselia (Moonblast) 6 Players
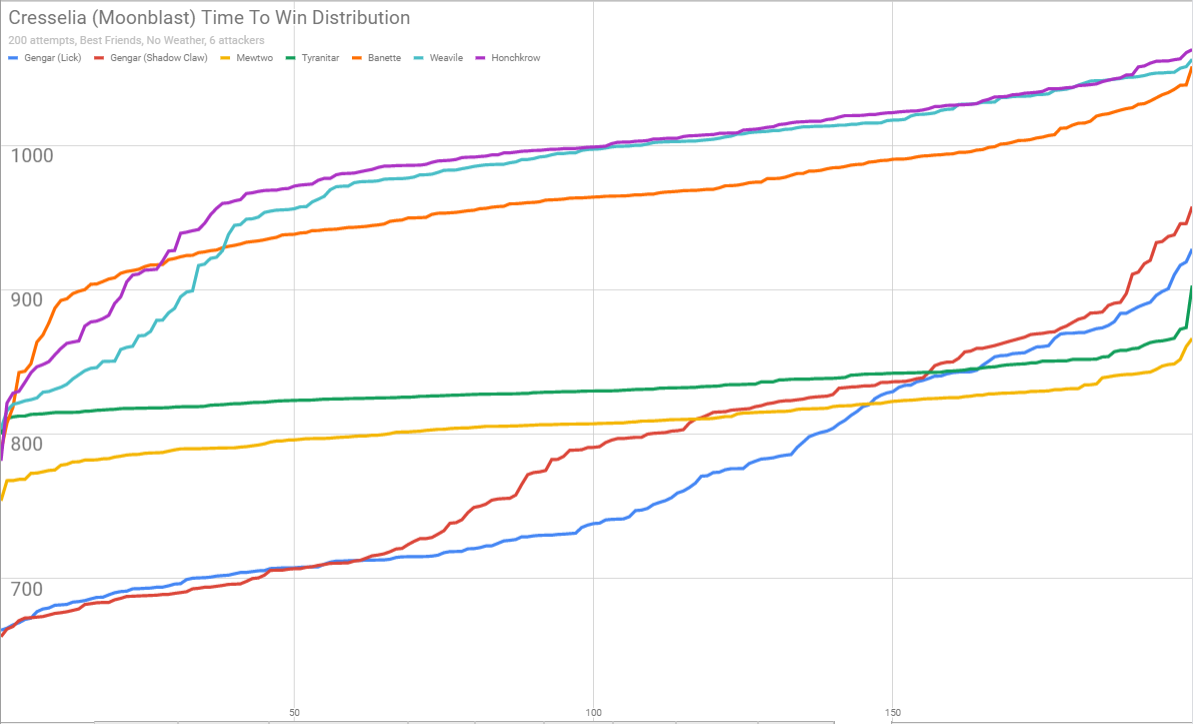
A 6 man group was chosen as it ends in a win 50% of the time for Shadow Claw Gengar. This means half the time there will be no rejoining for Gengar, near 100% rejoining for Banette, Weavile and Honchkrow and 0% rejoining for Tyranitar and Mewtwo. Combat time is around 170 seconds for Gengar so all of these fights end in a victory.
With 6 players, the boss gains more energy and is rapidly replenishing energy, sometimes able to use a CHARGE, QUICK, CHARGE deadly attack. It will also be gaining energy when you faint. This will often cause a Pokemon to faint, and the next Pokemon to get a large amount of energy right away due to being hit with an immediate special. Cresselia hits like a wet noodle with its pathetically low attack so you actually want this scenario to play out with the tankier Pokemon! Of course with a stronger Pokemon like Mewtwo using Focus Blast against your Tyranitar, this would be very bad. The point is, as long as you don’t need to rejoin, taking more damage without dying will increase your DPS and reduce your time to win.
The graphs here show the effect of needing to rejoin on your time to win. The interesting number to look at again is 900 seconds time to win.
- Mewtwo and Tyranitar are now both the most consistent and safe bets, with Mewtwo beating Tyranitar safely in all cases.
- Banette, Weaville, and Honchkrow all need to rejoin and the numbers are even worse than the solo attempts.
- Both Gengar moves are great 90% of the time but Lick is actually better than Shadow Claw a significant amount of the time!
Lick beating Shadow Claw is interesting. This does not happen without rejoining (Lick) (Shadow Claw). The only way Lick beats Shadow Claw is if you are able to get an extra charge move off, so what is the cause? If you recall, we are using random assistants, some will be better counters than others. So sometimes you win with just a little bit of health left. Other times you rejoin and are able to get a charge move off. And sometimes, you rejoin and the boss dies and you don’t get any charge move off at all. The final case is what is happening here. Shadow Claw is not building up enough energy to get off a shadow ball.
Cresselia (Moonblast) 20 Players
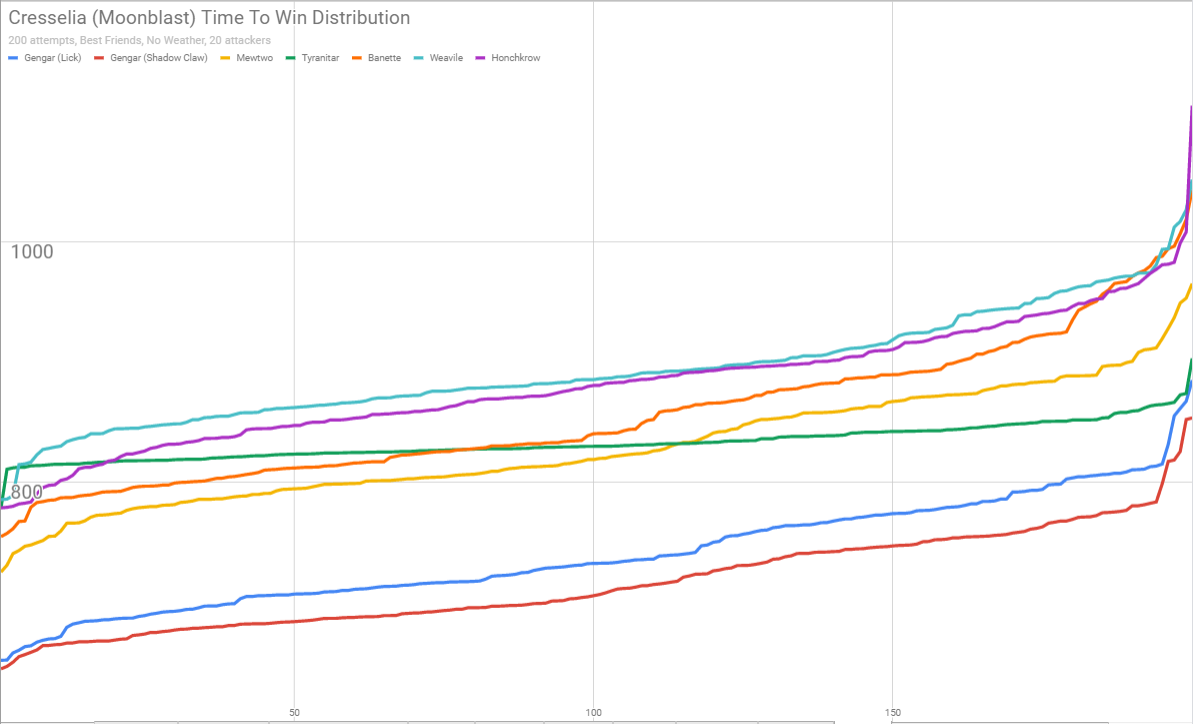
Ah, back to a normal looking graph again with rejoins out of the picture. We are down to a 60-second fight at this point and Gengar isn’t even doing 10% of Cresellia’s life so no one is getting any extra damage balls. At this point, the boss is gaining so much energy so quickly that CHARGE, QUICK, CHARGE will happen 50% of the time, and CHARGE, QUICK, QUICK, CHARGE will happen 25% of the time. That’s a lot of bonus incoming energy to use specials. If you don’t die of course.
- Shadow Claw Gengar has reclaimed the throne, surpassing Lick Gengar by a small but significant amount.
- Mewtwo starts off looking similar to the 6 man group but begins having worse match-ups than Tyranitar about 40% of the time.
- Banette, Weavile, and Honchkrow all do better than the 6 man group to start as they do not need to rejoin but they all are worse than Tyranitar the majority of the time.
- Tyranitar with its 3 bar move and extreme tankiness shows a very consistent result, coming in as a more consistent (and more readily available) version of Mewtwo.
All Pokemon show a few unlucky cases where they waste significant energy by dying at inopportune times. The increased energy gain is worth it for the tankier Tyranitar who is better in every case with the bonus energy. More Crunch = More DPS. The other show varying degrees of being worse time to win than the smaller group sizes. Dying with too much energy and your third or fourth Pokemon being unable to use a special move will cut your DPS quite a bit.
But I don’t want to think that hard
Avid users of Pokebattler will recall that the Overall Rating was used as the default sort for Pokebattler raid results for quite some time. The above graphs should hopefully show why. All else equal, a tankier Pokemon is going to be more consistent and if you are looking for an easy safe counter, it’s going to be very tough to beat. The overall rating for Moonblast shows Gengar -> Mewtwo -> Tyranitar with Banette, Weavile and Honchkrow dropping out of top 6. Estimator sort for Moonblast shows Gengar -> Mewtwo -> Banette -> Tyranitar. Based on the graphs above, I’d say the overall rating is actually going to be more enjoyable for the players. But no one liked it so now I use Estimator which is a bit easier to explain but you can always change it back!.
Patreon subscribers get a much more elegant solution, the ‘How Lucky’ drop down. This way you can choose exactly what you want.
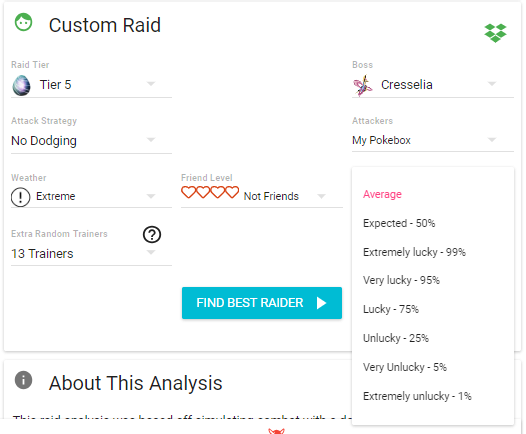
Are you looking for a record? Pick the Extremely Lucky option. Just want to win? pick the Very Unlucky option. Just want to have a good chance regardless of special move? Pick the Unlucky option. Or just pick Average if you just want to see how you normally do.
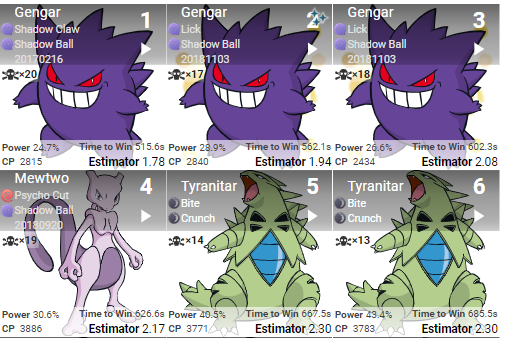
Here are my own results for Mewtwo, who can sometimes do quite a number on my Tyranitars
|
Celandro’s Average Mewtwo Counters
|
Celandro’s Extremely Lucky Mewtwo Counters
|
|
Celandro’s Unlucky Mewtwo Counters
|
Celandro’s Very Unlucky Mewtwo Counters
|
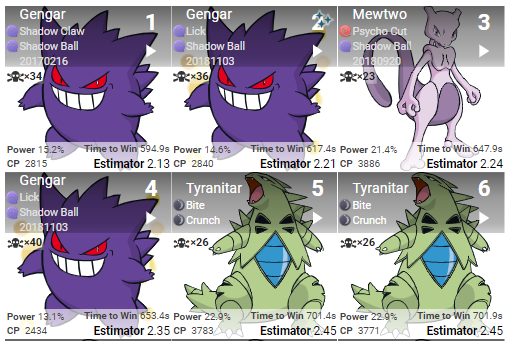
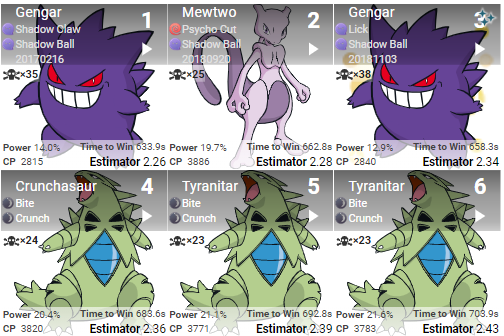
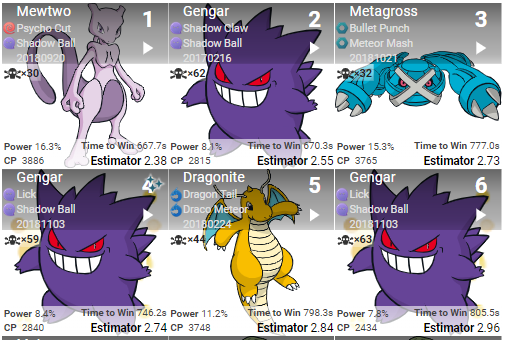
So you can see that if I really want to be consistent, I should be using tankier Pokemon like Mewtwo, Metagross and Dragonite. Mewtwo barely moves from 2.24 estimator to 2.38 estimator. Gengar moves from 1.78 with 20 deaths all the way to 2.55 with 62 deaths. That’s a huge variation in performance. Tyranitar is also a no go if I have to worry about bad focus blast luck. If I’m short people or trying for a 2 man, out come the Gengar and hope I get ridiculously lucky. Of course if I’m trying for a two man, an actual raid simulator is the way to go but that’s a whole other article;
Mind Blown?
Lots of graphs and numbers flying around this post but hopefully I can condense it down to a simple lesson for your every day raider.
Tie goes to the tankier Pokemon
There is a huge variation in results for raids due to the heavy randomness in the types of counters players are using, the number of Pokemon involved and the pure randomness of the Pokemon Go defensive combat algorithm. Tankier Pokemon will give you much more consistent results and will tend to out perform the numbers shown in Pokebattler in very large groups and even in more typical groups where rejoining occurs. Variation is not desired for every day raiding as failing a raid due to bad luck is a huge time sink.
This post was inspired by some haters on Pokemon Master Holly’s twitter. And for the curious, no, I don’t think 3% more average DPS is worth 25% more deaths and I wrote this whole article just to explain why.
Recent Comments